


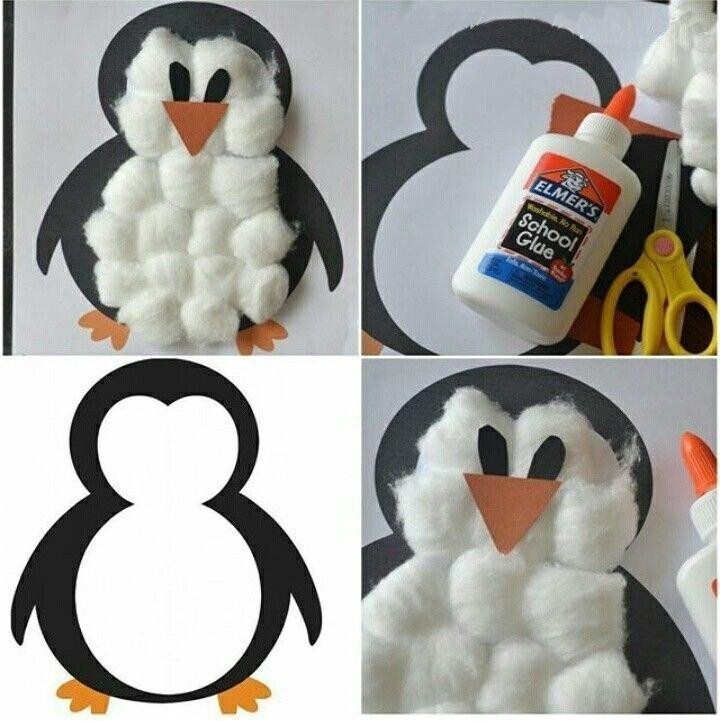
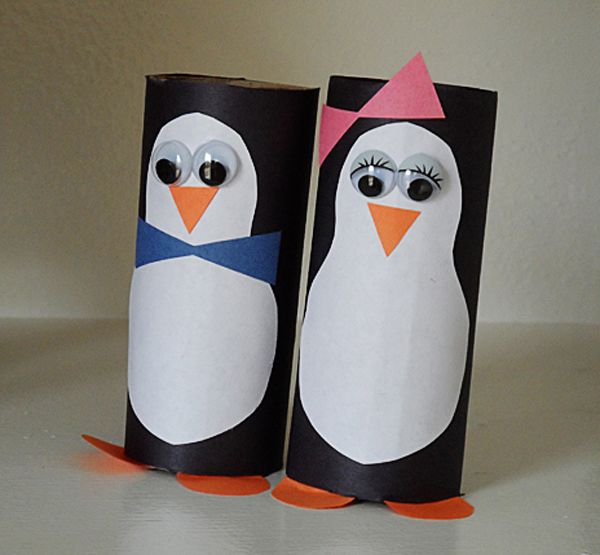
Penguin craft with water bottle: How to Make a Water Bottle Penguin Craft for Kids
How to Make Water Bottle Penguins
by Megan Kapple
Jump to Instructions
This post may contain affiliate links. Read our disclosure policy.
Hello! It’s Megan from Homemade Ginger and I have a super easy and fun winter craft for kids to do! This project is definitely a winner for your little ones on a cold and dreary day!
I don’t know about where you live, but here in the midwest, the weather has been unpredictable lately. There will be a few glorious days in the 50’s and then an ice storm will hit. This is what happened to us this past weekend. So, not only was school cancelled, but my girls couldn’t play outside because it was too icy. To say they were a little stir crazy would be an understatement! In these desperate situations, I try to come up with a fun activity that we can do inside with supplies that I already have on hand. We recently made some Q-tip snowflakes that were a huge hit on a dreary day. This time around, we made some water bottle penguins and they saved the day!
These little penguins are so adorable and my 3, 6 and 8 year old could all play a part in making them. My preschooler loved pushing the cotton balls down into the water bottles. My school aged girls absolutely loved playing with the foam and giving the penguins a little personality. The fun didn’t stop when the craft was over. They played with their penguins, making up stories and scenarios all day. So cute!
Next time you are desperate for an activity whether it’s yucky outside or not, whip up some of these little guys! I love that this project requires a lot of things that you probably already have if you tend to keep a craft stash. It’s easy, frugal and fun…what more could you ask for?!
Water Bottle Penguins
The printable of the instructions are at the bottom of the post, but here is what you will need:
- Felt
- Foam Sheets
- Googly Eyes
- Water Bottles
- Cotton Balls
- Hot Glue Gun
- Black Paint
- Foam Brush
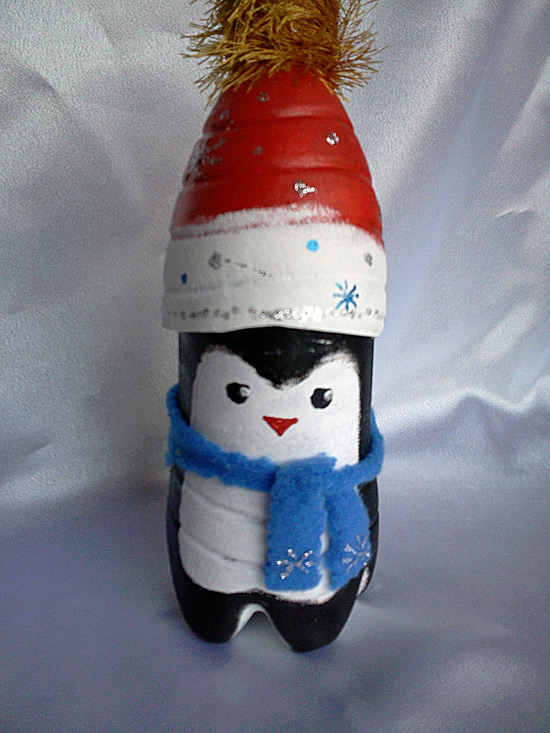
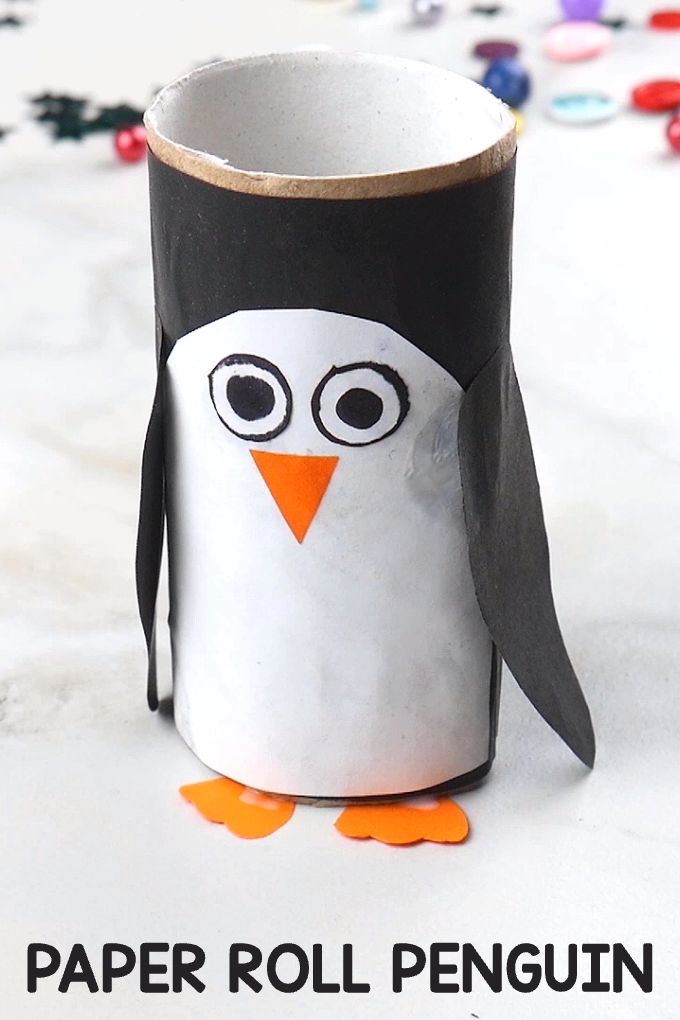
First you will want to remove the label on the water bottle.
Then paint about two-thirds of it with black paint. You may want to do 2 coats of paint.
After the paint has dried, fill the water bottle with cotton balls. I used a wooden skewer to push the cotton balls down about half way through and then continued filling it up.
Cut out some wing shapes out of black foam.
You will also need to cut out feet, the beak and a black strip for the head.
Wrap the black strip around the lid and hot glue in the back to attach. Glue the wings on the side as well.
To make the hat, measure a piece of felt around the head to make sure it will be the right size to fit over the head.
Then, glue the strip to form a cylinder shape.
Tie a piece of string around the center of the cylinder and cinch tight.
Trim off the top and strings and glue to attach to the head. Glue on the eyes and beak as well.
Wrap another piece of felt around the neck and glue down for a scarf.
Glue the feet onto the bottom of the water bottle and you now have a penguin!
Make a bunch to form a cute little penguin family.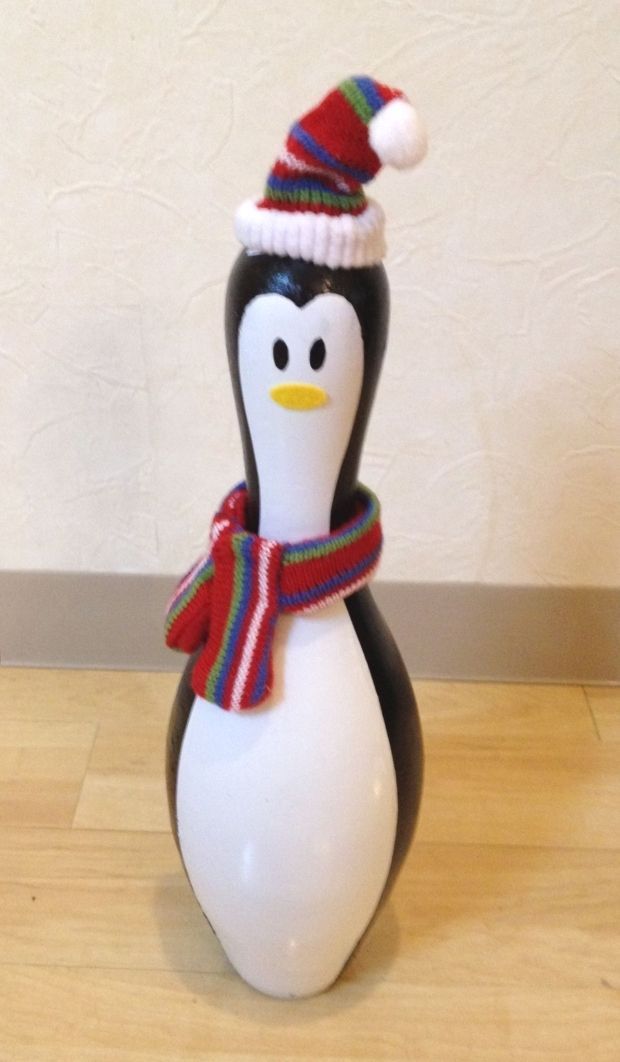
Water Bottle Penguins
This project is definitely a winner for your little ones on a cold and dreary day!
Author: Megan Kapple
- Water Bottles
- Googly Eyes
- Felt
- Foam Sheets
- Black Paint
- Hot Glue Gun
- Cotton Balls
- String
- Scissors
-
Remove the water bottle label. Then paint about two-thirds of it with black paint. You may want to do 2 coats of paint.
-
After the paint has dried, fill the water bottle with cotton balls.
-
Cut out some wing shapes and a long rectangle for the head out of black foam. Cut out a beak and feet out of the yellow foam.
-
Wrap the black strip around the lid and hot glue in the back to attach. Glue the wings on the side as well.
-
To make the hat, measure a piece of felt around the head to make sure it will be the right size to fit over the head.
-
Then, glue the strip to form a cylinder shape.

-
Tie a piece of string around the center of the cylinder and cinch tight.
-
Trim off the top and strings and glue to attach to the head. Glue on the eyes and beak as well.
-
Wrap another piece of felt around the neck and glue down for a scarf.
Make these little guys next time you are stuck inside on a dreary day and they will be sure to cheer up your little ones!
If you’re looking for more fun ways to upcycle used water bottles, be sure to click on over to see how to make an Anti-Gravity Galaxy in a Bottle. Shake it up and the glitter settles by going up instead of down! These are so easy to make and they’re so cool to watch!
Filed Under: Crafts for Adults, DIY, Kids Crafts and Activities, Preschooler and Toddler Activities
Tagged With: Contributors, cotton balls, crafts, crafts for kids, kids activities, Megan Kapple, penguins, preschooler activities, water bottles, Winter crafts
Love to cook, bake, craft, create?
Join the e-club for the latest
- Name
First
- Email*
Get the Book
Low-Mess Crafts for Kids
72 Projects to Create Your Own Magical Worlds
Get your copy
Reader Interactions
Upcycled Plastic Bottle Penguin Kids Craft
This adorable little penguin is perfect for crafty kids of all ages! Using nothing but a few simple supplies and a little bit of creativity, you can create your very own plastic bottle penguin to add to your holiday decor. He’s the perfect addition to any winter-themed decorations and makes a great gift. Plus, while it involves some painting, it is a super fun idea for the kids to make!
Table of Contents
Plastic Bottle Penguin
Our DIY plastic bottle penguin craft is a fun way to recycle your old plastic bottles into something useful. It’s also an easy project that kids will enjoy doing with their parents. You can even make it as a gift! This adorable little guy will look great on any desk or shelf or even as something useful like a plant holder. I love how adorable this little guy is and know everyone else will too!
If you want to use up even more of your old plastic bottles, this upcycled plastic bottle Santa boot is a great addition to your holiday mantle or table centerpiece. Here is another Santa boot idea that is based on an empty bottle. So cute to add to your holiday tables!
What Size Bottle Should I Use?
When making this plastic bottle penguin you can use any type of soda bottle. Depending on how you are making your penguin will help you to decide what size soda bottle to use. Smaller bottles are good for smaller spaces while larger bottles, like a 2-liter soda bottle, can be used when the penguin will be displayed in a larger space.
The thing to remember when choosing a bottle is that you want it to have a slight curve at the “waist” to give it a more natural look. Of course, any bottle can be painted to create a lovely penguin look for your winter decor.
What Paint Should I Use on the Plastic Bottle?
You want to make sure you use acrylic paint when you are painting the plastic bottle. Most other paint will not stick to the bottle. If you find that the paint does not stick to the bottle, you can rough it up a little bit using sandpaper. This gives the paint something to stick to.
The exterior of the bottle was sprayed with white spray paint, but you can use basic craft paint for it if you prefer. Spray paint is really to give the bottle a base so it is no longer translucent.
If you want this plastic bottle penguin to last longer, you can add sealer over top of the paint. There are different kinds, like spray sealer or brush on like Mod Podge. This helps the paint to not chip and the craft to stay nice for longer. Plus, it adds a bit of a shiny gleam on the bottle that is great when displayed.
What Other Ways Can I Decorate My Penguin?
After painting the penguin, you can add more decorations. Kids will enjoy adding glitter, sequins, or other fun trinkets. Another idea is to add snow along the bottom of the penguin. What is a penguin without snow? You want to make sure not to add the snow underneath the bottle. It might make it hard for the bottle to stand.
If you are feeling extra creative, you can use another soda bottle bottom and make it into an igloo. After cutting the bottle down, making a flat even edge along the cut edge, paint the bottle white and outline blocks with black paint. Then add some snow around the igloo.
What Can This Be Used For?
This adorable plastic bottle penguin can be used for a lot of things around the house.
- Pencil Holder- Place it on a desk or in an office and use it as a pencil or pen holder. You can use it to hold other things that you might need on your desk.
- Plant Holder- Kids can make this as a present for everyone on their list. Depending on the type of plant you are adding to the plastic bottle penguin, you will need to add drain holes to the bottle. The plastic bottle penguin can also be used as a vase for cut flowers.
- Decorations- You can place this penguin on the mantle, on a shelf, or near the tree. You can add small decorative stones, like the kind that are used for plants, in the bottom of the bottle to keep it from falling over.
Supplies Needed
- Empty plastic soda bottle
- White spray paint
- Black marker
- White craft paint
- Blue craft paint
- Black craft paint
- Orange marker
- White glitter pipe cleaner
- Blue pom pom
- Craft knife
- Paintbrush
- Hot glue gun
- Hot glue sticks
How to Make a Plastic Bottle Penguin
Cut two empty soda bottles in half. Discard the spout ends.
Place the bottles over each other to create one smaller bottle with ends on both sides.
Spray paint the bottle white and set it aside to dry.
Once the bottle has dried completely, begin using a black marker to draw the penguin’s body and outline.
Paint a black line about 1″ below the “face” and 1/4″ above the face.
Fill in the bottom half of the bottle with black paint, then add black paint up to the line above the open face you drew. Set it aside to dry.
Once dry, use a black marker to draw on two circles for the eyes.
Then an orange marker for the triangle nose.
Paint the top of the penguin blue.
Then use the blue paint to add a scarf around the “neck” and hanging down over the body then set aside to dry.
Once dry, add a bit of shiny pipe cleaner around the top of the penguin at the base of the blue portion to create a hat.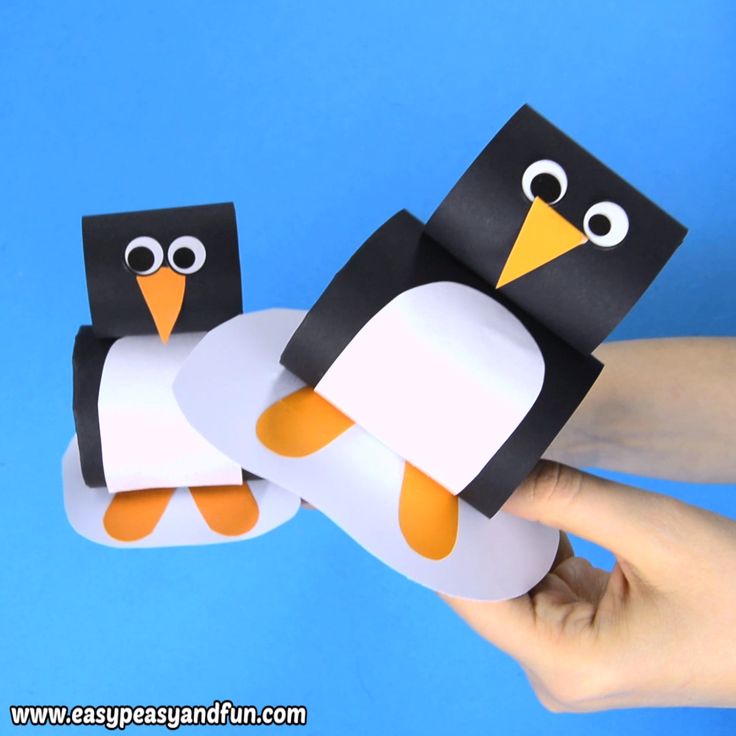
Glue a blue pom pom on top of the penguin.
Now, add a few dots of white on the hat and scarf as decorations.
Set aside to dry before displaying on your mantle.
More Easy Kids Crafts
If you love penguins as much as I do, then you are going to totally love the ideas below. Check them out then bookmark the ones you love the most. You can also easily print out their tutorials or even pin them to a holiday crafting Pinterest board.
- Adorable Pom Pom Penguin Winter Decoration
- Painted Christmas Lightbulb Penguin Decoration
- Adorable Foam Paper Penguin House Winter Decoration
- Rustic Pinecone Penguin Winter Decoration
Active Time
20 minutes
Additional Time
1 hour
Total Time
1 hour 20 minutes
Difficulty
Easy
Estimated Cost
$1
Materials
- Empty plastic soda bottle
- White spray paint
- Black marker
- White craft paint
- Blue craft paint
- Black craft paint
- Orange marker
- White glitter pipe cleaner
- Blue pom pom
Tools
- Craft knife
- Paintbrush
- Hot glue gun
- Hot glue sticks
Instructions
- Cut two empty soda bottles in half. Discard the spout ends.
- Place the bottles over each other to create one smaller bottle with ends on both sides.
- Spray paint the bottle white and set it aside to dry.
- Once the bottle has dried completely, begin using a black marker to draw the penguin’s body and outline.
- Paint a black line about 1″ below the “face” and 1/4″ above the face.
- Fill in the bottom half of the bottle with black paint, then add black paint up to the line above the open face you drew. Set it aside to dry.
- Once dry, use a black marker to draw on two circles for the eyes.
- Then an orange marker for the triangle nose.
- Paint the top of the penguin blue.
- Then use the blue paint to add a scarf around the “neck” and hanging down over the body then set aside to dry.
- Once dry, add a bi9t of shiny pipe cleaner around the top of the penguin at the base of the blue portion to create a hat.
- Glue a blue pom pom on top of the penguin.
- Now, add a few dots of white on the hat and scarf as decorations.
- Set aside to dry before displaying on your mantle.
 Discard the spout ends.
Notes
Make this little penguin with any color of hat and scarf that you prefer.
Recommended Products
As an Amazon Associate and member of other affiliate programs, I earn from qualifying purchases.
-
Personalised Penguin Thermal Bottle | Etsy
-
Penguin Motivational Water Bottle Tracker Bottle | Etsy
-
Penguin Bottle Stopper | Etsy
-
Penguin Water Bottle Tracker Penguin Gift Penguin Tumbler | Etsy
-
Add Your Name Free Glitter Penguin Tumbler | Etsy
-
Artic Penguin Handmade Party Favor/ornament/ Gift Tag | Etsy
Finished Project Gallery
Water Bottle Penguins & Books
Celebrate Winter with Books and Penguins!
As the days get shorter and colder, it is time to officially celebrate the winter! This means time to break out the hot chocolate, boots, and mittens! Talk with your child about some of their favorite winter activities. Below you will find some books and an activity to help you and your child celebrate the arrival of Winter.
You will need:
- Empty, plastic water bottle(s)
- Black paint
- Black & orange construction paper
- Glue
- Scissors
- Cotton balls
- Googly eyes (optional)
- Orange or black Feather (optional)
Directions:
-
- Remove the cap from the water bottle and paint it black, set aside for it to dry
- After making sure the water bottle is completely dry, tear off the label and stuff it with cotton balls
- On the black construction paper, cut out two ovals for wings and two shapes for feet. Glue the wings to the side of the water bottle, and the feet underneath
- Cut a triangle from the orange paper, after the cap is completely dry, glue the triangle onto the bottom of the cap so that it hangs over the top of the water bottle
- Glue the googly eyes (or construction paper circles) above the penguin’s mouth, and the feather (or construction paper piece) on the back of the cap, pointing upwards.
This activity has been adapted from Scholastic.
Next Resource >
Related Resources
September 15, 2022
ParentChild+ Expanding in Ireland…
GALWAY, IE, September 10, 2022 – Galway Rural Development has announced via the Galway Daily, that it is expanding the ParentChild+ Program from the Ballinasloe region into Tuam town next month. Please full article here. ### Media Contact: Ricardo Abreu, ParentChild+ Development & Communications Coordinator Phone: 516.883.7480 Email: [email protected]…
Read More
August 17, 2022
Julian Gomez J.D. Returns to the ParentChild+ Board of Directors…
MINOELA, NY, August 18, 2022 – ParentChild+ is pleased to announce the reelection of Julian Gomez to its Board of Directors. Gomez previously served on the board for seven years before moving abroad with his family. ParentChild+ Board President Jim Molloy enthusiasm at Gomez’s return, spoke for the…
Read More
August 11, 2022
ParentChild+ Receives Historic Increase to $4M in Massachusetts FY23 State Budget…
BOSTON, MA – On July 28th, Governor Baker signed into law the FY23 Massachusetts state budget, which includes a historic increase for ParentChild+ programming, bringing its total state budget funding to $4M. This over 20% increase from FY22 will support expansion into new MA communities, increased capacity at…
Read More
April 5, 2022
ParentChild+ North Carolina Sites Awarded Over $1 Million in ARPA Funds…
CHARLOTTE, NORTH CAROLINA, MARCH 31, 2022 – ParentChild+ is proud to announce that ParentChild+ North Carolina, in partnership with its three local partner agencies, has been awarded over a million dollars in American Rescue Plan funds. Mecklenburg County has awarded funding to two ParentChild+ local implementation sites. Charlotte…
Read More
March 7, 2022
NCIT Open Letter to the Nation…
The National Collaborative for Infants and Toddlers, along with nearly 1,500 organizations, including ParentChild+, have joined together to highlight the critical importance of support for prenatal to age three children and their families. To read the full letter, please click here.
Read More
October 27, 2021
How We Run Podcast, Episode ‘An Unexpected Leap to Virtual Programs’ Featuring …
ParentChild+ CEO, Sarah Walzer discusses the pivot to virtual visits on the How We Run podcast episode ‘An Unexpected Leap to Virtual Programs’ hosted by Trent Stamp and Julie Lacouture. Click here for the full episode.
Read More
September 27, 2021
ParentChild+ featured in Family Connection of Easton’s 2021 Fall Newsletter.
 ..
..
See ParentChild+’s Family Connection of Easton site during their 6-week Summer Book and Play Club by clicking here. ParentChild+ featured in Family Connection of Easton’s 2021 Fall Newsletter Checkout ParentChild+ as they are featured in Family Connection of Easton site’s 2020-2021 annual report, click here to read the…
Read More
August 31, 2021
Introducing Vidya Ragoo as ParentChild+’s New National Director, Family Child Care Initiative…
MINEOLA, NY, September 1, 2021 – We are proud to announce Vidya Ragoo as the new Family Child Care Initiative Director. Vidya will join ParentChild+ with over 20 years of experience in early care and education. She worked for the NY Early Childhood Professional Development Institute as a…
Read More
August 9, 2021
When An Educator Is More Than A Teacher.
 ..
..
Read here as ParentChild+ is featured in our Jericho Road Community Health Center site’s summer newsletter.
Read More
July 20, 2021
ParentChild+ Supporting Families in Peabody and Salem – Itemlive.com, July 2020…
The Peabody and Salem sites have been featured in itemlive.com powered by The Daily Item for the work that they have been recently doing. Click here for the full article.
Read More
June 30, 2021
Chronicle of Philanthropy article highlights ParentChild+ Virtual Home Visiting…
By Jim Rendon ParentChild+ helps prepare young children for prekindergarten. Before Covid, the visits between early-learning specialists and families, like this one in Sunset Park, Brooklyn, were all in person. ParentChild+ is not the kind of nonprofit that should have done well during the pandemic. It…
It…
Read More
March 8, 2021
Dr. Chrishana M. Lloyd Joins the ParentChild+ Board of Directors…
ParentChild+ is pleased to announce the election of Dr. Chrishana M. Lloyd, a nationally recognized Early Childhood researcher, to its Board of Directors. Tai Chang Terry, President of the ParentChild+ Board welcomed Dr. Lloyd to the Board noting, “She is an expert in the field of early childhood,…
Read More
25 Plastic Bottle Crafts for Kids
Why throw away those old plastic bottles when you can recycle them into fun crafts? It’s time to dig into the recyclable bin and gather all your plastic bottles!
These 25 plastic bottle crafts for kids of all ages are fun, creative, beautiful, bizarre, and downright awesome!
Let’s get the fun started!
Turn your junk into an afternoon fun that your whole family will love. Happy crafting using all sorts of different type of empty bottles from your recycling bin: empty plastic bottles, water bottles, soda bottles, bottle caps…what fun!
Easy and Fun Plastic Bottle Crafts for Kids
1.
 Create an Apple Shaped Recycled Container with your kids
Create an awesome apple-shaped container plastic bottle with your kids! While the original link is now unavailable for the step by step tutorial, I love how they the bottom of the bottle from two different clear soda bottles to create the apple shape.
Plus, your kids can make them as gifts for their teacher! Yay!
Love that apple-shaped container!
2. Play Bowling Using Plastic Bottles With Your Kids!
Play Bowling using plastic bottles with the whole gang this afternoon! Our family’s favorite backyard fun pastime. See how different plastic bottles from the recycling bin or rescued from the trash were used of all different shapes and sizes:
- Find 6 plastic bottles that are similar in size and remove the lid
- Spray paint a base coat of different colors to each empty bottle
- Add details with a paint and a permanent marker pen
- Have so much fun playing a backyard bowling game
Related: Make a plastic bottle bowling game
Happy faces bowling bottles to play with! (link no longer available)
3.
 Ride Plastic Bottle Horses with your Kids!
These plastic bottle horses by Tiale Blog are waiting to be ridden by the kids! They’re so easy to make that you could easily fill up an entire corral with them. Yee Haw! This is one of my favorite plastic bottle craft ideas!
Funny horses out of bottles! Yay!
4. Pretend Play Mini House Platic Bottles
Create adorable mini doll house plastic bottles (instructions unavailable) with your little ones! Who knew playhouses could be made using old plastic bottles? The handles come in handy when you need to relocate! Yay!
Aren’t these mini playhouses the cutest?!
5. Grab On These Candy Monster Plastic Bottles with the Kids!
These candy monsters plastic bottles by Craftberry Bush are super cute not to do! These monster bottles are going to nibble your kiddo’s fingers if they get too close. Rawr for these scary cute decorations.
Scare your kids away using these monster bottles!
6.
 Let Your Kids Have a Good Sleep With the Glow In The Dark Sleep Time Plastic Bottles!
This is my absolute favorite of all water bottle crafts. Have your child count the stars in this glow-in-the-dark sleep-time plastic sensory bottle great tutorial by Kids Activities Blog! So cool, they’ll have a good sleep all night too! Awesome!
Glowing bottle for a good night’s sleep.
7. Create Sparkling Crystal Princess Plastic Bottle Crown For the Little Girls
All you need to make this sparkling princess crystal plastic bottle crown by Paper Plate and Plane is a recycled plastic bottle and some glitter glue. Making little girls like princesses…what a great project!
Sparkling crystal crown for the little girls!
8. DIY Shrinky Dink Plastic Bottle For The Kids!
Never buy Shrinky Dinks by C is For Craft from the store again once you see this awesome plastic bottle hack! Just follow the tutorial link above with your kids and see the magic. Yay!
Cutie little Shrinky Dink for the kids!
9.
 Make a Glowing Firefly Plastic Bottle Craft With your Kids!
Make a toy insect out of plastic bottles for your kids! Follow this Glowing Firefly Plastic Bottle tutorial by Crafts For all Seasons to see glowing fireflies in no time!
Glowing Fireflies Bottle for all seasons!
10. Play Catch The Fish Plastic Bottles with Your Kids Today!
Catch the fish plastic bottles by Krokotak teaches hand and eye coordination. A super fun way for your children to have a friendly competition. Yay!
Thought that was really a real fish!
11. Let Your Kids Swim With Those Plastic Water Bottle Fishes!
A true empty water bottle transformation. This water plastic bottle fishes by Meaningful Mama is a fun way to engage your little ones swimming for the first time! Fun!
Bottle fishes are found anywhere. Yay!
12. Add Plastic Bottle Flowers To Your Kids Garden Now!
These beautiful and colorful plastic bottle flowers by Crafty By Amanda are made out of recycled plastic bottles! Such a fun rainy day afternoon gardening activity with the kids!
Colorful and beautiful bottle flowers in the garden!
13.
 Get That Dolly Plastic Bottle Visit The Salon With Your Kids
Grab your glue gun and create a dolly plastic bottle by Handmade Charlotte and have fun styling its hair with your little girls! Follow the tutorial from the link above and decide which hairstyle looks good for her!
A pretty dolly bottle needs a haircut!
14. Awesome Oceans Plastic Bottle With The Kids
Kids will surely marvel at this jellyfish in a plastic bottle by Bhoomplay’s Blog! You might end up having trouble convincing them it isn’t real instead of plastic bags, water and some food coloring. Genius!
Convincing jellyfish in the bottle!
15. DIY Sod Plastic Bottle Jet Pack For the Little Astronaut!
Send your tiny juggernauts blasting off into space with this soda plastic bottle jetpack tutorial by Doodlecraft. Have a blast!
Related: How to make a jetpack
1-2 and blast off!
16. Create This Awesome Windsock Koinobori Plastic Bottle Kites With your Kids
Follow and make one of these windsock Koinobori kite plastic bottle tutorials by Childhood 101. Your kids will surely love seeing it flying around in your front yard. It is a great way for kids to practice scissors skills on different materials.
Lovely windsock Koinobori inspired bottle kites!
17. Have A Blast Creating This Macaroni Penguin Plastic Bottle Craft with Your Kids
This macaroni penguin Plastic Bottle craft by Parenting Chaos is so easy to make! Your kids will love seeing them come to life. Yay!
Adorable macaroni penguin craft!
18. DIY Milk Jug Butterflies Plastic Bottle Craft for the Kids to Play
These colorful little butterflies are made out of plastic bottle milk jugs by Alpha Mom. Create this together with your kids and fill colors in their room in no time!
Colorful butterflies made out of milk jugs!
19. Have Fun Playing This Water Plastic Bottle Octopus With the Kids!
Create and dress up this water-plastic bottle octopus by Crafts By Amanda together with your kids! How sweet right?
Sweet water bottle plastic octopus found!
20.
 Make This DIY Plastic Bottle Piggy Bank For Your Kids
Help your child save for the future and learn about upcycling with this DIY plastic bottle piggy bank tutorial (unavailable). Happy Savings!
Plastic piggy bank bottle oinky!
21. Craft This Plastic Bottle Plane For The Boys!
This plastic bottle plane by Inna’s Creation will be a sure hit with the little boys! Board this one and take off shortly. Yay!
Cutie plastic bottle plane for the boys!
22. DIY Totem Plastic Bottle Poles To Play With The Kids
Create colorful plastic Totem bottle poles (unavailable) for the kids to play! A great way for kids to express themselves and explore Native American crafts. Awesome!
Colorful Totem Plastic Poles to play with!
23. Explore Chihuly Glass Art Plastic Bottles With the Kids!
These Chihuly glass art plastic bottles by Life With Moore Babies will flip, flap, and fly around in the wind. They’re super light and will look magical once they get moving.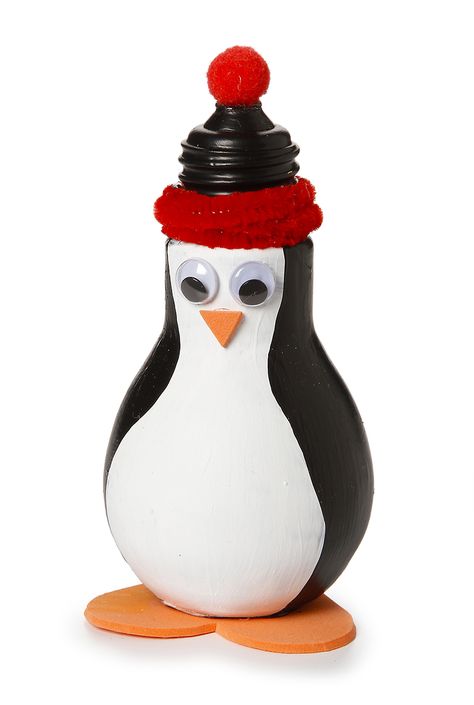 Yay!
Yay!
Classy Chihuly glass plastic bottles for the win! Yay!
24. Make A Plastic Bottle Wind Spinner For the Kids!
Make this plastic bottle wind spinner by Crafts by Amanda together with the kids today! Watch them twirl, and swirl with the wind. Yay!
Colorful wind spinner for the kids to watch inwindy weather!
25. Create Beautiful Wind Chimes Plastic Bottles Craft With the Kids!
Create colorful and beautiful wind chimes plastic bottles by Happy Hooligans with the kids! Hang them around to appreciate the beauty on it!
26. Make Whirligigs from Water Bottles
I love this idea for water bottle crafts from Kids Activities Blog because you don’t really even think of it being a water bottle when it is done. You will need a heavier weight plastic drink bottle that is clear and some prisms.
Let’s make water bottle whirligigs!
27. Let’s Paint with Water Bottles
This easy bottle painting idea is perfect for younger kids like preschoolers and Kindergartners. Use the bottom of a water bottle as a stamp for your floral painting masterpiece.
Can you tell what made the flowers?
More Awesome Plastic Bottle Crafts Ideas For Your Kids From Play Ideas
- Oh so many bottle crafts that kids can make!
- Check what Coca Cola has in mind on making plastic bottles more environment friendly, here!
- Learn how to make sensory bottles with these lovely sensory bottle ideas.
- Plan a summer worthy adventure ahead with your kids as you try these sensational summer crafts!
- Create different ninja turtle figures out of recycled crafts items with your little ones this afternoon!
- Be ready for some awesome snowflakes crafts adventure with the kids today!
- Go out and fly ahead inside these awesome airplane craft ideas you can do with your kids!
- Enjoy the snow indoors as you go along with these fun snow indoor activities you can play with the gang!
Choose from these plastic bottle crafts ideas to do!
Which of these plastic bottle crafts are you going to make with your kids today?
23 Perfect Penguin Crafts for Kids to Try
138
shares
-
Facebook
Get crafty with these penguin crafts! They’re a fun project to do with the kids!
No matter the time of the year, why not bring a hint of the animal kingdom into your home with some penguin crafts?
These are great for every season —winter or not.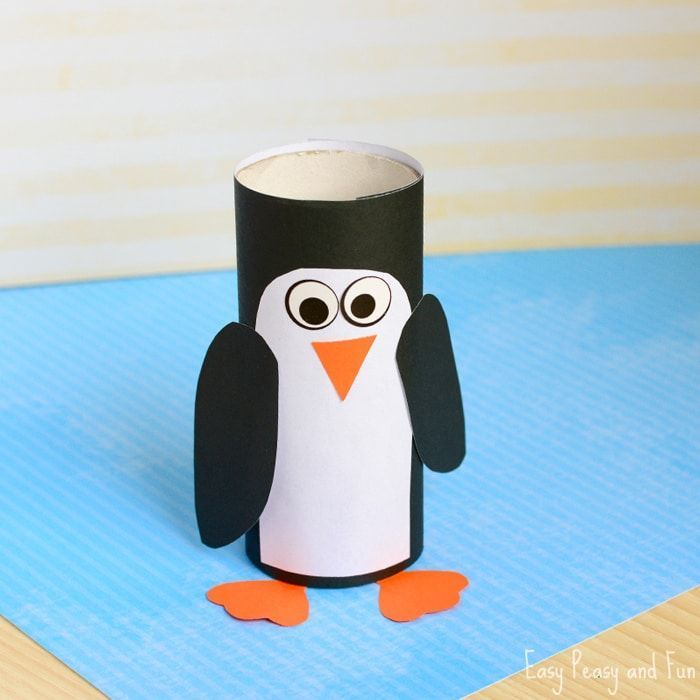 Also, they’re the ideal way to engage your kids with some lessons about the natural world.
Help their development and decorate your home at the same time! Check out these 23 perfect penguin crafts for kids to try.
1. Upcycled Cardboard Penguin Family
Credit: pillarboxblue.com
These upcycled penguin cardboard figures are so easy to make and customize.
In fact, you can make one for each member of your family and display them all together! Not only are these figurines fun and educational, they’re also sustainable since you’re recycling old cardboard.
Make sure to pick up some chalk paint (here) and poster paint in a couple of colors (here’s a good kit). So, you and your kids can go wild on the customization.
2. Penguin Paper Bag Puppet
Credit: simpleeverydaymom.com
Perfect for telling the story of Noah, having some playtime, or as a classroom craft session. These penguin paper bag puppets are easy and affordable to make.
Once they’re all done, have the kids put on a puppet show about the things they’ve learned about penguins! This is a super fun educational activity and can even help to encourage good public speaking.
Check out more crafts that kids will love!
3. Paper Plate Penguin Craft
Credit: simpleeverydaymom.com
These penguin paper plates are so cute I almost want to make them for myself! If your child is a winter baby, these penguin plates could be the perfect way to celebrate their next birthday.
All you need is a good stock of paper plates (choose compostable ones like these). Also, some colored card stock, glue, and paint.
Sit down with your little one to teach them what goes into party planning!
4. Penguin Rock Pets
Credit: livinglifeandlearning.com
They say bringing a pet into the house is the best way to teach your child some responsibility. But, maybe they didn’t know about rock pets!
Teach your kids about cold weather animals while making penguin pets.
This super-affordable craft’s main component can be found in your backyard. So, it’s perfect if you don’t want in the run-up to the expensive holiday season.
Whip out some paint and paintbrushes to make the perfect penguin pet. Once it’s painted, make sure to spray with some clear enamel-like this to keep the paint safe and unchipped.
5. Patricia the Hungry Penguin
Credit: theeducatorsspinonit.com
Patricia the Penguin is the perfect learning tool for teaching the letters and sounds for “p”. Dynamic learning tools help kids engage with their education, making it fun, and helping them to focus!
Fish an old cereal box out of the recycling and transform it with the help of some construction paper and paint. Patricia only eats paper with the letter “p” on it, so she’s an awesome learning tool.
Curious about some other paper crafts to help your child learn? Try any of these 20 Paper Crafts That Will Inspire Anyone.
6. Five-Fold Origami Penguin
Credit: origamiexpressions. com
com
When it comes to childhood development, one of the best activities to take on is origami. Each new fold teaches your child something new about spatial reasoning, thus helping them to grow!
This cute little origami penguin is very simple, requiring only five folds. So, it’s a fantastic introductory origami project.
A quick note: make sure to invest in high-quality origami paper, as the color can crack and flake off with the cheaper kinds. This black origami paper from Folded Square is perfect.
7. Paper Lunch Bag Penguin
Credit: abcsofliteracy.com
Whether your child is in school or still stuck at home, this paper bag penguin is a great way to brighten up their lunchtimes with their favorite wintertime animal.
Pack their lunch in the completed bag and send it along with them. Once they’ve eaten, it’s an adorable puppet they can use to put on plays with their friends!
8. DIY Wooden Penguin Ornament
Credit: homemadeheather. com
com
Bring a little wintertime fun indoors by making this wholesome wooden penguin ornament with your child. Sit down on the day you trim your tree and whip out the supplies for a day of family Christmas fun!
These ornaments are super simple, and they always come out looking great. Make sure to buy wooden circles with a pre-drilled ornament hole (here) for the string if you don’t have a drill at home.
Complement your new ornaments with any of these 20 Dollar Store Christmas Crafts!
9. Penguin Rock Family
Credit: sustainmycrafthabit.com
Here’s another take on penguin rocks. This time, it’s an entire family of penguins!
Render your family as rock penguins with this adorable Christmas craft.
If you’re really looking for these rocks to shine, pick up some Decoart Multi-surface Satin Paint. They have the same colors specified in the tutorial, they’re durable, and they look amazing.
Not only is this great for teaching your child about a new animal, it’s also a great activity if they need a little help understanding family dynamics.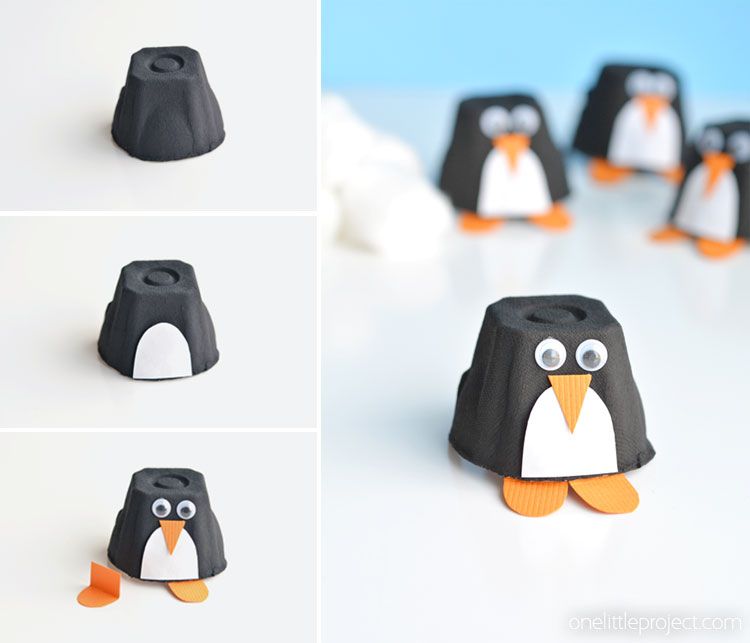 Go nuts and paint the entire extended family!
10. Toilet Paper Roll Penguins
Credit: krokotak.com
In the quest to make your home an enjoyable wonderland for your little one, don’t neglect the bathroom! These cute toilet paper roll penguins are perfect for lining the bathroom shelves.
Upcycle those toilet paper rolls into a contingent of winter creatures. If you don’t already have white toilet paper rolls, pick up some white spray paint like this. So, you can alter them before you start crafting.
Curious about some other ways to use toilet paper rolls? Here are more toilet paper roll crafts to try.
11. Water Bottle Penguin Craft
Credit: homeschoolpreschool.net
Here’s another upcycling craft to put the sustainability spirit into your family activities. This water bottle penguin is adorable, offering easy decoration for a kid’s space anywhere in the home.
Make sure you have a quality glue gun at your side for this one (like this one). That’s because working with porous surfaces like plastic and foam can make other glues reluctant to stick.
In fact, if your kiddo wants to do the gluing, pick up a cold glue gun and let them get to work too!
12. Popsicle Stick Penguins
Credit: thejoysharing.com
Got some leftover popsicle sticks from all those wintertime treats? Put them to good use with these popsicle stick penguins!
These cuties even have their own earmuffs to keep them warm. Assembling the penguins themselves is super easy, perfect for doing with the kids.
Pick out some colored cardstock for the accessories. You can even add some snowflake jewels like this for some sparkle.
These little penguins aren’t the only way to use those leftover popsicle sticks. Check out more popsicle stick crafts here.
13. Pop Up Penguins
Credit: kidscraftroom.com
These adorable pop-up penguins need only cardstock to come to life. They’re another great way to develop your little one’s spatial reasoning as you craft. I call that a win-win.
Whether you run a kindergarten classroom or you’re a parent, this is an ideal craft because it doesn’t require too many supplies. Not to mention, you can let your kid take care of most of it!
14. No-Sew Sock Penguin Craft
Credit: easypeasyandfun.com
Rather than buying a pre-made penguin stuffed toy for your little penguin-lover, why not upcycle a basic black sock? Make it into a toy that will carry memories with it forever?
Thanks to the no-sew design, this little stuffed companion is easy to make with children of all ages. The result is cushy, cuddly, and adorable (perfect for hugging).
You can either use rubber bands or embroidery floss like this to tie off the head shape. It’s up to you. Make sure you pick up another sock in a contrasting color to create an adorable penguin beanie!
Want to try this technique, but with a different animal? Here are sock plushies to try out for your tot!
15. Plastic Spoon Penguin Ornaments
Credit: iheartcraftythings. com
com
Christmas ornaments don’t just live on the tree! If you’re looking for an adorable touch to add to your centerpieces, look no further than these plastic spoon penguin ornaments.
Using some black and orange felt, a hot glue gun, and some googly eyes, you can easily transform some basic spoons into cuddly penguins. Prop them in their own Winter Wonderland for a cute centerpiece!
16. Cotton Ball Penguin
Credit: easypeasyandfun.com
Perfect on any size and any surface, this cotton ball penguin is an ultra-adaptable craft that’s perfect for any child who loves soft, cuddly things.
Using some inexpensive cotton balls, you can make a large penguin as a poster or make a smaller one as a gift card. The choice is up to you and your little crafter.
17. Penguin Family Salt Dough Ornament
Credit: messylittlemonster.com
Making ornaments out of salt dough is such a nostalgic, traditional Christmas time activity. Pass on the tradition to your little one by crafting these penguin family salt dough ornaments!
The basic ingredients are staples in any household—flour, salt, and water—but the decoration elements are what make it special. Pick up some acrylic paints and markers to create the perfect ornaments.
You can make these ornaments in all manner of shapes and sizes. Just check out these DIY salt dough ornaments for some inspiration.
18. Cute Footprint Penguin Paper Craft
Credit: simpleeverydaymom.com
Here’s a way to create a memory with your child that will last the ages. Even after they’ve outgrown these little crafting projects, you’ll have the memory of their little footprint forever!
This clever craft uses the shape of your child’s footprint as the penguin’s body. Decorating it with other shapes cut from construction paper to form the full penguin.
If you’re using thick paper, make sure to grab some glue that will last, like this Elmer’s CraftBond.
19. Egg Carton Penguins
Credit: kiwico.com
Sitting on the presents, hidden between candles, chilling out in the fridge, these tiny penguin friends are the perfect ornament for any part of the house. Not to mention, they’re so easy to make!
Once you’ve made the penguins, you can make a game out of hiding treats in them and sending your kids on a hunt around the house.
20. Little Penguin Buddy from a Clear Ornament
Credit: gluesticksblog.com
Who said clear ornaments can only be hung on trees? This clever crafter found a way to turn a clear ornament into a standing penguin decoration, perfect for sitting on the mantelpiece.
All you need to get this done is a clear ornament (like this), some polystyrene balls, a black pom-pom, and some felt! The result?
A sweet companion for the chilly months, and a fun project with the kids.
21. Miniature Cork Penguins
Credit: masandpas.com
Speaking of tiny penguins, here’s a method for making your leftover wine corks into these wintertime birds. Don’t worry if you don’t have corks. You can buy packs of them here.
You can make these in minutes with some paint and a little felt. There’s no formula, so how these penguins turn out is totally up to you and your kid.
Craft your whole family out of penguin wine corks!
22. Fun Penguin Hat Craft
Credit: kidscraftroom.com
Whether you’re in the lead up to Christmas, a teacher in kindergarten, or a parent planning a penguin party, this is the craft for you. Your kids will love running around pretending to be penguins!
In fact, this is a great craft to do at a birthday party. It keeps the kids engaged, gives them a fun result they can play with, and doesn’t require intense adult supervision.
Plus, it’s budget-friendly.
23. Woven Penguin Paper Plate
Credit: nontoygifts.com
Finally, this woven penguin paper plate is a unique and exciting craft to take on with your kids the next cold winter day. It’s light enough to hang on their wall easily, and it’s absolutely adorable.
All you need for this craft is the paper plate, some construction paper, white yarn, a single hole punch, and a yarn needle for weaving.
Not only does this craft deliver a great result, but it also helps with your child’s spatial development and reasoning. You get the best of both worlds!
Conclusion
Which one of these penguin crafts was your favorite? Share them with your friends and loved ones!
Penguin Crafts Ideas – The Most Amazing Crafts
Penguins are entertaining, cute, and happy animals that children would love to play with. So, it’s no wonder why penguin movies are pretty popular among kids. There are many fun ways to teach kids about this playful animal, and one of them is by making penguin-themed crafts.
This craft activity can help your little ones pass the time during the holidays. For this reason, we’ll share with you some adorable easy penguin crafts that you can try out.
1. Popsicle Stick Bow Tie Craft
This is a cute way of bonding with your kids during the winter season. You can make this craft by gluing popsicle sticks side-by-side on a small piece of cardboard to make it sturdy. Ensure that the two middle popsicle sticks are higher than the rest.
Let your child use a pencil to draw an oval shape to represent the penguin’s stomach, paint it white, and then paint the remaining part black. Next, place the penguin’s eyes, beak, wings, and bow. Good job! Now your cute penguins are ready. Kids can make this fun craft as a gift to their friends.
Find out more about this Popsicle Stick Bow Tie Craft at Crafty Morning.
2. Paper Bag Penguin Crafts
Would you like to help your kids build their motor skills and boost their creativity? If so, make this fun penguin craft!
This incredible craft idea is easy for preschoolers and young kids to create and won’t require many materials. You’ll only need glue sticks, black or white paper bags, scissors, construction paper, toilet paper, and stock papers. Also, you can visit craftwhack. com for more paper bag craft ideas.
Learn how to make these Paper Bag Penguin Crafts on ABC’s of Literacy.
3. Penguin Footprint
This is a fun way of keeping kids busy during the winter break. And they can make this footprint penguin with materials that can be easily found at home.
They’ll need white paper, black paint, orange paper, and anything that can serve as a wiggly eye and foot. This is one of the perfect craft ideas for preschoolers, toddlers, and older kids.
Learn more about the Penguin Footprint on The Best Ideas for Kids.
4. Paper Cup Penguin Crafts Roll
This craft is one of the best ways to help your kids learn while having fun. It’s pretty easy and doesn’t require many materials to create.
The supplies you’ll need include one black cup of paper, orange and black construction paper, two googly eyes, and white paper. This craft is colorful and ideal for all young kids.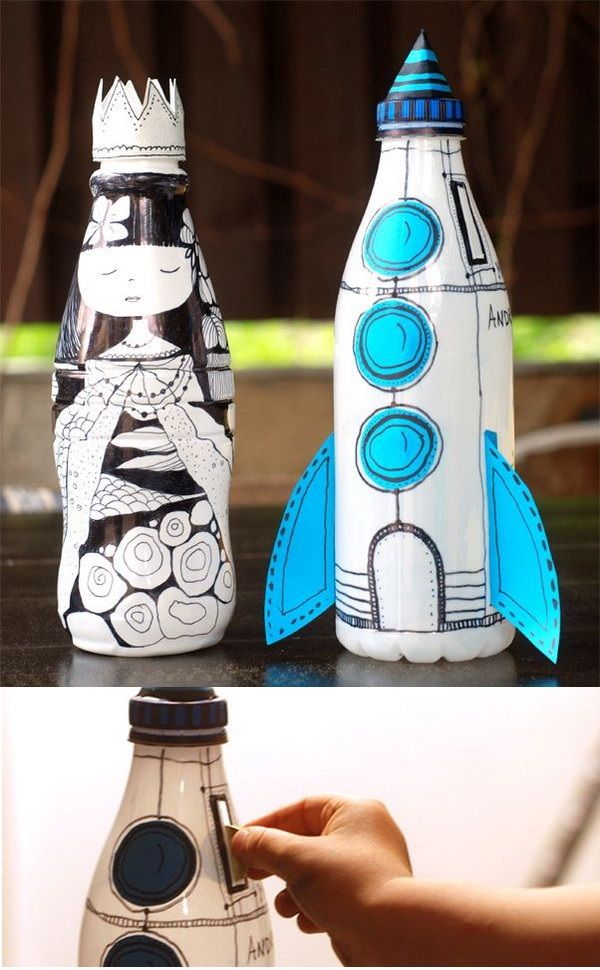
Learn how to make the Paper Cup Penguin Crafts Roll on The Imagination Tree.
5. Water Bottle Penguin Craft
This craft is one of our favorite penguin crafts, and we know your kids will love it. You can do this project with materials such as empty water bottles, cotton balls, string, pipe cleaner marker, and googly eyes.
Learn more about making the Water Bottle Penguin Craft on Home School Preschool.
6. Paper Plate Penguin Craft
This one is super easy to make. And you can decorate and hang your cute penguin on the wall in your home once you’re done.
The craft is great for preschoolers, toddlers, and young kids to have fun. The supplies needed for this cute penguin craft involve paper plates, paint brushes, and construction papers.
Get the information about making the Paper Plate Penguin on A Dab of Glue Will Do.
7. Cotton Balls Penguin Craft
Your kids will love to make these cotton ball penguin crafts. The materials needed are cotton balls, buttons, scissors, and a white, black, and orange paper sheet. It’s an ideal activity for preschoolers, toddlers, and young kids to have fun during the winter break.
Learn more about how to make the Cotton Ball Penguin Craft on Easy Peasy and Fun.
8. Hand Painted Penguin Magnets
This is one of our favorite fun penguin craft ideas that the whole family would love to create. Use a disc that you’ve sketched the design of a penguin on. Then, paint both the penguin sides and the magnet with dark grey paint while leaving the belly and eyes area with white paint.
Let your kids join in on the fun activity as they enjoy putting their feet and beaks together. Allow the paint to dry, then coat the magnet with acrylic sealer and place a small piece of a magnet at the back. Your adorable penguin is all ready!
Learn how to make the fun Hand Painted Penguin Magnets in simple steps on FirstCry Parenting.
9. Penguin Ink Blot Symmetry Craft
This unique penguin craft is a great idea for having a fun math activity with your kids during the holiday. It’s also a fantastic way to let them learn about symmetry. Even though the art project might make your kid look like a messy little monster at first, it’ll be worth the time after your cute penguin is ready.
Get more information on how to easily make the Penguin Ink Blot Symmetry Craft on Artsy Momma.
10. Mosaic Penguin Craft for Preschoolers
This penguin craft is one of the finest ideas for your kids to have fun with during the holiday. It’s safe for kindergarteners and preschoolers since there isn’t a need for scissors when making the penguin.
You can use materials such as googly eyes, construction paper or an egg carton, a pencil, and cardstock to make a cute penguin that your little ones will love.
Learn more about the steps involved in making the Mosaic Penguin Craft for Preschoolers on Easy Craft for Kids.
11. Cardboard Tube Penguins
Enjoy your snow day and get crafty on the craft table with your kids this winter break. You can do this using cardboards to make adorable penguin crafts that’ll intrigue them. What a great way to pass the time and have fun with your kids!
You can make this penguin craft with materials such as a toilet paper roll, googly eyes, construction papers, and an egg carton that can be found easily in the house. No wonder they’re pretty easy to make.
Learn the steps required to make the Cardboard Tube Penguins on Crafts by Amanda.
12. Sock Penguin
This is a creative way of turning your old socks into penguins. Imagine the stunning look on your kid’s face when you start and the “Wow!” you’ll get when you’re finally done with the penguin.
This penguin craft is suitable for toddlers, preschoolers, and young kids to have a fun winter break.
Find out the entire process for the no-sew Sock Penguins on Instructables.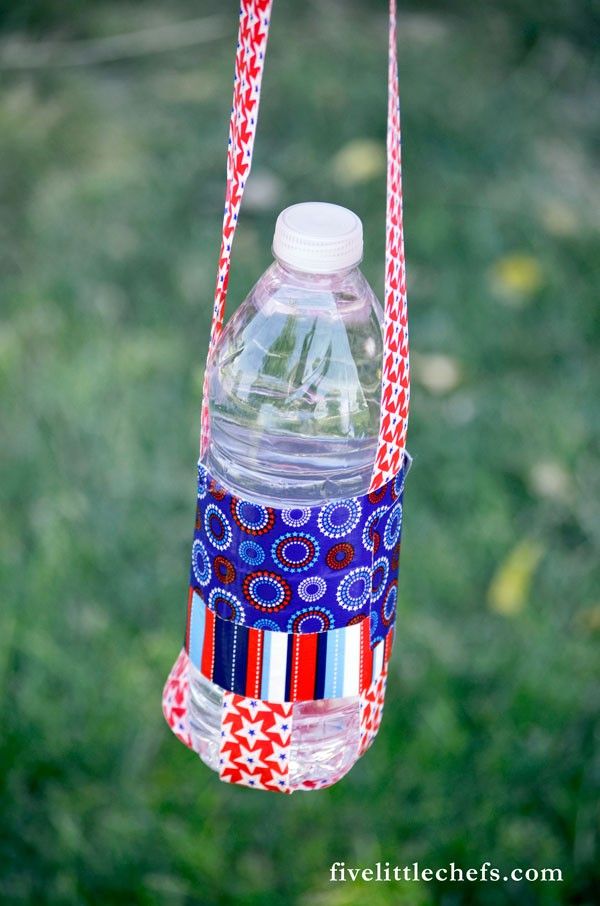
13. Penguin Painted Rocks
If you’re looking for a good penguin craft idea that every family member will enjoy, this is it! These cute rocks will make a good part of your Christmas decoration.
All you need for the craft are some river rocks and white, black, and yellow paint. In addition, you can get rocks of different sizes to make a family of penguin rocks.
Learn more about these Penguin Painted Rocks on The Soccer Mom Blog.
14. Fingerprint Penguin Ornament
This wood slice finger ornament is a cute keepsake you can hang anywhere in your home or on the Christmas tree. Also, your little ones would enjoy making these adorable penguin crafts.
Find out how to make the Fingerprint Penguin Ornament at Messy Little Monster.
Did you find any of our penguin craft ideas inspiring? Let us know in the comment section below. And keep crafting and bonding with your family!
Comments
0 comments
Crafts from plastic bottles for decorating a summer house and garden (100 photos).
 Beautiful crafts from plastic bottles for the garden Useful little things for the house from plastic bottles
They will enliven the garden or vegetable garden and add a touch of exclusivity and originality to it crafts from plastic bottles, made at home with your own hands. There are no particular difficulties in the process of creating such elements of landscape decor, especially when there is a detailed instruction at hand with a step-by-step description of the actions and a photo of the final result. With such information at their disposal, even beginners will not experience difficulties and will easily create many new, spectacular, unusual and inexpensive decorations for their site.
Simple DIY plastic bottle crafts step by step for beginners
If you have no experience in making crafts from plastic bottles, you don’t need to immediately take on complex options. It is better to try to make some simple product intended for beginners, and, so to speak, fill your hand. Then everything will be much simpler and there will be no more difficulties with the creation of original and beautiful things from plastic.
Materials for easy crafts for beginners from plastic bottles
- white plastic bottle – 3 pcs
- yellow bottle – 1 piece
- 5 l plastic bottle – 1 piece
- stationery knife
- paint green – 20 g
- candle
- glue for plastic or “Moment” universal
Step-by-step instructions for beginners: how to make a simple craft out of plastic bottles
Interesting crafts from plastic bottles step by step with photos for kids
Children can make fun, interesting and colorful crafts out of plastic bottles, such as playful, cute penguins. Kids with great pleasure will take part in the manufacture of birds, and then decorate their room or playroom in kindergarten with them.
Required materials for making an interesting children’s craft from plastic bottles
- 1 liter plastic bottles – 6 pcs for 3 items
- utility knife
- plastic adhesive
- acrylic paints
- brushes (wide and fine)
- decorative items (ribbons, scraps of fabric, embellishments from threads for knitting, etc. )
- medical alcohol
- cotton pad
- marker pen
 )
) Step-by-step instructions on how to make crafts from plastic bottles with children
Practical crafts from plastic bottles for the garden – photo and description perform useful functions, for example, serve as an original and unusual flower bed.
Necessary materials for creating garden crafts from plastic bottles
- 5 l bottle – 3 pcs
- 2 l bottle – 1 piece
- caps yellow – 6 pcs
- plastic adhesive
- acrylic paints (red, yellow, green, white) – 150 ml each
- black felt-tip pen with thick lead
- stationery knife
Step-by-step instructions for gardening and gardening from plastic bottles
- Wash and dry bottles well. Degrease the outer surface so that the paint lies neatly and evenly.
- Use a utility knife to cut a piece of plastic from one side to make a rectangular notch. Process all three bottles in this way.
- Paint each container: one red, one yellow, and one green. Leave the blanks to dry well.
- Then, on the sides with white paint, draw two medium-sized circles on each bottle. These will be the wheels of the train.
- In a red bottle, cut a large round hole closer to the part with the cork and insert a dark two-liter bottle into it with the cap down.
- Paint the lids on all five-liter containers white and draw a smiling mouth over them.
- Use glue to glue the yellow caps on the bottles where the eyes should be. Place a thick drop of white paint inside each lid.
- Arrange all the bottles in the right place in the garden one after the other, starting with the red one. Pour soil inside and plant seedlings or seeds of decorative flowers.
 Process all three bottles in this way.
 DIY DIY crafts from plastic bottles for the garden – photo with step-by-step instructions
Purchased landscape design elements are an expensive pleasure that not everyone can afford. But there is no need to be upset about this, because many things of this kind can be done at home with your own hands from the simplest and most affordable materials, for example, from plastic bottles.
Required materials for DIY new crafts from plastic bottles
- 5 liter plastic bottles – 4 pcs
- paint set
- brushes – 2 pcs (wide and fine)
- stationery knife
Step-by-step instructions on how to make garden crafts out of plastic bottles
- Cut off the neck of three clean and dry plastic five-liter bottles. Paint the resulting containers bright yellow and leave for a while to set the paint.
- Cut out three rectangular and three triangular pieces from the fourth bottle. Paint them red.
- Make an even cut in the bottoms of the bottles with a knife and insert red rectangles there, figuratively cut on one side to fit the shape of a cock’s comb.
- On one side of the bottle, paint the big eyes of a chicken. A little lower between them, make a vertical slot and insert a red beak triangle there.
- Arrange the colorful chick figurines in the place that you want to further ennoble.
 A little lower between them, make a vertical slot and insert a red beak triangle there.
 Bright, funny and useful crafts from plastic bottles for the garden – master class
Empty plastic bottles are available to everyone and usually lie around until the owners bag them and take them to the landfill. However, even these little useful items can be put to good use, for example, they can be used to make fun crafts for the garden. This master class tells how to make an interesting and stylish element of landscape design from empty plastic bottles – a cheerful, pink pig that will enliven and decorate vegetable beds. If you want the product to be not only attractive, but also useful, it can be used as a mini flower bed or flowerpot. To do this, at the initial stage, you need to cut off the “back” of the bottle with a sharp knife, and pour suitable soil into the resulting container and sow seasonal flowers.
Necessary materials for making bright crafts from plastic bottles in the garden
- plastic container with a lid, 3 or 5 l – 1 pc
- plastic two-liter bottles with caps – 4 pcs
- black buttons – 2 pcs
- medium wire – 30 cm
- universal adhesive for plastic – 1 tube
- Enamel for plastic surfaces, black – 20 g
- pink spray paint – 200 g
- brush
- construction knife
- marker pen
Step-by-step instructions for a workshop on creating useful crafts for the garden from plastic bottles
- Thoroughly wash all necessary plastic containers with a non-aggressive cleaning agent and dry them dry.
- On the largest container with a felt-tip pen, make a sketch of the location of the ears, tail and paws of the future piglet.
- With a well-honed construction knife, cut neat holes in the plastic for the ears, round holes for the paws and pierce a small hole in the bottom to securely fasten the tail.
- From dry 2-litre bottles, cut off the upper flared part with the cap diagonally. Insert these parts into the holes for the legs cut in the large bottle. So that they hold tight and the figure is stable, pre-lubricate the paws with plastic glue.
- Cut out two triangular pieces from the remains of one of the 2 liter bottles. They will serve as the ears of the future piglet. Lubricate them at the base with a thin layer of glue and carefully insert them into the slots made in the front top of the large container.
- Twist a piece of wire into several perky curls and fix it in the hole cut in the bottom of the “body”.
- Glue the buttons on the places marked as eyes. Leave the structure for a while so that the glue dries and all the details stick to the right places.
- Open a can of pink paint and tint the product evenly on all sides.
- When the tint layer is completely dry, take a thin brush, dip it in black paint and draw all the necessary details, in particular the hooves and snout (if desired, you can make a few spots on the back and add a smiling mouth and eyelashes to the piglet).
- Dry the composition at room temperature and place in a suitable place in the garden, for example, in the area of \u200b\u200bcucumber or cabbage beds. A bright and cheerful plastic pig will look very impressive against the background of dense, juicy greenery and will immediately attract the attention of relatives, friends and acquaintances who come to admire the site.

Plastic bottles are not just a container for water, but also an excellent material for creativity and. Some craftsmen manage to make something out of them that is difficult for many to imagine. All you need in this business is the actual material, scissors, sometimes paint, glue and free time. Also, it would not hurt to turn on creativity and stop looking at the container from under your favorite soda as an ordinary thing. So let’s get started!
Planter piglets
This craft is easy to make, so that’s where we start. In this, you can plant flowers for the summer or use piglets as. This will revive anyone, especially children will be happy with this creation.
Tools and materials:
- 5 liter plastic bottle. Their number is according to the number of piglets that will be created. 1 container – 1 pig.
- Sharp knife, most convenient for stationery.
- Bottles – 0.5 l or 1.5 l, 4 pieces per piglet.
- Glue.
- White enamel and red or pink paint.
Manufacturing sequence
The container must be rinsed and dried, and if there are labels on it, they must be removed, as they will interfere. If you decide to make a planter, then cut a hole in the upper part so that there is where to plant flowers and pour earth. If you are creating a garden sculpture, skip this step.
The smaller bottles will be used to make the legs. They need to be cut from the neck by 10-15 cm or to the length that is needed.
Tip!
The more hooves you make, the higher the piglet will be. Moreover, the containers should be selected of the same volume so that the limbs come out even and beautiful.
Tip!
In order to make it more convenient to glue the legs, cut each neck in the widest place with a fringe and bend its edges.
Now the important task is gluing. To do this, you can use:
- Moment glue.
- Glue “Titan”.
- Thermal gun. It is most convenient to work with it, although the plastic can be deformed from hot silicone, so it should be handled with extreme care.
Tip!
It is more convenient to glue two limbs, since after applying the adhesive, they need to be held for some time for high-quality bonding. Use glue according to the instructions.
After everything is dry, you can cut out the ears, they will be from the same material as the whole piglet. It is convenient to cut them from the lower parts, as there is a factory bulge there. The shape is natural, the size is arbitrary. For ease of gluing at the bottom, you can also make a fringe – like on legs.
Note!
It is most convenient to glue if you are making flower pots. The cuts in this case must be glued to the container from the inside with the same composition.
Now the creative stage – painting. Natural color – pink
, but you can use another if you wish. Experienced craftsmen advise using it, it fits well on plastic and is more durable. You need to tint only on the outside, but carefully so that the color of the bottle does not shine through. It is very convenient to hold the lid-piglet. Do not forget to cut and glue the tail, it is also made of plastic, it is more convenient to paint it before gluing. Eyes can be drawn or bought, these are sold at any sewing store.
Important!
If the piglet will be used as a flower pot
, it is necessary to make holes in the lower and side parts for the free outflow of water.
Fly agaric for decorating the garden
A detailed master class on making fly agaric from bottles – on the video:
It would seem that a plastic bottle is such an ordinary thing, but once it was worth its weight in gold – our grandparents carefully put precious containers on the balcony to use instead of a milk can or a jar for storing compote. Now PVC bottles are a dime a dozen, so humanity has become thoughtful, because soon there will be nowhere to step because of plastic containers. How to adapt all this abundance of plastic for the benefit of the business? The most amazing ideas using the costs of the food and chemical industries are floating islands and huge installations, residential buildings and energy-saving systems created from a lot of waste plastic containers. We invite you to join the global plastic bottle boom. Evaluate the original garden crafts from used packaging that we offer you as an ideological basis for further creativity on the way to creating an amazing and unusual country design.
The burning problem of all summer residents is the laying of a house and ancillary buildings on a garden plot in a small plot of land and limited funds. In addition, the seasonal purpose of the dacha does not imply the construction of capital buildings “for centuries.”
So, the enterprising people decided to use a prosaic plastic bottle as a building material. The walls of houses, gazebos, greenhouses, and other garden structures are laid out traditionally – in a checkerboard pattern using cement mortar, only instead of brick, unnecessary plastic containers filled with sand are used.
To maintain this not quite familiar eco-style, you can make a variety of crafts from bottles for the garden so that the design of the site is decided in a unified way. Let’s take a closer look at how you can make your life easier and more comfortable with the help of PVC containers.
Country house
Despite the apparent simplicity of building a building from plastic containers, there are some nuances that you need to consider if you decide to build a country house with your own hands. Here are a couple of useful tips:
- Lay a reinforcing mesh between the rows of masonry – the adhesion of the mortar to the surface of the bottle will improve.
- Do not forget that plastic does not come into contact with cement, like brick, so make small holes in the container – this way the mortar will begin to interact with the sand inside the bottle and the wall will become stronger.
- During masonry work, secure the bottles with string or wire to keep rows from moving apart.
Please note that plastic tends to break down under the influence of frost and heat, especially from temperature changes, so be prepared that after some time – 5-10 years, the walls of the building will begin to “countdown”.
Using PVC bottles as a building material, you can build an economical house in the country
material, as it turned out, can be used for roofing. We offer you two options for a roof made of used PVC containers:
- Plastic tiles.
This simple roofing material requires plastic bottles to be pressed together. If this process is carried out without light heating of the plastic, then the containers will simply crack, so the easiest way is to put the raw material in the sun and then flatten the containers. Installation of PVC modules is carried out with conventional self-tapping screws to the frame with laying the material in several layers. From such tiles, you can easily form a cone-shaped roof for a gazebo or bath. - Plastic slate.
It is easy enough to make something like a slate roof covering from the cylindrical part of a plastic bottle. To do this, it is necessary to cut off the bottom and neck from the container, cut the middle part of the container lengthwise and in half, connect the resulting PVC elements with glue, forming a wavy surface.
If you decide to build a house of wood, brick, or there is already a residential building in your summer cottage, pick up a plastic bottle, show your imagination – decorate the facade with an unusual decor made of plastic corks. Complex geometric patterns, floral patterns or slightly naive “cartoon” animals – choose for yourself any style that suits your spirit.
It is quite affordable to make a roof for a summer house out of plastic bottles – either in the form of tiles or similar to slate.
Arbors, greenhouses, pergolas
The most rational use of plastic bottles for a garden is not only crafts designed to decorate it, but also more significant things, such as greenhouses or. Why buy expensive polycarbonate for building a greenhouse if the PVC from which the container is made is practically the same material?
Why equip a greenhouse with even more expensive glass than laminate if there are unnecessary bottles? By refracting the sun’s rays, PVC packaging performs the same tasks as glass with polycarbonate, moreover, it is the most economical option for building a greenhouse that you can find.
An economical option for arranging a gazebo or greenhouse in the country – building from plastic bottles
If you are bored with the traditional rectangular gazebo, make it in the form of a hemisphere using a metal frame and plastic bottles
Once you’ve built a frame out of wood or metal, equip yourself with a red-hot knitting needle, a drill, or a hammer and nails. In one of the ways, make holes in the bottom and cork of a plastic bottle and put plastic vessels on a fishing line or wire, the length of which will be slightly more than the height of the building. Stretch the resulting elements and fix them on the crossbars of the frame – this is how you will form the walls of the greenhouse or gazebo. Additionally, you can fix the vertical modules in the transverse direction by tying the bottles within one row with wire. Using containers of different colors, try to create some kind of ornament – this is how you diversify the colorless mass of walls made of transparent plastic.
What else can you build with plastic bottles for your garden? The most easily erected version of a small architectural form from plastic bottles in the garden is a lightweight gazebo, which usually serves as a frame for climbing plants. However, despite the fact that in spring and summer the structure of the pergola will be hidden by weaving roses or ivy, in winter its frame will be exposed and will not look very good. To avoid this phenomenon, you can ennoble the design of the pergola with plastic bottles of a natural shade – brown or green. The brownish colors of PVC vaguely resemble wood, and the grassy ones will enliven the appearance of the garden in the cold season.
Fences, railings, gates
You can save a lot of money if you use plastic bottles for arranging a garden fence. Using the same principle that was described in the construction of the gazebo, instead of corrugated board, chain-link mesh or polycarbonate, use plastic containers to fill the space between the fence posts.
A little creativity and diligence – the border of your garden will become not only impassable, but also extravagant, attracting attention. If the fence has already been erected before, a new sound will be given to it by a floral decor made of plastic bottles – the most natural option for a garden.
Build a fence using the same containers to support the summer house out of plastic bottles for the integrity of the landscaping
Multi-colored flowers carved from plastic bottles will refresh and decorate an old fence or summer house building
Car shed
The eternal problem of car owners is the allocation of space on the land for parking a car or several vehicles – bicycles, scooters or ATVs. Not always the project of a compact private or country house involves a room for a car, so it becomes necessary to build a detached garage or shed. The construction of these structures is expensive and many cannot afford, so the car is standing under the scorching sun, open to winds, rain and snow. Ordinary plastic bottles come to the rescue in this situation – junk, useless containers that allow you to experiment without fear, without fear of spoiling the building material. If something does not work out and the bottle becomes unusable, you can always take another one and not lose a penny.
It will also be useful material on parking options for a car in the country:
 Ordinary plastic bottles come to the rescue in this situation – junk, useless containers that allow you to experiment without fear, without fear of spoiling the building material. If something does not work out and the bottle becomes unusable, you can always take another one and not lose a penny.
It will also be useful material on parking options for a car in the country:
A carport made of plastic bottles will not only fulfill its immediate function, but will also bring an original accent to the country landscape
will create a protective plane from precipitation, sun and, at the same time, decorate your garden. There is nothing difficult in forming a canopy from bottles – it can well be made by hand.
First, you need to make through holes in plastic containers, or rather, it is best to burn them with a red-hot rod, and then put the bottles on a fishing line, rope or wire, connecting them in rows. Between themselves, the sequences of bottles are fastened with perpendicular bonds by means of another pair of holes and the previously selected material for “firmware”. Thus, a movable surface is obtained, resembling a “bottle cloth”, which remains to be attached to a metal or wooden frame using hangers of different lengths to create a wave-like effect.
Important to know! Considering that a plastic bottle is a kind of lens that refracts light like glass, it is advisable to paint over the bottom of the container to block direct sunlight.
Useful devices for the garden
Solar collector
Surely you have come across the fact that there is no central water supply in the country house, you did not have time to get a boiler, and after a hard day of caring for the garden, you really want to take not an ice shower, but wash yourself with warm water . We suggest you try to make a summer shower for your site with an energy-saving system – a solar collector made of PVC bottles. The principle of operation of such water heating is based on the so-called “thermosyphon” – denser hot water moves up, less dense cold water moves down. The developer of the system, a Brazilian engineer who received a patent for the invention, claims that 1 m 2 of the solar panel will be enough to bathe 1 person.
From plastic bottles you can assemble a solar panel and forget what ice water is in a summer shower
plastic bottles:
- 2-liter plastic bottles – 60 pcs.;
- 1 liter milk cartons – 50 pcs.;
- PVC pipe 100 mm – 70 cm;
- PVC pipe 20 mm – 11.7 m;
- PVC corner 20 mm – 4 pcs.;
- Tee 20 mm PVC – 20 pcs.;
- Plugs 20 mm PVC – 2 pcs.;
- PVC adhesive;
- Black matte paint;
- Brush;
- Emery;
- Scotch;
- Rubber mallet, wood jigsaw.
Plastic bottles must be cut off at the bottom and inserted into one another. 100 mm PVC pipes are used to form a rectangular solar panel frame, 20 mm pipes are cut into 10×1 m and 20×8.5 cm sections and assembled into a single structure using tees. One meter long pipes and milk bags are painted with black paint, which are placed under the bottles to improve heat absorption.
Plastic bottle solar panels must be located at least 30 cm below the water storage tank on the south side of the wall or roof. To optimize heat absorption, the panels must be installed at an angle calculated as follows: add 10° to your latitude. It is recommended to replace plastic bottles in panels with new ones every 5 years, as after a while the plastic becomes opaque, and this reduces its thermal conductivity.
Another energy-saving idea “sailed” to us from hot Brazil called “1 liter of light”. The essence of this engineering thought in terms of how to illuminate a room without windows on a sunny day is striking in its simplicity – it is enough to hermetically integrate a plastic bottle into the roof – but not empty, but with water. It is water, refracting the rays of the sun, that will fill the room without natural light with bright light.
Filling a plastic bottle with water and cutting it into the roof of the house, you will always have a bright source of light in rooms without natural light
Growing and watering plants
Plastic bottles will be useful in the garden not only for buildings or decoration, but and directly in the cultivation of plants, flowers and vegetables. By cutting a hole in the container and filling it with earth, you can use a plastic container for growing seedlings. Just don’t forget to drill holes in your new pots for drainage and take care of water drainage.
Glue corks to a plastic bottle and you will get funny little people instead of boring seedling pots
Pots for growing plants can be given a little color by painting them with stained glass paints or decorating with bottle caps. If your dacha is small in size – try to create vertical gardening – hang plastic pots from bottles on a fishing line under the wall. So you decorate a deaf, inexpressive plane and save space.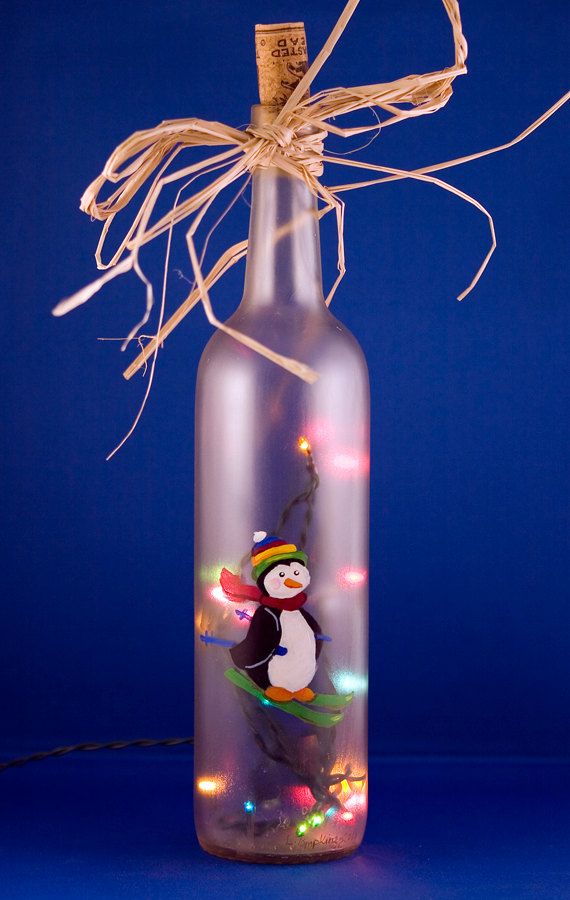
To create pots for seedlings and flowers, not only plastic bottles from drinks are suitable, but also multi-colored containers left after using household chemicals
Make multiple holes in a plastic bottle – this will allow you to get a device for Drip Irrigation
PVC bottles also come in handy in the process of watering the garden, if you poke miniature holes in the bottom of the bottle and attach the container to the hose, you will have a good tool for drip irrigation. Equipping a home-grown bottle water sprayer with wheels from an old baby car or stroller, you can move the watering machine around the garden.
Furniture for the garden and at home
A lot of trouble for summer residents is the maintenance of furniture in the garden house and on the street – the constant proximity to the ground negatively affects the appearance of sofas, beds and armchairs. Having built country furniture from plastic bottles, you will forget about what a sloppy upholstery is, which is so hard to put in order outside the city, away from service and dry cleaners. The containers and corks themselves are a unique material for the production of furniture with your own hands – durable and easy to clean.
Plastic bottles can be used to assemble quite practical furniture for the garden and at home
Chairs and a table for summer cottages made of plastic corks – this is an economical solution for outdoor furniture
foam padding and covered upholstery fabric
A couple of dozen plastic bottles, a metal frame – and a comfortable chair for the garden and cottage in front of you
Garden lamps
Lighting fixtures for the garden plot is another cost item that gardeners often ignore. With a plastic bottle, the lighting problem is solved in a minute. Take a colored canister from household chemicals, cut off the neck and fill the cartridge with a light bulb inside – the dacha lamp is ready. Create a more complex ceiling configuration by deforming plastic bottles by heating, melting the edges and painting in different colors. Original lamps made of PVC containers will perfectly replace industrial analogues, as well as decorate your home and garden.
In order to create an original design for dacha lamps, it is enough to paint them with stained glass paints or slightly deform them
Unusual street lamps for dacha can be made from plastic bottles – both electric lamps and candles serve as a source of light in them
plastic bottles
When creating garden decorations from plastic bottles, everything is used – the whole container, the bottom and neck, the middle part and cut out fragments, and corks are especially popular. They make a very expressive decor for the garden – paths and decoration of empty planes of the house or fence. Another unforgettable decoration of the site can be installations made of PVC containers – three-dimensional and planar figures of animals and plants. Flowerbeds and borders that limit the planting of different types of flowers can be successfully made from the same plastic container.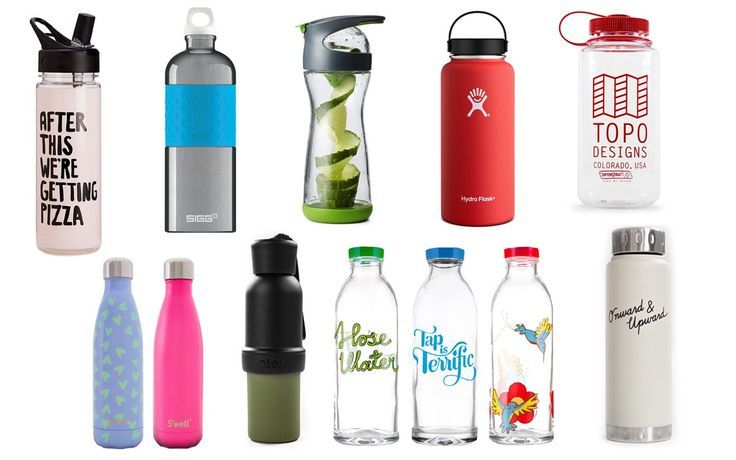 And so that your ears are always delighted with the singing of birds, hang feeders and drinkers for birds made with your own hands from PVC bottles on the trees.
Multi-colored corks from plastic bottles are an excellent material for creating planar compositions in the summer cottage landscape.
Examples of flower beds arrangement. A special “cutting” of the flower bed is given by low borders that outline its shape and complete the flower arrangement.
In the absence of stone or brick, traditionally used to form a border, bury plastic bottles upside down along the border of the flower bed – you will get a simple fence for flower planting. A good solution for the shady areas of the garden plot, where nothing wants to grow – the original flower beds made of PVC containers, various in shape and color.
equip with a flowerbed of plastic bottles of shadow or swampy zones of the garden
A small flowerbed in the form of a ladybug looks bright and unusually
Plastic bottles of green color are perfect when forming a border for a flowerbed
Garden tracks
The issue of laying garden paths is always difficult – and you need to strengthen the soil, and buy decorative material – as a result, a considerable amount is obtained. And you don’t want to walk in the mud. While you are accumulating money and looking at the pavement for the tracks, we offer you a temporary option for arranging them at minimal cost. Fill the paths in the country with a thin layer of cement mortar and immerse plastic bottle caps in it – due to the corrugation along the side plane, they will be well fixed in the building mixture.
A prosaic cement path can turn into a picturesque panel thanks to multi-colored plastic covers
Decorative installations
A quite popular trend in decorating a garden landscape is the creation of three-dimensional installations from various improvised materials, including plastic containers. However, here you need not just some skill and patience, because you need to lay out either whole containers or parts cut out of them according to a certain pattern.
The most expressive decor for a garden landscape is volumetric installations from plastic bottles
We suggest you make a not very complicated installation of plastic bottles in the form of a Christmas tree in your country house. Although the New Year is still far away, as they say, prepare a sleigh in the summer – think about it in advance. Of course, the Christmas tree is the main attribute of the winter holiday, without which it is impossible to create a truly upbeat, New Year’s atmosphere. What if there are no coniferous trees on your site, and you do not welcome traditional logging on the eve of the New Year? An excellent solution in its simplicity and environmental friendliness is the creation of a Christmas tree from plastic bottles.
The basis of such a composition is a rigid rod, to which the bottles can be hung or put on a wire and wrapped around, create tiers of circles, tie or install auxiliary supports and form a tent tree shape.
It is not necessary to make a Christmas tree from standard green plastic bottles – it can be assembled from containers in any shade. The bottles themselves can be deformed, melted, painted in unusual colors – in general, there is room for imagination and ingenuity to roam. Do not discount bottle caps either – they will make unusual garlands and miniature decor.
By the way, the Christmas tree does not have to be hidden or dismantled for the summer season – if you choose the conical shape of the tree, then the internal space of the structure will serve you on hot days as a gazebo or become a place for children’s games. From used green sprite bottles, you can make a miniature Christmas tree for the house, you just need to cut the curved planes of plastic containers with “noodles” and stick them on the base.
Feeders and nests for birds
One of the types of garden decor that combines many functions – feeders, nests and drinkers for birds. A feeder made with love will decorate the garden and attract birds – they will repay you for your kindness with cheerful chirping, destroying garden pests at the same time.
Create nests, drinkers and bird feeders from plastic bottles and paint them in natural colors
Bird nests and feeders will be a useful decoration for your garden
Decor for a country interior
to create an extravagant interior design of a country house.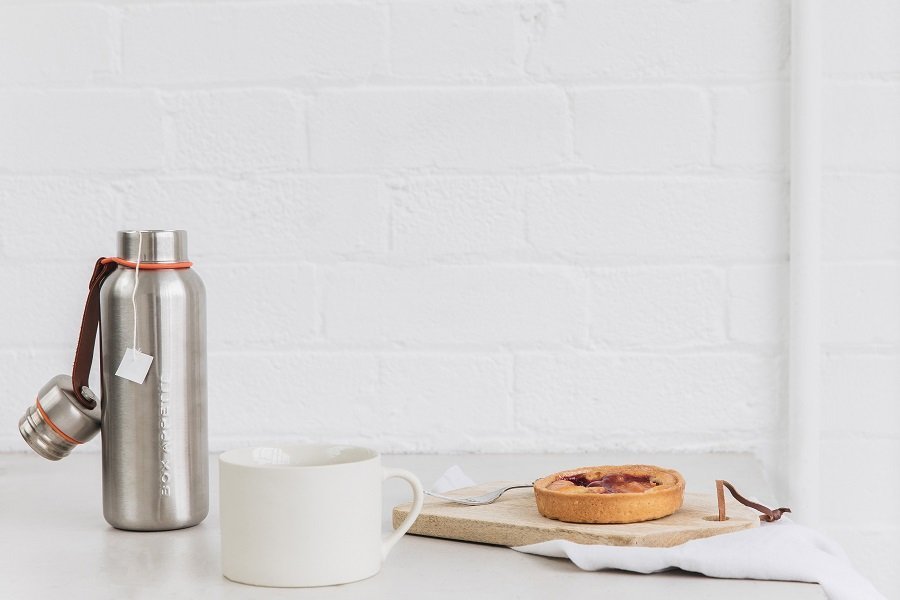 Bright panels for walls and furniture, partitions and screens, even curtains – you can do all this yourself from PVC containers. Such decorations for the home look quite original and original, at least you won’t see anything similar in anyone else’s. Putting your soul into decorating a country house, you will enjoy both the creative process and the results of your imagination, combined with skill.
By cutting the bottoms of transparent plastic bottles and connecting them with a thin wire, you will get air screens for dividing the space of a country house at home in all shades of the rainbow plastic bottle caps will help you
Entertainment, recreation, games in the country
Playgrounds
Playgrounds on the land are not only a pleasant thing for organizing leisure time, they are also a certain element of garden decor. Bright swings and slides, mini-golf courses and fabulous houses will create a pleasant atmosphere for a child to stay in the country.
Plastic bottles will help separate the area for children’s games, as well as serve as a base for creating interesting toys
Arrange a croquet field in your country house, and make a gate out of plastic bottles
Boats and crafts
There must be a river or a lake near your garden. If so, then your vacation on the shore of the reservoir will become more exciting if you have a means of transportation on the water. Getting to a deserted island, going on a boat trip or fishing – nothing is easier when you have a boat. You can easily build this simple transport from plastic bottles.
A narrow boat similar to an Indian pirogue with a capacity of 1-2 people or a larger boat for 3-4 passengers – there are a lot of options. The simplest watercraft is a rectangular raft, from which it is convenient to fish, having sailed a little from the shore.
Plastic bottles will make a boat or raft that is quite stable on water
To make a boat in the form of a kayak, cut the bottom of the bottles, insert one into the other one after the other and form something like long tubes.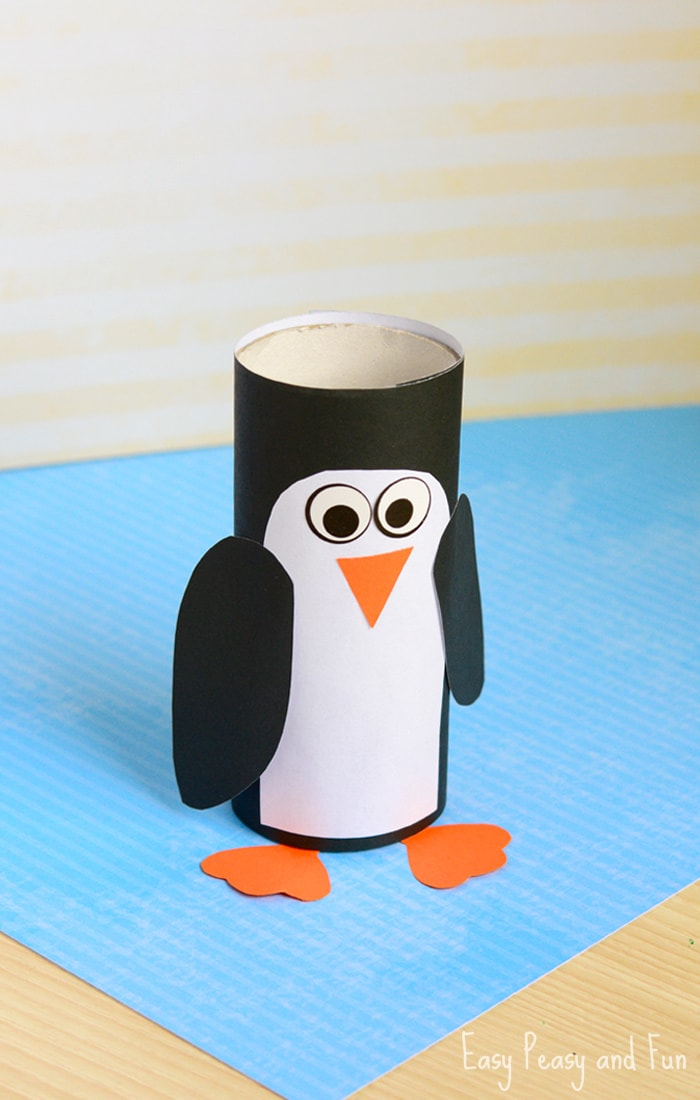 Glue the joints with furniture tape – it is wide and will not peel off when in contact with water. From separate tubes, connecting them together, glue the sides and bottom of the boat with the same adhesive tape to get a wedge-shaped shape. Here it is important to correctly calculate the ratio of the width of the vessel and its height – trial launches and a little engineering will help you to turn a mountain of unnecessary containers into a useful thing.
A non-trivial approach to decorating a pond in the country – delicate daisies from bottles on the surface of the water
A more complex design for a boat for the whole family, which involves connecting vertically standing bottles in two rows and additional sealing of the ship’s hull with bags. Nothing prevents you from installing a motor on the boat, which will significantly improve its driving performance and range. So, using the unsinkable properties of plastic bottles, from which, by the way, entire islands are built in Japan and Taiwan, you can surf the surrounding water bodies with breeze and comfort.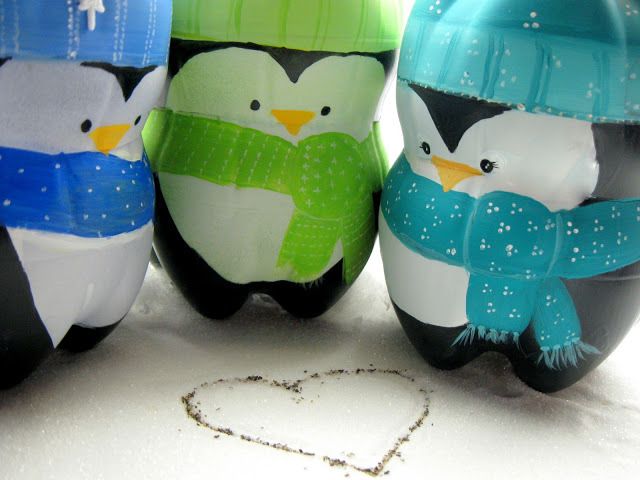
Haven’t you got the idea of the plastic boom yet? Do something extraordinary for your garden and you will not have time to look back, as you will immediately join the ranks of admirers of a plastic bottle.
Summary:
DIY crafts from plastic bottles for children. Crafts from plastic bottles to give. Crafts from plastic bottles for kindergarten, photo. Flowers from plastic bottles. Craft ideas from plastic bottles.
What can be done with plastic bottles? In this article, we will tell
you what crafts from plastic bottles you can do with
children with their own hands. Plastic bottles – a versatile material
for making crafts. We will tell you how to do:
Vases from plastic bottles
Crafts for gardening from plastic bottles
– crafts for the garden from plastic bottles
1. Crafts from plastic bottles. Toys
from plastic bottles
Plastic bottle catamaran
By taping two plastic bottles together with duct tape, you can
make a toy catamaran for dolls.
Plastic bottle craft for kids
– the fountain
On a hot summer day, there is no better entertainment for children,
than outdoor water play. From an ordinary plastic bottle
you can make an educational toy for
experiments and games with water in the country or on the beach.
Use a sharp object to make a few
holes. In the photo below, the holes are made in the center of the bottle, but,
in fact, it is better to place them at the bottom of the bottle. In this case it will
use the maximum volume of water from the bottle. Plug your palm
holes and fill the bottle to the top with water. Screw on the lid. take away
hand with holes. Surprisingly, the water does not pour out of the bottle through
holes.
Now unscrew the lid a little and you will see how the water starts to pour out
through the holes in the bottle. It’s coming through the neck of a plastic
bottles, the air displaces the water from the bottle.
This toy can be used as a washstand in the country.
Plastic bottle crafts for kids
in papier mache technique.
Plastic bottles can be used to make fun crafts for kids
in papier mache technique. Boys, for sure, will be interested in homemade
an airplane from a plastic bottle, and girls can make a whole homemade
zoo.
The principle of making toys from plastic bottles using papier technique
move next. First, from cut and whole bottles, it is made
frame of the future crafts. Everything is held together with tape. Cut out of cardboard
and additional parts are also attached with adhesive tape or electrical tape.
Then tear or cut the paper into small pieces.
It can be either regular paper for printers or special paper.
corrugated paper for children’s crafts. Dilute PVA glue with water
in a ratio of 1:1. Then, dipping each piece in diluted
glue, attach it to the bottle frame. So cover
your craft with 4-6 layers of paper.
When the glue is dry, paint and decorate your plastic
bottles.
How to make a plane out of plastic bottles >>>>
DIY plastic bottles. Cow >>>>
Children’s crafts from plastic bottles. Tropical fish >>>>
Children’s crafts from plastic bottles. Crocodile >>>>
And a few more links to master classes on making crafts from
plastic bottles for children:
2. DIY plastic bottles. Plastic vases
bottles
The easiest way to make a vase out of a plastic bottle is just
cut off the top of it and decorate. At the same time, it is desirable to
use an iron to round off the edges of a homemade vase. So it will be more beautiful
and safer.
To round off the edges of a plastic bottle vase, put
a sheet of paper on top of it and bring a hot iron (paper is needed for
so that the plastic does not stick to the soleplate). Sharp edges of the bottle
round off from high temperature. Caution – bring the iron for a short time
and constantly check what is being done under the paper. Link >>>>
We would like to invite you to make a creative craft vase. For its manufacture
you will need some plastic bottles. you can use
one large bottle (1.5 liters) and 4 small bottles (0.5 liters).
To make a vase from plastic bottles, you will need glue
for plastic or glue gun. Instructions for making a vase
from bottles, see the link >>>>
You can make a cute felt case for a plastic bottle.
Insert the bottle inside the case – a vase from a plastic bottle is ready!
A beautiful, “airy” vase from a plastic bottle can be
to do if you first hold the cut bottle over the fire to
give it shape. After that, make numerous holes in it.
soldering iron. Only food products in it is still better not to store!
And one more idea how to quickly and easily make a vase from a plastic bottle.
3. Crafts from plastic bottles photo. Flowers
from plastic bottles
Making flowers from today’s most diverse materials
is one of the most popular types of crafts and needlework. From ordinary
plastic bottles can make original artificial flowers
with your own hands.
Detailed master class on making flowers from plastic bottles
see link >>>>
To make this craft from plastic bottles, you, in addition to
plastic bottles of different colors, you will also need a candle and glue
pistol. However, instead of a glue gun, you can simply use
glue. Attention! Be extremely careful when working with fire!
A separate instruction on how to make flower stems from plastic
bottles can be found here >>>>
To do this, you need to cut a plastic bottle in a spiral to get
narrow strip of plastic. Then twist it over the fire.
4. DIY plastic bottles.
Boxes and boxes made of plastic bottles
Take two bottoms from plastic bottles and glue between them
zipper with a glue gun or glue for plastic. Wallet box
ready for the little things!
Bottle zippers can also be sewn on.
Decorate the box with a flower, also made from a plastic bottle.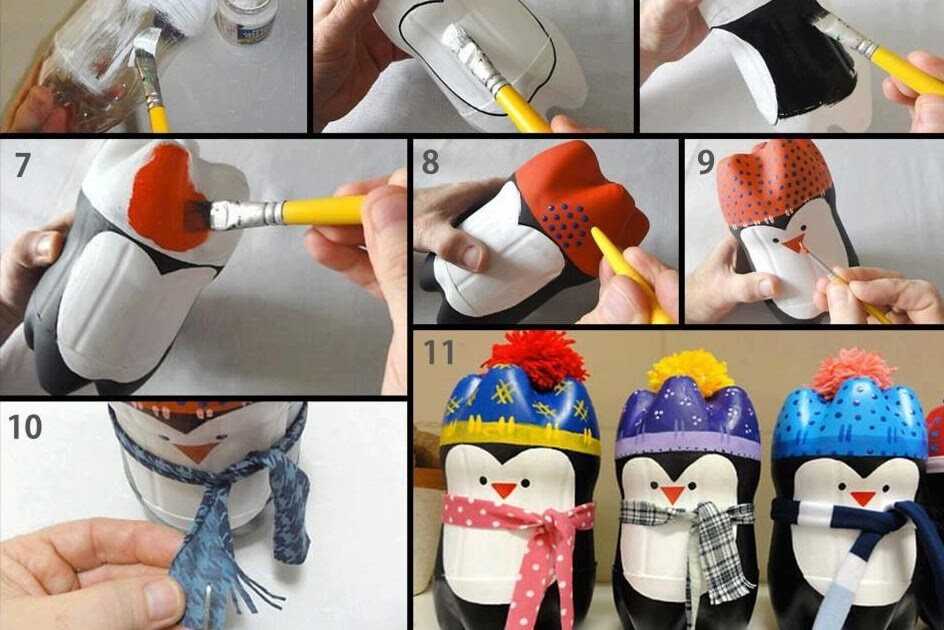
How to make flowers from plastic bottles, we told above.
A plastic bottle can be turned into a beautiful packaging box for
a small gift for a loved one.
Mothers or grandmothers who know how to crochet can make comfortable
and practical boxes of plastic bottles for storing children’s
books.
Detailed instructions for making this craft from plastic bottles
see the link >>>>
Link-2 >>>>
5. Crafts from plastic bottles master class. Plastic jewelry
bottles
Who would have thought that plastic bottles could be made into stylish
decorations! Bright, fashionable bracelets or delicate, airy necklaces.
Plastic bottle bracelets
Cut out a plastic ring of the desired thickness from the bottle. wrap
it with colored yarn or elastic fabric, glue it with lace or sheathe it
threads. Stylish, summer decoration is ready!
You can also buy inexpensive beads and attach them to a plastic ring
colored yarn.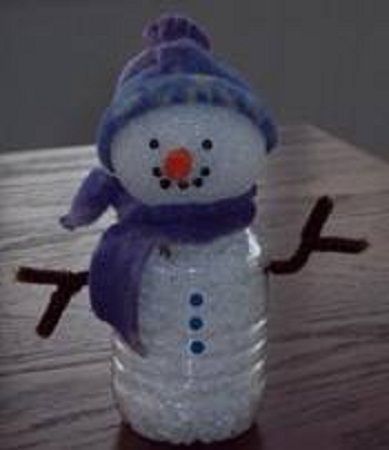
A detailed master class on making this craft from plastic
bottles, see the link >>>>
Above we talked about how to make flower stems from plastic
bottles. These beautiful spirals can also be used to make
decorations from plastic bottles.
From a plastic bottle, following the same principle as flowers, you can make
beautiful necklace. Cut out petals of various shapes from a bottle
and leaflets. Hold them for a short time over the fire to
they took shape. Put them on the line.
And the bottoms of plastic bottles can be used to make a jewelry stand.
For making this DIY plastic bottle craft
you will need, in addition to the bottles themselves, a threaded metal rod,
as well as nuts and washers.
6. Plastic bottle crafts for giving.
Crafts from plastic bottles to give
Bottom plastic bottles make beautiful decorative
apples and pumpkins. To do this, cut off the bottoms of two bottles and
paint them with acrylic paint, and then fasten them together.
You can do without paint by putting crafts from plastic bottles inside
corrugated paper cut into strips. Link >>>>
a very large number of bottles.
To make curtains from plastic bottles for your country house, you
it is necessary to cut the bottoms of the bottles and fasten them together with a fishing line
or silk thread. The bottoms of the bottles need to be cut along the edge so
in such a way that such blanks having the shape of a flower are obtained. The edges
such blanks can be slightly worked with sandpaper or singe
over the fire so that there are no hooks on the cut.
With an awl, heated over a fire, we pierce holes for threading
strings or threads. Knots fix the position of the blanks on the thread,
so they don’t bunch up. The work is painstaking and delicate, but such
the curtain does not require financial costs.
Here is another useful use of a plastic bottle in the household.
Useful handicraft from plastic bottles for giving – homemade broom.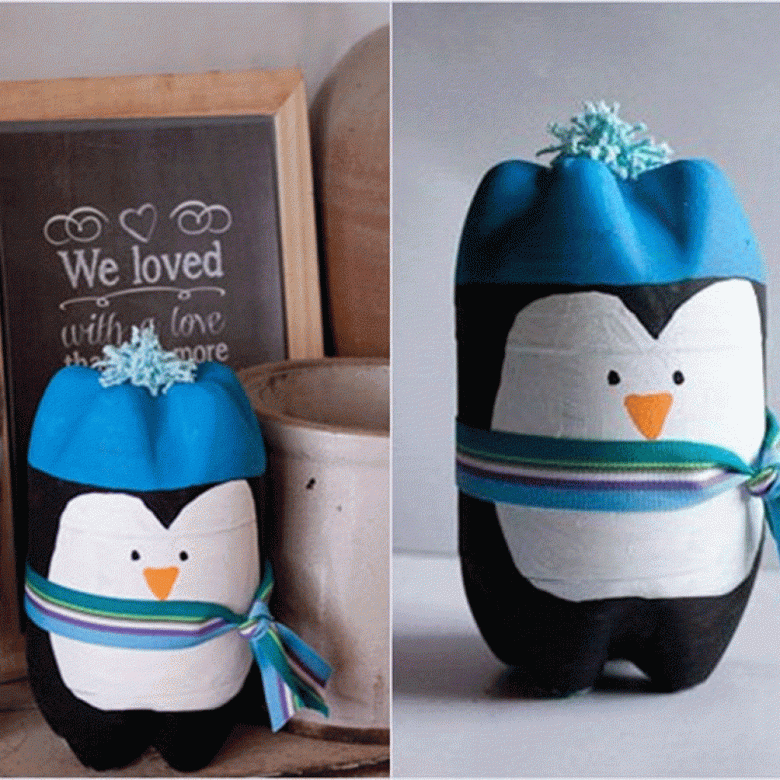
A broom made of plastic bottles is a necessary thing in the private sector, especially
during leaf fall.
7. Crafts from plastic bottles for children
garden
Material prepared by: Anna Ponomarenko
Other publications on the topic of this article:
Crafts from plastic bottles for kindergarten – ISaloni – interior studio, wallpaper salon
Content
Making crafts with children from plastic bottles 900 5 you can come up with a huge amount of entertainment, but we’ll talk about such leisure activities as crafts made independently from plastic bottles. There are many positive aspects here, one of which is the development of creative thinking in the baby, in addition, games can unite a child with an adult, since in this case they have common interests.
Everyone in the house accumulates a lot of unnecessary parts of food packaging, plastic bottles, plastic straws, corks and much more. All this sooner or later goes to waste. Few people think that all these products can be reused, thereby giving them a second life. One of the options is the implementation of children’s crafts of toys from plastic bottles. Children instantly learn this simple activity and manage to surprise not only their parents, but also loved ones.
From such bottles to make a variety of products, different in shape, color and size. Variants of examples: a vase, sprinklers, as well as various figures in the form of animals, birds, cartoon characters. For experienced “creators” you can stop at making flowers cut from bottles, stars, butterflies, “hats” for lighting devices and a variety of other products.
Flower vases from bottles look very original
Let’s consider several options separately. First, we will describe the execution of a delightful vase from a plastic bottle. The child needs to be helped in this matter, and entrusted with the independent implementation of some of the simplest elements.
If a lot of bottles have accumulated in the house, then you should not immediately throw them away, in the summer you can make an excellent raft from them. And for people living close to the reservoir, it will be a great opportunity to please both your child and others. The main rule is to never forget that all children’s games related to water must be under the close supervision of adults.
In addition to all of the above, you can make many other equally interesting products from plastic straws and disposable cups. Cut out muzzles, eyes, paws and tails from hard paper in different colors, and then glue them to the glasses. With the help of straws, you can make legs and arms. Thus, it turns out a lot of cute and funny little animals with which you can play or arrange performances.
Yogurt cups are also ideal for making finger-wrap cartoon characters. Draw muzzles, ears, eyes and everything else on paper, try to make the drawing look like the intended character. Cut out and glue onto an upside down glass. Add to the image “hair” made of threads, dress in an outfit made of fur or fabric. For a small child, playing with fingers contributes to the development of work with pens and imagination. You can also cut the straws with scissors and put them on a thread, you get beads or bracelets.
Read more: Peacock from plastic bottles
Do not forget about the other inhabitants of the house – animals. For them, you can also make a useful product, for example, a house or feeder from a bottle , in which the bird will live.
Watch the video: Bird feeder from a plastic bottle
You can launch a boat made with your own hands from plastic bottles. It will be interesting for a child to play with such a craft, especially if he is next to a pond. And the fact that he himself will take part in the manufacture will add even more attention to it.
To do this, you need:
– a bottle of plastic, 2 liters in volume
– three sticks of plastic or wood (one 15 cm long, the second 25 cm)
– multi-colored paper from a dense composition
– plasticine
– threads
See also: Crafts for the garden from plastic bottles
Step-by-step execution of a boat from plastic bottles:
1.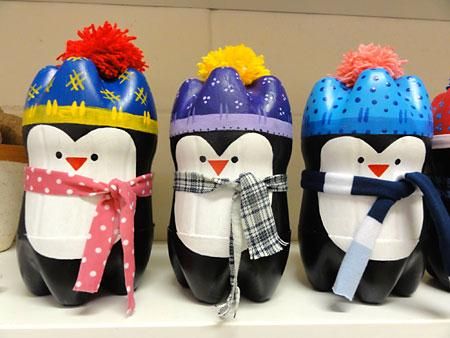 Cut the bottle, in appearance it will resemble the base of the ship
0030 3. Cut out sails from colored paper. One is 14 * 22 cm in size, and two are 10 * 8 cm in size. The first one can be in the shape of a triangle, and the rest can be rectangular.
4. Carefully, trying not to damage anything, cut out or make two holes with a hole punch, which should fit our sticks. They will be located at the top and bottom of the sail, and we string them on sticks.
5. We stick the resulting sails into the bottom of the boat (it is necessary to build on the rule – set the long mast in the middle, the rest along the edges).
6. Wrap with mast threads.
7. We make a test “launch” of the ship on the water to check how it stands. Add some plasticine if necessary.
8. Everything is ready. You can safely give the boat to a child, it can be used both in the bathroom at home and on the street.
Making crafts with your own hands using ordinary seemingly useless plastic bottles is not at all difficult. And the result is amazing and unique. All of the above is only a small part of what you can do with your own hands. Over time, making various products will become easier and much faster.
Children’s crafts made from plastic bottle caps
Children’s imagination knows no bounds: they can see a funny character in any banal object. And in order for the imagination of children to work at full capacity, it must be developed from a very early age, offering to make crafts from a variety of things.
Excellent soil for children’s creativity – corks from plastic bottles. They are distinguished by the brightness of colors and are easily glued to any surface, so they can be used to create a wide variety of paintings and figures. Children’s crafts from corks of plastic bottles delight the eye with their rich shades and are liked by the children themselves, because they turn out to be voluminous and interesting.
Children’s crafts from plastic bottle caps
Two types of crafts can be made from corks: three-dimensional figurines and toys and appliqué.
The simplest application made from plastic bottle caps is, of course, a caterpillar. It can be made in different lengths, different colors, complemented with a beautiful background and small details – in such work there is where to swing children’s imagination.
Cork caterpillar
The background can also be created from corks, for example, by gluing a sun and a flower together.
Landscape from corks
No less interesting are birdies made from corks: connect two corks and get the head and body of a feathered friend. Wings can be made from cardboard, fabric, and real feathers.
Cork birds
You can also make an application in the form of other animals:
rabbits with a pom-pom tail;
Cork rabbit
penguin;
Cork penguin
fish;
Cork fish
dogs;
Cork puppy
chicken;
Cork chicken
hare;
Bunny from prbok
a bird with a fluffy tail made of leaves.![]()
Leaf cork bird
Two white corks can easily make a cute snowman.
Cork snowman
It’s easy to make voluminous crafts from plastic bottle caps. For children, they will be even more interesting than applications.
It is enough to glue the heads of cotton buds and a fragment of an ice cream stick to the cork and you will get a cute turtle.
Cork turtle
And if you use pieces of chenille wire instead of cotton buds, you will get cute spiders.
Cork spider Cap spider
It’s easy to transform corks into ladybugs and bees by painting them with the right colors, gluing wings and antennae.
Coloring the cork Painting over part of the cork Gluing the eyes and wings Painting the red cork Drawing the back of a ladybug Gluing the eyes Insects from corks
And if you string a lot of corks on a fishing line, thread or wire, you get a charming rattlesnake.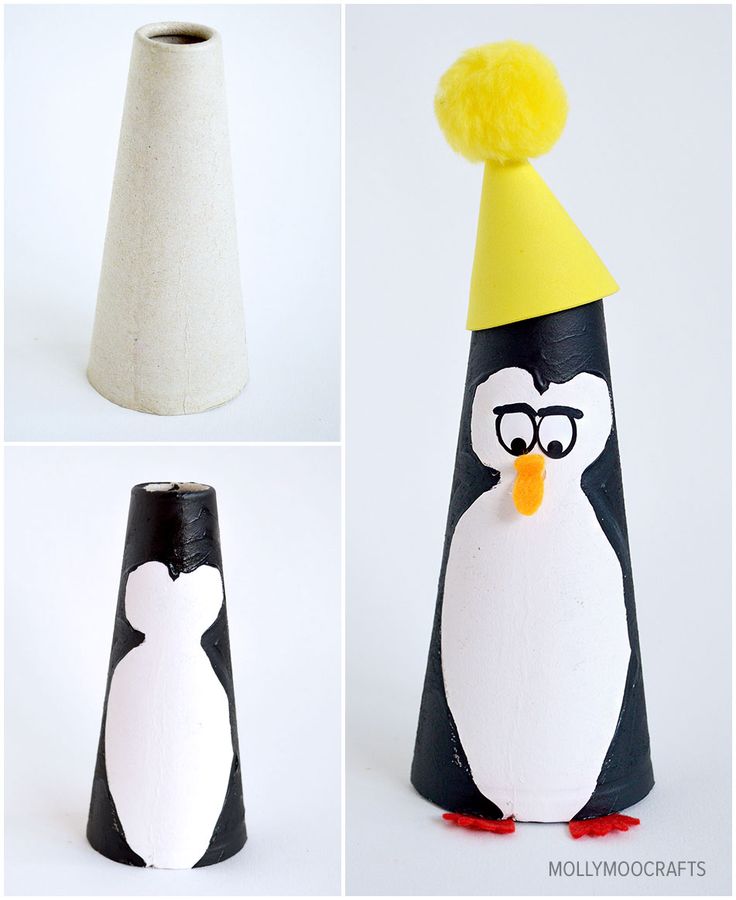 Her head can be made from a capsule from a kinder surprise.
Cork Snake
These various crafts are easy to make from a rather ordinary, and most importantly, affordable material.
Plastic bottled daisies | A SEA of creative ideas for children
How to make daisies – simple flowers from plastic bottles with your own hands.
Plastic bottle flowers
Flowers are beautiful and quite common crafts that you can make from plastic bottles with your own hands to decorate a garden, cottage, yard, and so on. Moreover, flowers from plastic bottles can decorate not only flower beds and front gardens, but even fences and gates. Unlike real flowers, they do not fade and do not require constant care, and unlike crafts made from traditional materials for creativity, they are not afraid of rain or hot sun.
Flowers from plastic bottles can be very different. The simplest and fastest option in terms of manufacturing time is chamomile.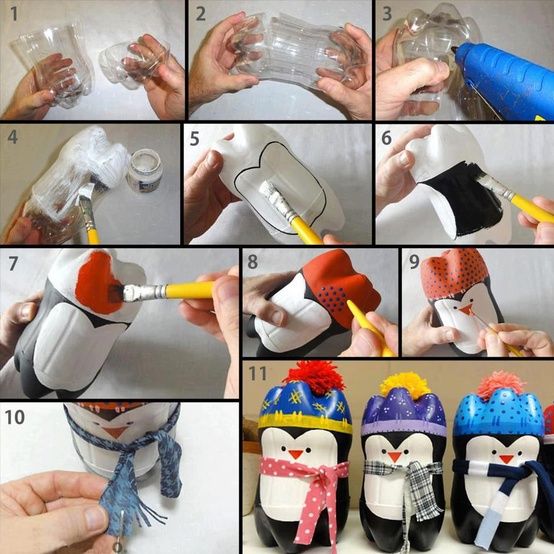 It is so easy to make them that even children can do this work. And how the garden plot will come to life when such elegant and pretty unfading flowers bloom on it!
Many thanks to Baturo-Lasitsky, Veniamin (6 years old), Maria (4 years old) and their mother Anna, who live in Minsk, Belarus, for the idea and master class for the summer creative competition. They called the work “Our Daisies”.
How to make chamomile flowers from plastic bottles with your own hands
Children and I decided to create a fairy tale from everyday life. It’s summer now. And our creations went to conquer the yard. Now, in addition to real daisies, we have also grown fabulous ones. My children – a son (6 years old) and a daughter (4 years old) were able to decorate our gate on their own. See what they got.
It all started with the fact that we had a lot of milk bottles. And from this material, I decided to show the children how to make crafts. I made the first flower myself, and they decided to make the rest themselves. And my help, to my surprise, was graciously refused.
Materials and tools
Materials needed:
- milky plastic bottles with caps
- scissors
Stages of work
- First, we cleaned the labels from the bottles and washed them.
- And then they cut off the bottom of the bottle.
- And cut the bottle lengthwise to the neck into the required number of sectors.
I rounded the ends, giving a resemblance to chamomile, and the children left it as it is.
And now the gate pleases the eye. We like to create with plastic. It has become our favorite material. Now let’s continue to please ourselves and our neighbors.
My eight-month-old daughter was the first to appreciate the craft.
___
I propose to look at other articles from the heading “Crafts for giving, garden, yard.”
© Julia Sherstyuk, https://moreidey.ru
All the best! If the materials of the site were useful to you, please share a link to them in social networks – you will greatly help the development of the site.
Placing site materials (images and text) on other resources without the written permission of the author is prohibited and punishable by law
.
Crafts from plastic bottles for summer cottages, gardens, gardens, kindergartens, schools with their own hands. Photo
Plastic bottles are means of unlimited space for the realization of creative ideas of adults and children. DIY crafts allow you to add originality, creativity and a positive mood to the interior of your home and garden.
Features of plastic as a material for making crafts
Features of the material are:
- Availability of material.
- Low cost (or free use).
- The pliability of the material (it bends, melts, paints, does not get wet).
- Keeps its shape (when not heated).
- Durability (plastic retains its properties up to 100 years).
- Large variety of shapes and colors.
- Non-toxic.
- Not eaten by insects, animals, birds.
- High strength and wear resistance (does not break down in water).
Advantages
The main advantage for man-made plastic crafts is a long service life without loss of original properties.
Also, a wide choice of colors, sizes, shapes of plastic dishes against the backdrop of a meager cost create ideal conditions for creative people.
Disadvantages
A small range of temperature stability is the main disadvantage of plastic. At negative temperatures in the cold season, plastic products become brittle, crack, break when pressed. Therefore, especially valuable products are recommended to be stored in heated rooms.
Materials and tools for working with plastic
To make neat and unusual crafts, you may need:
- accessories).
- Several types of scissors (large, manicure) for the convenience of cutting out details.
- A utility knife will come in handy if you have to cut canisters or cut bottle necks.
- Hammer, nails (for fixing some elements to wooden sticks).
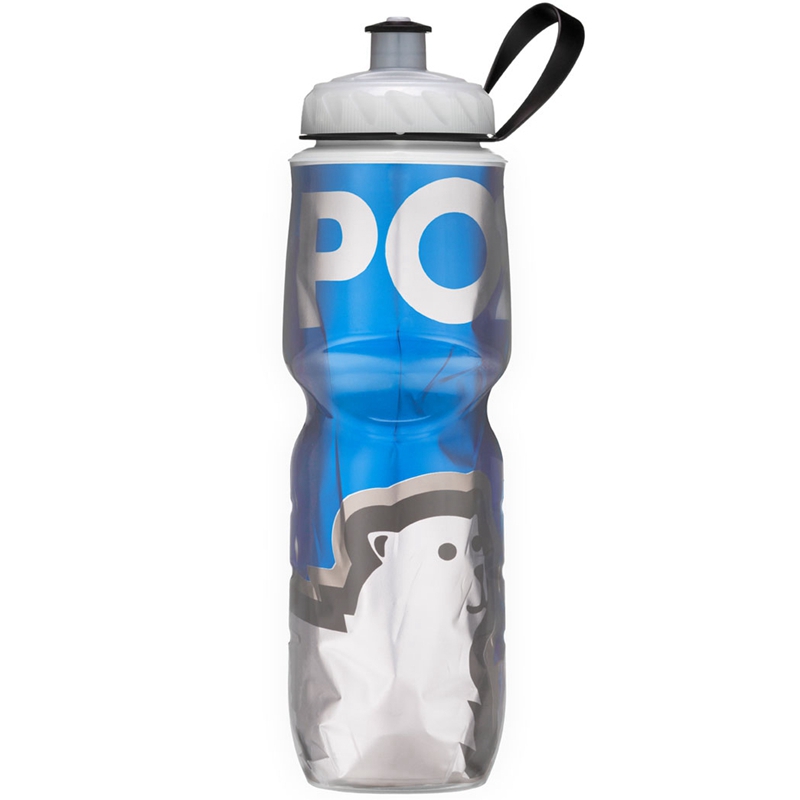
Standard set of materials and tools for making crafts from plastic bottles
- Candles, matches for melting the edges of plastic parts or giving the desired shape, as well as for making holes with a hot awl.
- The remains of wire, rope, fishing line are needed to fasten parts or fasten mustaches to figures in the form of animals.
- Washcloths are an excellent wig for voluminous figures (horse’s or donkey’s mane).
- Needlework eyes for small figurines when they are difficult to draw.
- Fast-drying paint – the main element for creating color.
- Glue is selected individually based on the author’s idea.
- Nail polish (transparent and not only) is an excellent substitute for paint in small crafts, such as butterflies.
- Felt pens or markers are needed for drawing cut lines on the plastic or for finishing body parts.
- Stapler and staples for fixing elements.
- Tape (if needed) and awl.
- Gloves for hand safety.
- May require a sewing kit.
What bottles can be made for kindergarten or kindergarten? Step by Step Instructions
Plastic bottle crafts are a great way to decorate a playground for toddlers in kindergarten.
Multicolored bottles can be used to make life-size flowers or cartoon characters from popular films. Children will be more than happy to explore and play with plastic characters, especially if they are the same height. Installing elements and characters of one cartoon on one site will allow children to plunge into a fairy tale and feel like the main participant in the events, like Alice in the “wonderland”.
Also, from jars of drinking yoghurts and other fermented milk products, children together with their parents create animal figurines, New Year’s toys, nesting dolls and other masterpieces for competitions in kindergarten.
Chamomile
A simple craft that does not require painting, but nevertheless looks very impressive in a full-length bouquet.
To make it, you need to have:
- Several white plastic bottles from kefir, milk, drinking yogurt, 1-2 l. (for petals).
- 3-5 yellow plastic or metal lids from a 3 liter jar.
- 2-3 green bottles (for foliage).
- 3-5 pieces of hard wire (to make flower stems).
- Glue and scissors.
- Green duct tape.
Process for creating daisies:
- Cut out identical ovals (petals) from the side walls of white bottles, along with part of the neck.
- Glue the petals with their necks to the inside of the yellow lids. Spread the bud so that all the petals are in the same plane. If desired, make a terry chamomile (if you make 2-3 rows of petals).

- From green bottles cut off the necks (3-5 pcs.) with a grip of 5 cm of plastic and glue to the yellow cap from the inside (creating a tapering green part of the bud, and then the stem will be inserted into the neck).
- Cut flower leaves from green bottles and attach them to the wire (stem). Do this with sticky tape.
- Wrap the wire (stem) with green electrical tape.
- Insert the stem into the neck of the bud (for a strong fixation it is worth wrapping more tape around the end of the stem so that it fits tightly into the neck of the bottle) and fix it with tape.
- Put the finished flowers in an outdoor vase or place them in a flower bed.
Penguin
Amazing bird figurines can be made from several bottles without cutting them, all you need is paint (black, white and red) and a few miniature hats (which are quickly created from children’s socks or sleeves of unwanted clothes).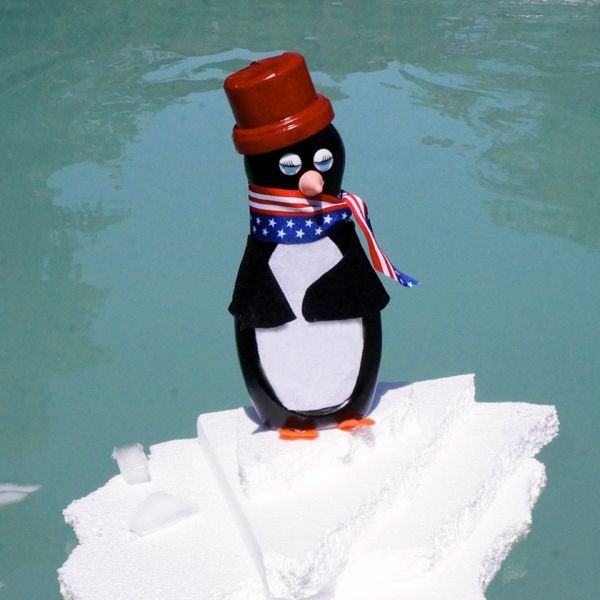
Steps for making a family of penguins for the street:
- Take 2-3 plastic bottles (of any color or colorless) with an isthmus.
- Use a marker to draw the wings and muzzle of the penguins.
- Paint most of the bottles black (back and sides of the birds), front – white.
- Let the paint dry and paint on the eyes and beak.
- Put baby socks or doll hats on the neck of the bottles.
- If desired, the penguin girl can wear red beads with an elastic band and a handbag (which is easy to make from a container from a chocolate egg, a piece of wire and red paint). A penguin boy will look beautiful if he is tied with a small tie or bow.
- It is recommended to fill the finished figurines with sand and place them on a platform in a flower bed, under a tree or near a garden pond.
Another option for making penguins from plastic bottles is suitable as a craft for a kindergarten competition. These crafts can be made by a child with a little help from an adult.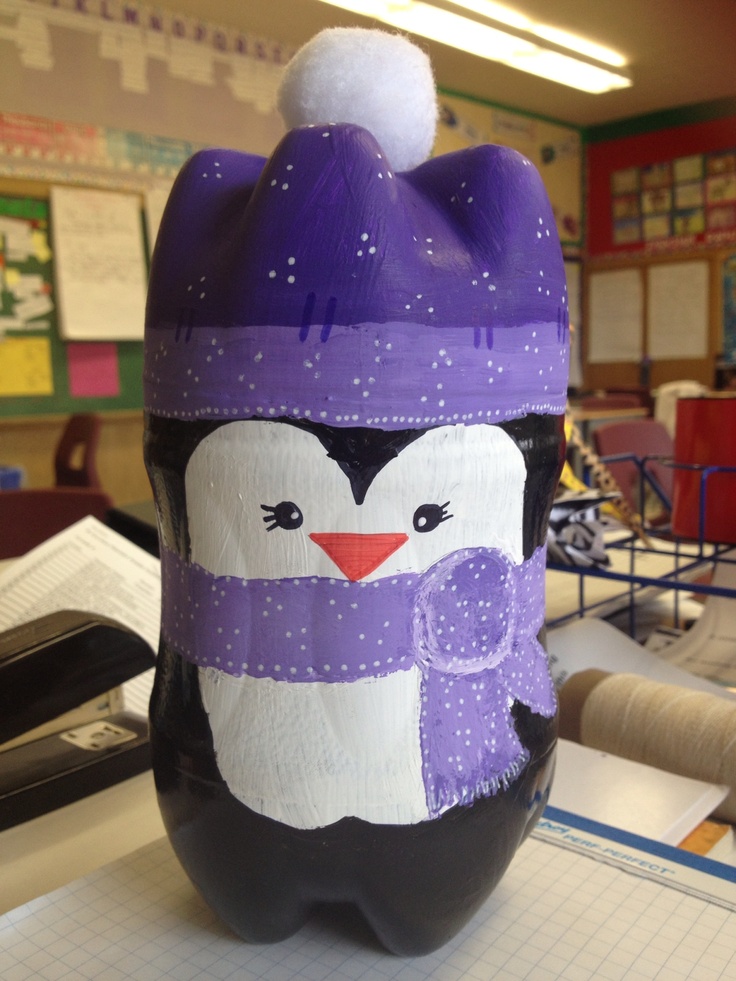
How to make them yourself – step by step description:
- scarf.
- Cut off the bottom of one bottle (this will be the penguin’s hat) and cut the other in half.
- Connect the two parts of the bottles with the bottoms in opposite directions and fix with adhesive tape along the seam, as shown in the photo:
- Color the penguin with paints.
- After the paint has dried, tie up a scarf from a piece of fabric and glue on the pompom.
- If desired, glue beads or rhinestones onto the cap. The penguin is ready.
Crocodile
Crafts from plastic bottles, due to the availability and cheapness of the material, there are a wide variety of sizes and complexities. From simple children’s figurines from one or two containers to huge compositions from dozens of bottles. The figure “Crocodile” refers just to such crafts. Here are examples of two works, one can be done by a child of 3-5 years old, and not every adult can master the second.
For kindergarten, a small crocodile figurine will be more optimal. To make it, you will need:
- 2 plastic bottles with a long narrow neck.
- 8 caps (preferably green).
- Eyes.
- A sheet of green cardboard (or stiff felt).
- Green paint (acrylic, unscented or can), adhesive tape.
Making a crocodile:
- Cut off the bottoms of both bottles and connect them with adhesive tape so that the necks point in opposite directions.
- Glue 4 caps on the belly (previously make cuts in the bottle so that the figure becomes stable and the paws are in the same plane).
- Glue 2 covers in the eye area (these will be the eyelids).
- Color the shape green. Let dry.
- Make short longitudinal cuts along the back of the crocodile (the comb will be inserted into them).
- Cut triangles out of cardboard or felt and insert them into the slits on the back (you will get a characteristic comb).
- Glue eyes and eyelashes on the eyelids (optional).
- Glue cardboard or felt fingers to the paws (3 fingers per cover).

To intimidate the figure at the stage of collecting two bottles, it is possible to cut one of them lengthwise and cut out the reptile’s teeth with nail scissors. And when painting teeth to make white. Such a craft will definitely not go unnoticed among others in kindergarten.
Bees
The fascinating process of making small bees will surely captivate all family members and inspire further creative fantasies from plastic. To decorate a children’s corner on the playground, a small swarm of bees hanging on a tree looks great.
Materials needed: small transparent plastic containers, up to 1 liter, black electrical tape, yellow paint, thread, scissors and felt-tip pen.
Production:
- Pour a little yellow paint into the bottles, close the lid and shake to paint all the walls from the inside. Drain off the rest of the paint.
- Open the lid and let the paint dry.
- Wrap the bottles with black electrical tape, imitating stripes on the body of a bee.
 Drain off the rest of the paint.
 - Draw eyes on the lid.
- Make 2 cuts on the back of the bees and insert transparent wings (ovals made of transparent plastic).
- Hang insects on a tree.
Such bees will serve for a long time, decorating the site, and will not bite.
Butterflies
Crafts made from plastic bottles can become real masterpieces of art, indistinguishable from living insects. An example of this are the most beautiful handmade butterflies made from transparent bottles, candles and nail polish.
Manufacturing instructions:
- Cut out the middle part of the transparent smooth bottle.
- Draw the pattern of the desired butterfly on paper or print it from the Internet.
- Transfer template to plastic.
- Then cut out the outlines of the butterfly and color with nail polishes.
- At the request of the author, decorate the body of the insect with beads planted on glue.
- Melt the edges of the craft over a candle flame to make it smoother.

Hedgehogs
All children love these funny animals. Crafts from brown plastic bottles are no less charming and very similar to a living hedgehog.
For the hedgehog you need:
- Collect several identical brown bottles with a corrugated bottom. Leave one bottle whole (this will be the basis of the craft), and cut off the bottoms of the rest and cut them in the form of needles.
- Attach the bottoms to the hedgehog’s body with glue or nails. If the mount is chosen with nails, then the base of the hedgehog must be cut from the side of the abdomen and when screwing the nail, use small wooden blocks.
- Glue on the eyes and screw on the black cap (this will be the nose).
- Glue 4 black caps to the belly to make the figurine stable, which will act as paws.
Helicopter
This miniature helicopter is easy to make with a baby yogurt bottle, 3 straws and a tennis ball.
Assembly sequence:
- Cut off the top and strip from the bottle.
- Make a round hole in the lid and insert a tube with a bent end into it.
- Attach the strip to the part of the bottle with a stapler, and then attach it to the halves of the tubes.
- Insert the ball into the bottle. Draw the cockpit with a marker.
- Form propeller blades from two straight tubes and attach them to the cockpit with a pin.
Matryoshka
A wide variety of matryoshkas and dolls can be painted on bottles, where you only need to cut off the bottom, take paints and use your imagination.
The bottle must first be drawn with outlines to facilitate coloring. In a similar way, you can create big chess and teach your child to play.
Fly agaric
Bright mushrooms are regular guests of any garden plot.![]() They look great in bunches under trees in the grass. Making them is easy.
They look great in bunches under trees in the grass. Making them is easy.
Materials for 1 mushroom:
- Bottle with grooved bottom.
- Red, white and beige.
- Brush and glue.
Manufacture:
- Cut off the top and bottom of the bottle.
- Turn the bottom part over and put it on the lid, fixing it with glue.
- Color the mushroom (beige stem, red cap with white polka dots).
- At the base of the stem of the fly agaric, finish the grass with a green marker (optional). The mushroom is ready.
Plastic bottles in garden decor
Crafts made from plastic bottles have become an integral part in the arrangement of a personal plot. Scoops, planters, lamps, brooms, animals in a children’s corner, furniture, and even greenhouses and boats are made from plastic containers. A pleasant bonus of such a hobby is the durability of the invention and, of course, its low cost.
Beautiful flower beds
With plastic containers you can create stunning flower beds. They are both traditional and hanging (or wall). The latter allow you to revive and decorate with benefit the empty walls of the fence or structures.
By hanging a few bottles with a cut-out window and filling them with earth, you can grow greenery or hanging flowers all year round. Such a green wall will decorate any interior and create a feeling of airiness. The new airport in the Crimea (Simferopol) is decorated in this technique, striking with its beauty all the guests of the city.
Traditional flowerbeds are decorated with plastic bottles no less original. They are usually framed with painted and filled with sand or water bottles, half buried in the ground. When implementing this idea, it is worthwhile to carefully approach the selection of material (all bottles are desirable to have the same size and type.
Flowers, palm trees
Flowers of amazing beauty are obtained from empty containers from shampoos, shower gels, household chemicals, since plastic already has a bright and rich color and doesn’t need to be dyed, and thick yogurt packs make excellent bases for white daisies.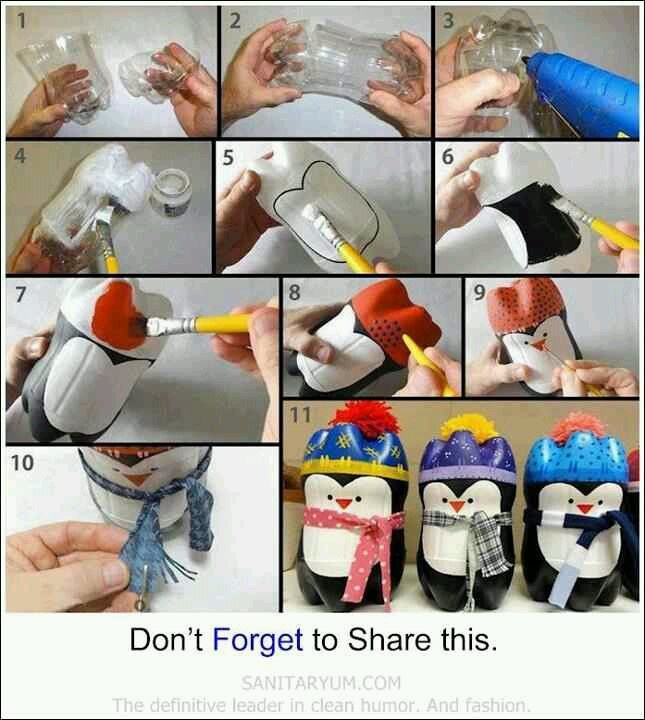 0003
0003
An example of flower buds from shampoo packages (the work of the author of the article):
To repeat flower crafts, you need to collect:
- 2-3 tubes of personal care products or household chemicals that have a bright color.
- Scissors.
- Needle, nylon thread.
- Candle and pliers.
Instructions for action:
- Cut out flower petals from an empty container.
- Make 2 holes at the base of each petal (using a needle and a candle).
- As a basis for attaching the petals, you can use a cap from any tube, along the perimeter of which you can also make several holes.
- Attach the petals to the base with thread, sewing with a needle.
- Make the center of the flower using the plastic cap and buttons, sewing on in the same way.
- The finished flower can be hung on a tree or lowered into a garden pond (this way you get water lilies that will always bloom, and it will be very difficult to distinguish them from real ones).
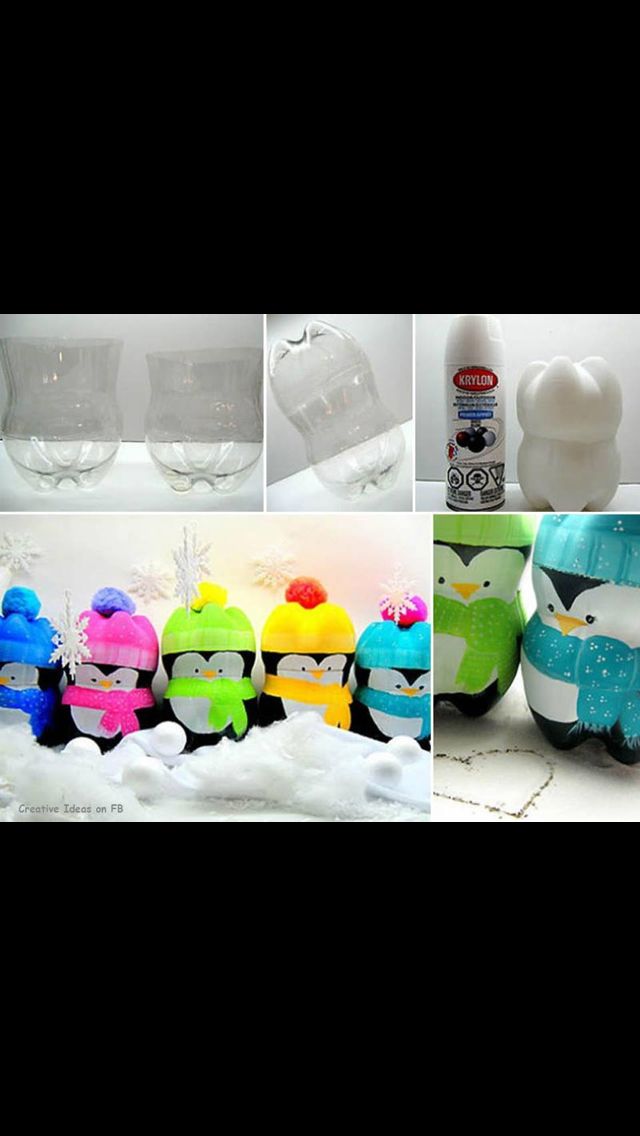
If a plastic container with a corrugated bottom is lying around in the country house, then the bottoms of bottles can be used for flower arrangements, example in the picture:
Making a flower arrangement:
- Cut off the bottom parts of 10-13 bottles and form flower buds, cutting plastic material. Make a hole in the center of each with a heated awl.
- Paint the buds with weatherproof paint and dry.
- If desired, add stamens to each flower by cutting them out of a dark plastic bottle and placing them on the glue.
- Nail the flowers to the stump and add artificial greenery. Delicate and original flower bed is ready.
Palm tree – southern tree, reminiscent of a vacation at sea.
To make it in your garden you will need:
- A lot of brown and green plastic bottles (at least 2 liters in volume), their number depends on the desired height of the palm tree.
- Rigid base for the barrel (stick or metal rod).
- Scissors and utility knife.

Algorithm for making a palm tree with your own hands:
- Cut off the bottoms of brown bottles and put them on a rod with their necks down, inserting one bottle into another, as shown in the diagram:
- Also cut off the bottoms of green bottles and cut along, cutting out the edges of the leaves. Chart reference:
- Take another whole brown bottle, cut it across. To work, take a part of the container with a bottom. In it, cut with a knife several round holes corresponding to the diameter of the neck of green bottles. Insert green leaves from bottles into the holes and secure (tighten with a lid or glue) as shown in the figure:
- Assemble the two parts of the palm tree by joining them. If desired, the foliage can be increased.
- Drive the finished tree into the ground and fix it.
Animals for the garden
Large plastic water bottles make cute little animals that will decorate the children’s corner and enliven the space in the garden.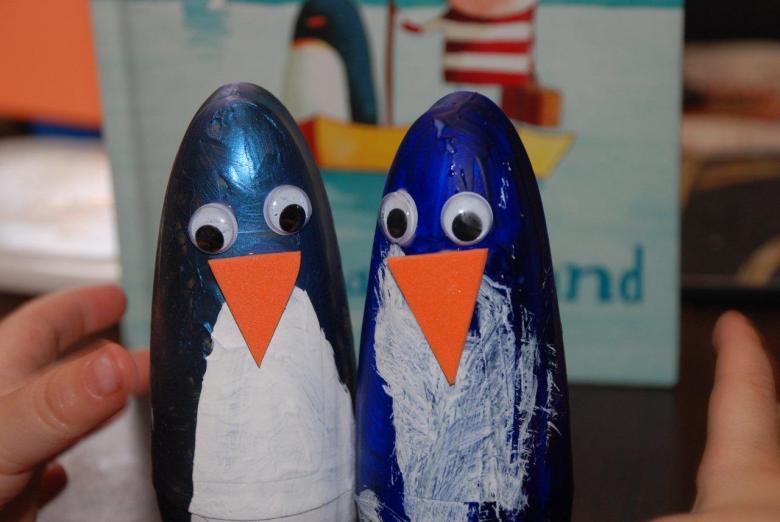 They can be made empty or in the form of small flower beds. Miniature piggy beds with succulents or blooming petunias look funny, creating a creative hairstyle for the animal.
Piglets are made very quickly, it requires several large bottles and paint. If the pig is planned in the form of a flower bed, then it is better to make it without legs, and if in the form of a decoration, then with hooves.
Work process step by step:
- Cut a window in the bottle on the back of the future pig (flowers will grow there), and make several holes on the stomach (so that moisture does not stagnate and the roots of plants do not rot).
- Paint the bottle pink, draw eyes and a snout on the lid.
- From another bottle, cut out the ears, paint them and insert them into the cuts on the head.
- Cut off a thin strip of plastic and curl it with scissors (this will be the tail), insert into the opening of the bottle.
- It remains to fill the earth and plant flowers.
Another interesting character is obtained from 1.5-2 liter bottles – a large crow that can be placed in a nest on a fruit tree. It is made from several long bottles and paint (black and gray).
Steps for making a crow:
- From one bottle, cut out the head of a crow, cutting off the neck and forming a beak.
- Make a hole in the neck area, the diameter of the neck of the second bottle.
- Use the second bottle whole. In it, you only need to make 2 cuts on the sides for the wings and one for the tail.
- Connect the crow’s body to the head.
- Cut out the tail and wings from the third bottle.
- Paint all parts of the bird and join.
- Attach a bow to the head for decoration.
Air curtains for the garden
One of the most unusual and chic interior decor ideas is air curtains made from the bottoms of bottles. With patience and collecting a lot of identical bottoms, you can create a real masterpiece that will please the eye for more than one year. If you hang them as curtains in an open gazebo, guests will be delighted.
How to create a similar curtain, algorithm of actions:
- Collect a lot of bottoms of the same size and color, cutting them out of the same bottles and melting the edges with a candle (so as not to get hurt during further work).
- Cut out flowers from the bottoms.
- Use a heated awl to make 3-4 holes in each flower (in the petals), this is necessary to fasten the parts of the curtain together.
- Connect the bottoms of the fishing line at the same distance from each other in a checkerboard pattern.
- Hang the resulting fabric on the hooks.
Lamps and chandeliers for the garden
Using a similar method (like air curtains from the bottoms) it is possible to make very beautiful lamps for summer cottages, especially if you use colored plastic containers.
To implement the idea, it is necessary to find a chandelier frame (a circle with a socket), to which to hang a part of the air curtain (description given above) and place it in the right place.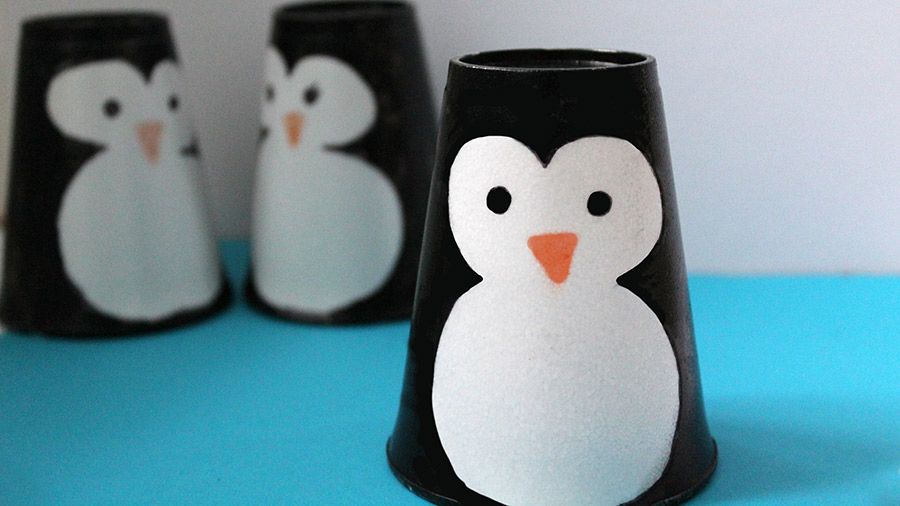 Another way to create an unusual garden lamp is to use a 10 liter bottle as a base.
Crafts from plastic bottles: garden lamp
Steps for making a chandelier from a large container and plastic flowers (as in the second photo):
- Cut off the top with a neck from a 10-liter bottle.
- Cut out flower buds from 2 liter transparent bottles, melt the edges and create curves (heating over a candle flame). Collect 5-7 buds.
- Glue or otherwise attach flower buds to the edges of the bottle.
- Insert the cartridge into the neck.
- Make a round hole in the cover and thread the wire through it. Screw on the cover.
- It remains to check the lighting dynamics and hang the resulting chandelier.
It is not recommended to use powerful bulbs in plastic lamps, as this can lead to excessive heating and deformation of the structure.
Bottle garden path
Creative gardeners can build a garden path from any material at hand and get admiring glances from all the neighbors as a result.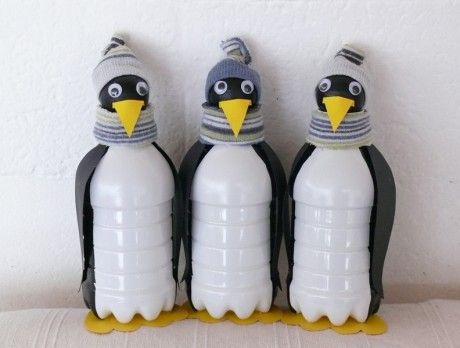 An example of this is the methods of making paths from plastic containers.
Types of paths and their manufacturing features:
| The material used | ||
| The bottles are placed perpendicular to the ground and buried with their necks in the ground, thus creating a ridge fence. | Need to have many containers of the same type and need to secure bottles (concrete pouring) so they don’t fall apart | |
| The corrugated bottoms of the bottles | cut off the bottom are laid up the convex side at the same distance from each other to dry concrete | due to the airiness of the design and partial fullness of the convex bottom, the track may deform |
| The brightest and most labor-intensive method, requiring a large number of covers. | ||
| Combination of all materials | Combination of all the methods and materials described above.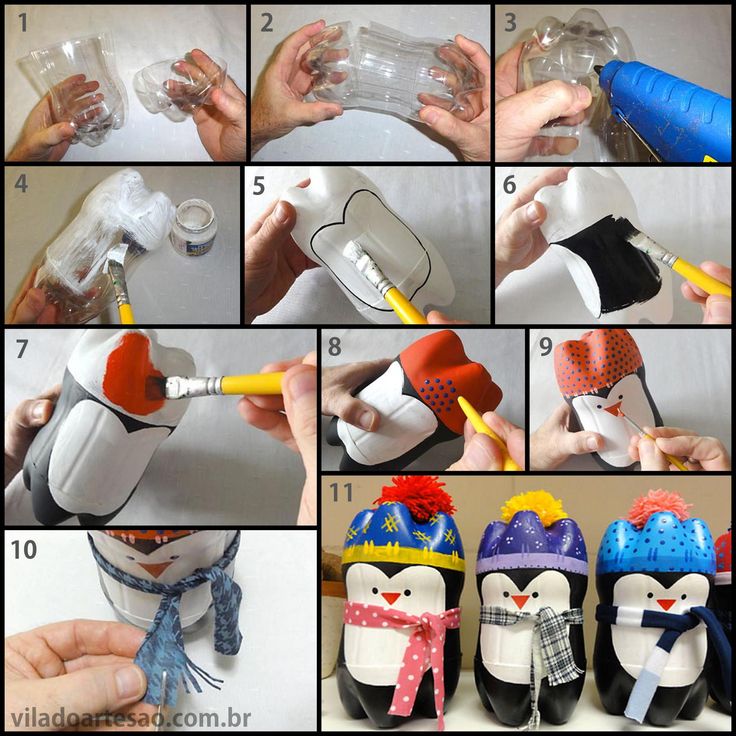 |
An excellent option if you have a lot of source material, time and desire. |
Any walkway requires formwork and ground preparation to keep its shape.
Greenhouses from plastic bottles
It would seem that making a greenhouse or greenhouse from plastic bottles is a ridiculous idea, but the owners of unusual structures appreciated their advantages, namely:
- The bottles transmit and diffuse light very well.
- The material is strong enough, in contrast to film covers.
- Low cost and minimal labor.
- Light weight and excellent mobility (quickly dismantled and moved by one person if necessary).
- There are no restrictions on the size of the structure.
Examples of finished greenhouse and greenhouse:
To create a compact greenhouse you need:
- 1.5-2 liter plastic bottles, approx. 200 pcs.
- Wooden frame (as in the second photo). Manufactured to your specifications.
- Rope or heavy rope.
- Tools (nails, hooks, loops, hammer, screwdriver).
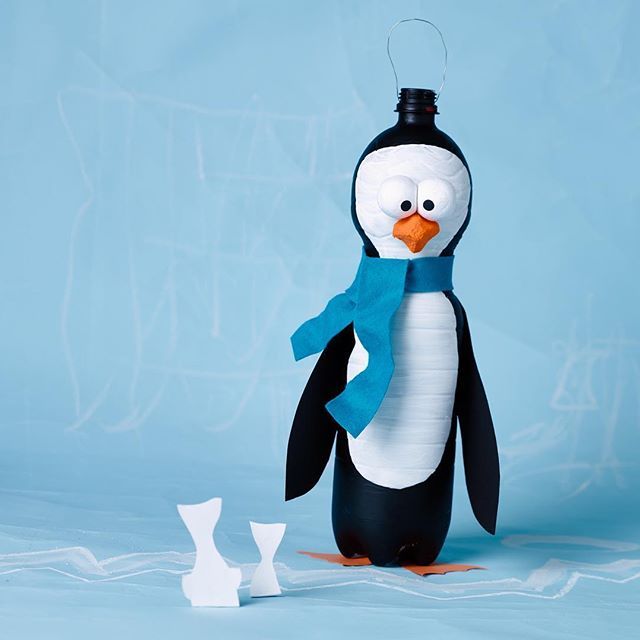
Making a greenhouse-book:
- Screw the loops around the perimeter of the frame in the form of a book (the distance between them should be equal to the thickness of the bottle used).
- Cut the cord into equal parts (each part should hold about 5 bottles in length and have a small margin for strings).
- In all bottles, make holes for the cord in the bottoms.
- String 5 bottles on each cord (according to the principle of assembling beads) and fix them so that they do not move.
- Tie threads with bottles to the frame and pull.
- The finished greenhouse is open on both sides. If necessary, similarly make side triangular doors.
To assemble a larger greenhouse, the same technology is used on a wooden frame with the addition of hinged doors and a roof.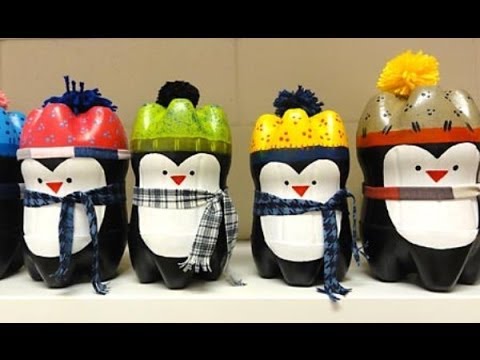 The greenhouse can be made entirely of bottles or partially covered with foil. A greenhouse measuring 2 * 2 * 2 m will require from 500 to 1000 bottles.
The foundation is necessary in this case, but it must be separately built according to standard rules and connected to the plastic structure for the period of active use. A finished greenhouse or greenhouse will last for several years with careful use.
Pergolas from bottles
An economical and original way to create a pergola with your own hands is to use plastic containers. The structure is being built according to the principle of a greenhouse or greenhouse (described above), but more airiness is provided.
For a variety of ideas, it is recommended to decorate the entrance to the gazebo with a curtain made of covers or an air curtain. The result is a cozy place to relax, as in the picture above.
Household supplies from plastic bottles
Plastic bottles in the form of various crafts help gardeners and gardeners to make life easier and save money. Washstands, scoops, devices for watering plants and other necessary accessories that are very necessary in the garden are quickly created from ordinary plastic bottles, and can last for several years.
Wash basins and boxes
If you have a used 5 liter bottle on the farm, you can turn it into a wash basin if you purchase a special valve for water supply. The bottle needs to be turned over, fixed to a tree or a rigid structure, cut a hole in the bottom (for replenishing water) and insert the valve into the cap.
If there is a need to make boxes for storing inventory, then large bottles or canisters are needed, in which the lid is cut out and the clasp is sewn on.
Scoops and spatulas
The most necessary and durable thing in everyday life is created from a dense canister with a handle, in which part of the wall is cut out and the lid is screwed on.
Use of such a device will be very convenient for pouring soil into pots, spreading fertilizers or other work with loose objects. And if you add a wooden blade to the scoop, you get a full-fledged spatula.
Slippers
These shoes are created from one bottle more often as a decorative decoration of a garden house.
To make a slipper you need:
- cut out 3 blanks shown in the photo from the bottle;
- glue 2 parts of the sole;
- sew on toes;
- Decorate with plastic flowers if desired.
Rodent and Insect Repellent
A handy and effective item is made from several plastic bottles to repel moles and annoying insects. In each bottle, square windows are cut out (three cuts) and folded outward. Then the bottle is mounted on a metal pin and stuck into the ground.
It turns out like a spinner, when moving from the wind, the bottle creates noise that scares away moles and insects within a radius of 1-2 meters. On the entire site it is required to put several such turntables.
Toolboxes
Storage in the garage, shed or basement is always in demand. In order not to buy ready-made furniture, save money, and at the same time restore the desired order, plastic canisters will help (they are often thrown away after construction work). By cutting off one wall of the canister and placing it on a shelf or in a specially built box, you get a real roomy cabinet.
Also suitable for easy storage and use of small items (such as nails) is the construction of transparent plastic bottles screwed to the shelf with lids. The bottle is easy to unscrew, items do not crumble and do not take up extra space.
Device for deep watering of plants and their night heating
People who have a summer cottage far from their place of residence are often puzzled by the question of automatic watering of plants. There is a simple and proven way to moisten the ground near a seedling – to bury a plastic bottle with many holes next to it. Moreover, the neck of the container should remain on the surface of the earth.
Then, using a funnel, fill the container with water and do not worry about watering for 2-3 days. In extreme heat, it is additionally recommended to lay hay or straw on the ground around the seedling (this will protect the surface of the earth from quick drying and hardening.
The second option for automatic watering of plants is to dig an inverted plastic bottle next to the plant (with the lid down, in which holes are made), cut off bottom and pour water in. Gradually, the water will penetrate to the roots of the plant and moisten the ground.0003
A third option is to hang a plastic water bottle over each plant. Make several holes in the lid of the container. Thus, drip irrigation will be carried out.
But if it is necessary to ensure the heating of plants at night, large plastic bottles (2-5 liters) will come to the rescue. Having cut off the bottom of the bottle, the seedling is closed and dug in with earth, in case of windy weather. The individual greenhouse is ready. Adjustment of temperature inside is carried out by unscrewing and screwing of a cover.
Gardening knee pads
Useful item for the elderly to safely and comfortably kneel on the ground.
To make the knee pads, you will need to cut out two rectangles from a smooth bottle and attach ties (2 for each knee pad).
Pots for flowers
They are created in an elementary way, for this a planter is cut out of a bottle and painted with paints at the discretion of the author. The flight of fancy in this case is unlimited.
Pots can be hung up if necessary by making two holes on the side.
Candlestick
For small candles, a corrugated bottle base is ideal.
The cut off part is colored with markers and melted with a candle flame. Romantic craft is ready.
Broom
This is the main device for putting things in order on the territory of the personal plot, especially in the autumn season, when a large amount of foliage falls and it needs to be removed.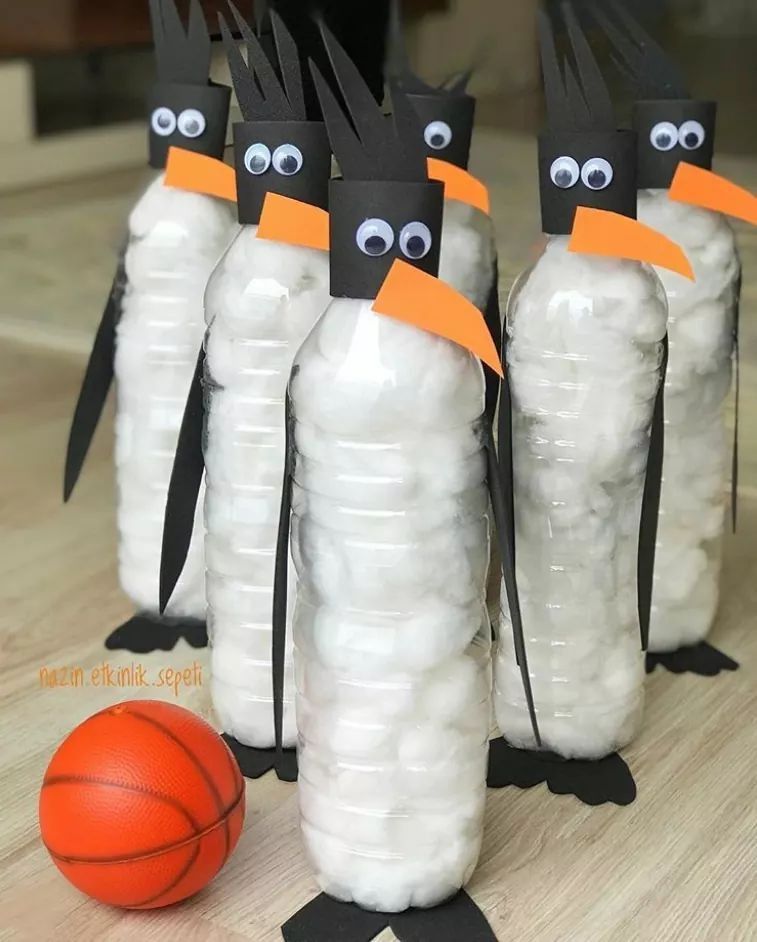 A broom made of rods in this case is less attractive, since it requires being in a state of inclination, and the rods can break off.
Plastic broom from bottles is a godsend, it is durable, does not break, does not bend and looks very presentable. To make such a broom, you will need several 1.5 or 2 liter bottles (4-5 pcs.), As well as a wooden stick and nails.
Procedure:
- Remove all labels from the container.
- Cut off bottoms of bottles.
- Cut the bottles into lengthwise strips (not reaching the neck).
- Cut off the necks of all but one bottle.
- Flatten all bottles in the same plane.
- Put all the other cut bottles on the bottle with a neck
- You will get a broom blank so that it does not spread, you must constantly hold it with one hand or press it down with a stone.
- Take another bottle and cut off half of it, take the upper part to work.
- Slip the cut half over the assembled workpiece.
- Use an awl to make two holes in the whole structure through all the bottles (this is necessary to fix the craft).
- Sew the broom with nylon thread.
- Fasten the thread inside.
- Insert a wooden stick into the necks.
- Drive 1-2 nails through plastic and wood to secure the handle.
- Cut the pile and the broom is ready.
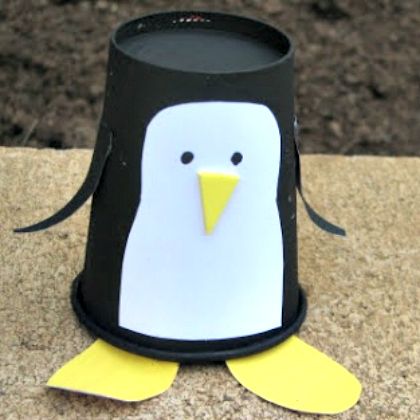
Funnels
Household funnel is a necessary thing in any home. However, it is not often used, which is why many housewives forget about it until the moment when it is necessary to pour liquids or pour something from one container with a narrow neck into another.
In such cases, a plastic bottle of any size will always come to the rescue. It is enough to carefully cut off the top of the bottle with a neck and apply as needed. The main thing to consider is that you need to cut off the bottle at an angle, which will facilitate its use.
These funnels are very convenient for motorists for pouring gasoline or engine oil, as well as for pouring antifreeze liquid in winter.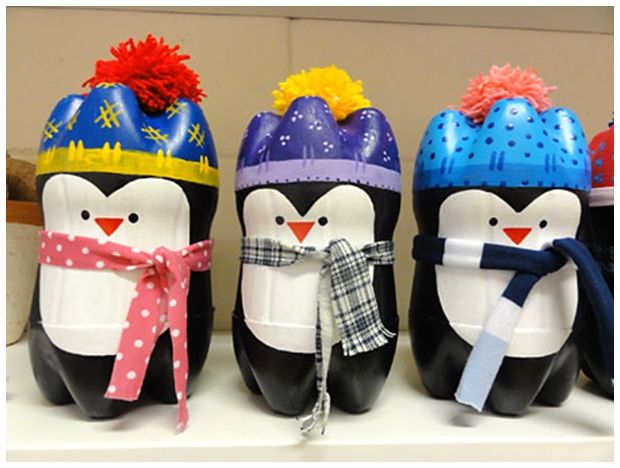
Bird feeders
This is perhaps the easiest craft that you can quickly make from 2 bottles (5 l and 2 l).
Sequence of actions:
- Cut out 3 windows from a large bottle, stepping back 5-7 cm from the bottom and bend the resulting “roof” up (this will protect the birds from rain).
- Cut off the bottom of the 2 liter bottle and remove the cap. Then insert it through the window inside a large container with the neck down (this will be a grain tank that will protect the food from wind and snow).
- Hang the feeder and pour grain through the neck into the small bottle.
- Screw on the cap of the large bottle.
- The feeder is ready. As the birds eat food from the bottom of the large bottle, the grain will automatically be poured from the small container.
DIY crafts made from plastic bottles can not only last for many years and be very useful in everyday life, but also become real masterpieces of art, decorating any house with a garden plot.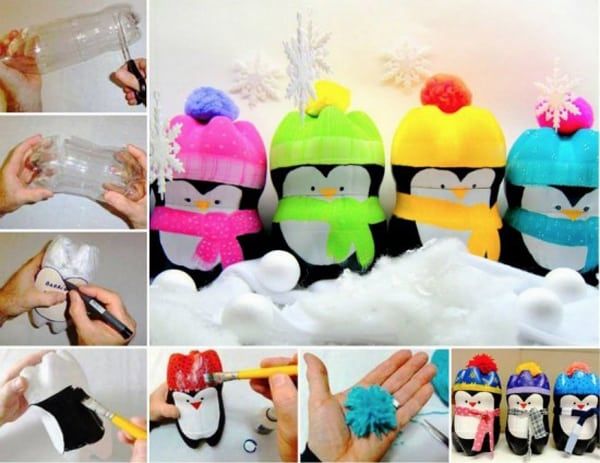
Article design: Natalie Podolskaya
Video about crafts from plastic (plastic) bottles
Crafts from plastic bottles – options for ideas:
Crafts from plastic bottles: top 50 ideas (photo)
It would seem – how can we use the empty plastic bottles that we constantly encounter in everyday life? Yes, they are very different – big and small, from carbonated and drinking water, from ketchup, sauces, mustard, shampoo, cream …
Most of us throw them into the trash without regret. But, it turns out, absolutely in vain! Even such, at first glance, useless things can be very good use.
So, what kind of plastic bottle crafts can you make with a little imagination?
Children’s toys
Of course! Toys and more toys.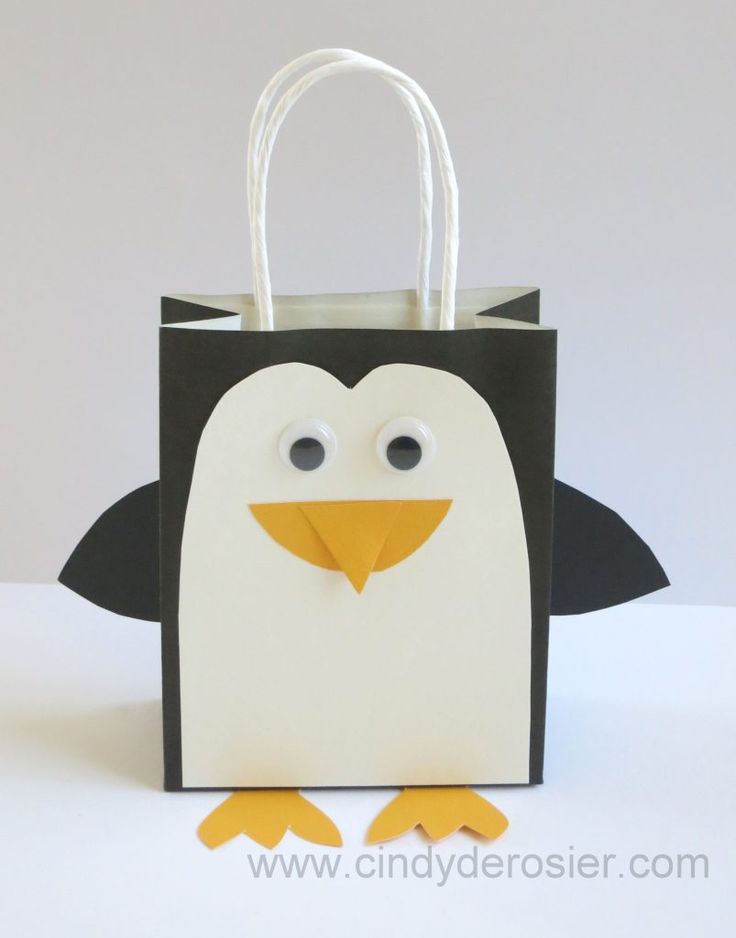 Pigs, cows, cats, lions, penguins. Just look carefully at the bottle: what does its shape remind you of? Take up paints, brushes and spend time with joy and pleasure!
Here are examples of different shapes of plastic bottle toys for inspiration:
Idea source: Home Dzine
And the creative French have created a whole world of robots out of plastic bottles and caps!
Bottlerobot.com
Shampoo bottle boats are a great bath toy.
Such a colorful and cheerful elephant will help to diversify the interior of the children’s room and simply delight your children:
Idea source: La casa park
Recommended by mothers – the best books
them a funny nightlight.
Source of the idea: Fab
Or these fireflies.
You can also make bright and funny rattles for the little ones out of plastic.
Idea source: Pink Pistachio
And these “foam blowers” for older children – in the summer they will be very popular with children on the street.
Idea source: Spoonful
It turns out that not only toys, but even a whole game can be made from plastic bottles! For example, how do you like this bowling alley?
Idea source: Cool Craft Sites
And you can make decorations for girls:
Idea source: Spoonful
And, of course, you can make a traditional piggy bank very simply! True, it will be difficult to break it. 🙂
Idea source: Martha Stewart
Christmas crafts
Christmas tree from plastic bottles
It turns out that you can make a Christmas tree (for example, a tabletop one) and even a Christmas tree out of plastic bottles. Links to master classes are under each Christmas tree.
Workshop here >>
Workshop here >>
Two workshops here >>
Christmas toys from plastic bottles to decorate the Christmas tree or the whole room.
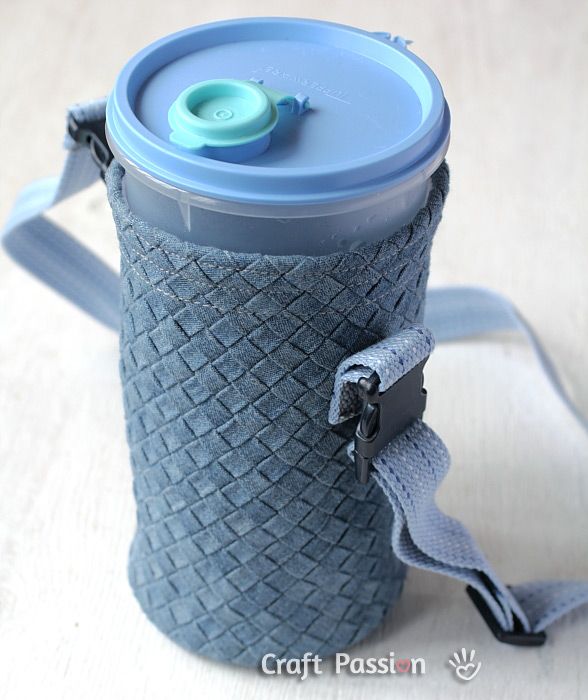 Here are some ideas that will help you make unexpected and fun Christmas toys and decorations out of almost nothing – from plastic bottles and a minimum of improvised means.
You can decorate a Christmas tree with the help of such original balls (these balls are based on rings cut from a plastic bottle, and you can think of any decor):
hands – and depending on how you decorate or fill them, you can get a lot of options:
Source: Materialization of dreams
If your Christmas tree is large, you can make golden bells for it:
Source: domstoy. ru
And you can – bumps from brown plastic bottles:
Source: mastera-rukodeliya.ru
Christmas decorations for the house from plastic bottles paint:
Source: samodelki.com.ua
Such a ball can become a decoration of a room, and several balls suspended at the entrance to the house will create an unforgettable festive atmosphere:
Source: kollekcija. com
com
It is very, very easy to make Christmas candlesticks from plastic bottles:
Source: klubrukodelnic.info
how difficult it is sometimes to bring them to visit without spoiling all the beauty. Ordinary cake boxes are too big for them, and for some reason no one has come up with mini-boxes yet. So make them yourself! All you need is a plastic bottle, cardboard and colored tape.
By the way, macaroons can be packaged in the same way!
Details here: Paper Plate and Plane
Here are some more ideas for creating a variety of containers from plastic bottles to store various items:
Idea source: apartment therapy
Idea source: Home designing ideas: Home-Dzine
Idea source: EPBOT
Idea source: Craft
Idea source and MC: duitang
Idea source: Ocean Whispers
We don’t know about you, but for us it’s always a big problem to find a place for a charging phone.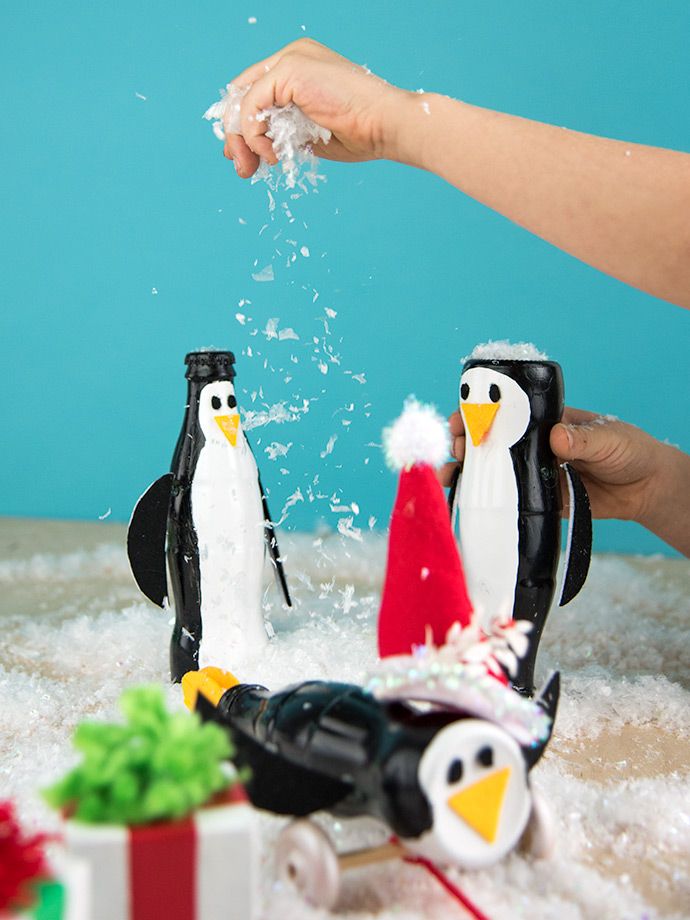 With the help of a bottle of shower gel, you can easily solve this issue. Just cut out a holder from it, which will fit both the phone itself and the charging cable. And you can decorate it with the help of fabric or napkins using decoupage technique.
Idea source: Savvy Housekeeping
Birdfeeders made from plastic bottles
Birdfeeder may not be the most creative craft, but it is very useful for our little brothers, and it also deserves attention, especially with the approach of spring.
Make two holes through the bottle, insert a wooden spatula. And, of course, do not forget to pour the grains!
Idea source: Spoonful
Idea source: Birds&Blooms
Idea source: Design Sponge
Plastic bottle crafts for the garden
Now let’s see how plastic bottles can help us grow flowers and other plants.
This idea will save a lot of space, because these bottle-pots are used to place an empty wall before.
Idea source: treehugger
With these transparent covers, your seedlings will not be afraid of wind or bad weather.
Source of the idea: Spoonful
Source of the idea: Blomsterverkstad
Source of the idea: Apartment therapy
– letusDiy.or 9000 9000 9000 9000, perhaps the most, but the most common, but the most common it home or garden plants! It doesn’t matter if you are preparing to grow seedlings for the garden at home, or if you just have fragrant herbs growing in pots – such a watering can can be very useful.
And you can make it with just a bottle, a match and a thick needle!
Master class: A Journey to a Dream
Fun with water in the form of a whole system of iridescent vessels – ideal for summer time with children in the garden and in the country.
Idea source: Playing by the book
The next series of crafts is just for fun. She will tell you how to decorate a room for a holiday party or just decorate your home. You will need quite a bit of effort and materials, and the result will surely delight your household and friends.
Do-it-yourself flowers from plastic bottles
These decorative flowers can be made from plastic bottles of different colors. Great for co-creating with kids.
Idea source: Oh Happy Day
Bright flowers made from plastic bottles will brighten up your party or simply add variety to your home or garden.
Idea source: KROKOTAK
Plastic bottle lanterns
How to make DIY lanterns from a variety of materials, we have already written. Let’s complete the list with unusual options for flashlights made from plastic bottles.
Idea source: Inhabitat
Idea source: About.com
More? Among the many homemade Christmas trees, you will also find DIY Christmas trees from plastic bottles! 🙂
All these unusual, original and useful crafts can be made from plastic bottles! If you have examples of such work on your blog, we will be glad if you share them in the comments.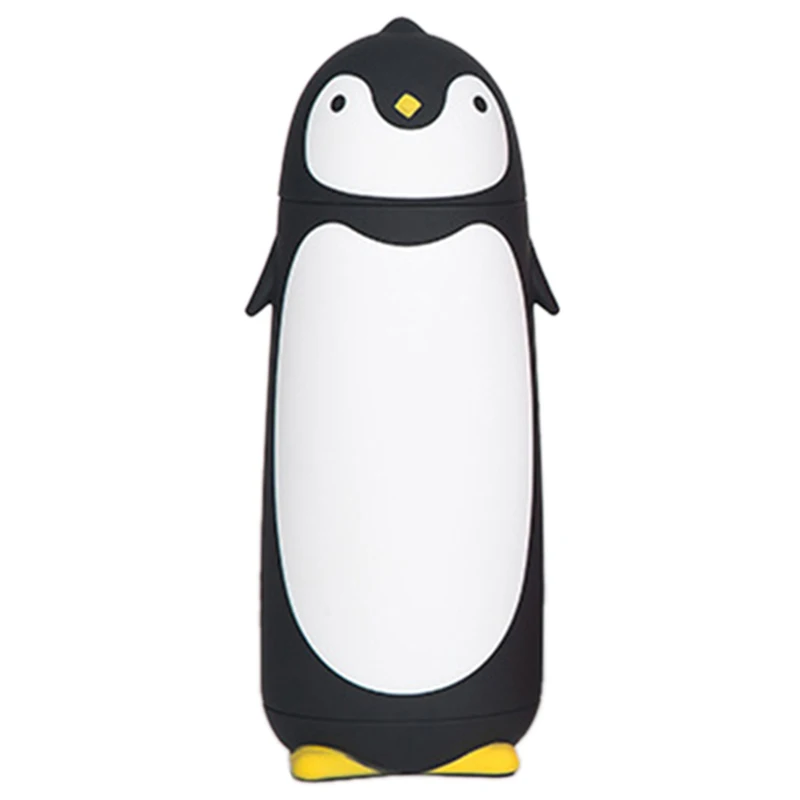
More on the topic:
Crafts from garbage and waste >>
Crafts from disks >>
Flashlights with your own hands – in summer and winter, spring and autumn >>
1 the best golden book . Beads, origami, salt dough, crafts made from natural materials >>
Research Institute Eureka. Crafts from plastic bottles for children
Greetings, dear readers! Creative activities with a small child are one of the important areas in his upbringing and development. Creativity contributes to the development of curiosity, observation and imagination of the baby, helps him in understanding the world around him. In the process of creative activity, the child develops such skills as accuracy, perseverance, diligence. Not the last role in creativity is given to the manufacture of crafts from various materials. Today we want to tell you what crafts you can make from plastic bottles for children. Don’t forget to involve your child in the work. After all, joint work not only brings him closer to adults, but also brings awareness of his own significance: “Look, I did it myself!”
Plastic bottles of various shapes and sizes are found in every home. Let’s turn this junk material into amazing toys, cute little things, and decorate a children’s playground with them.
Making toys
We have no doubt that your little one has a wide variety of toys. But handmade toys, as a rule, have a special place. Use our tips and make funny penguins, a funny bee and cute ladybugs with your child.
One penguin, two penguin
For work you will need:
- 4 plastic bottles with a capacity of 1 liter;
- acrylic paints and brush;
- scissors;
- glue.
The first step is to cut the bottles. Cut off the bottom of two bottles, and cut the rest in half. Take the bottom of one bottle and connect it to the half of the other.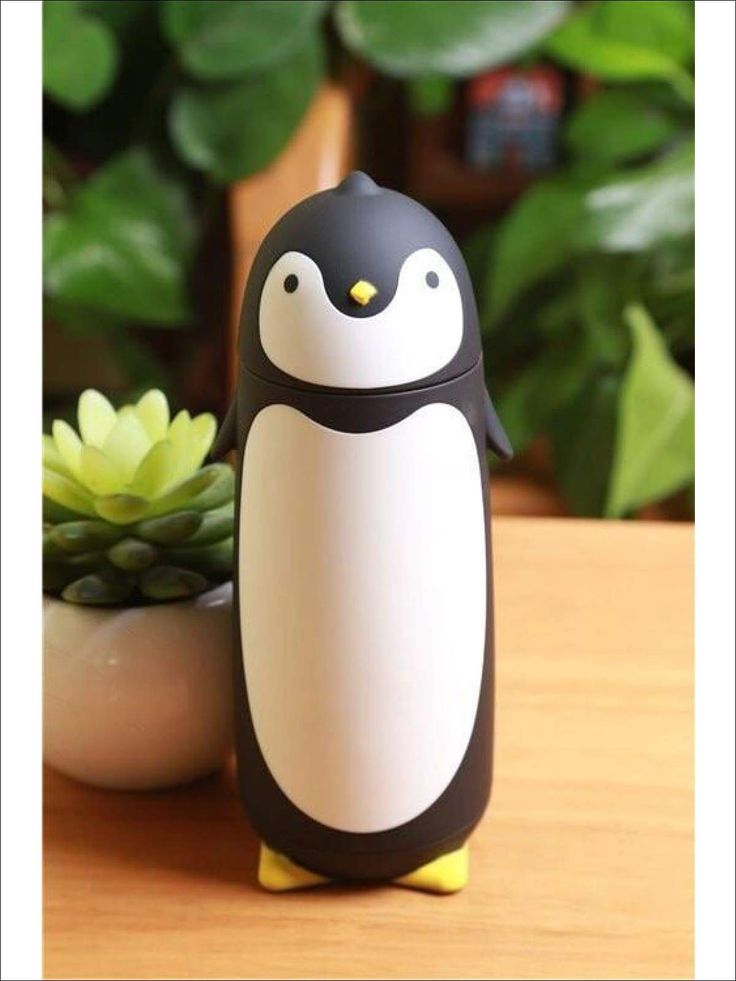 Fasten with glue. You have two blanks for penguins.
Start coloring. Cover the workpiece with white paint. Then carefully circle the place for the cap, torso and wings with a pencil. Paint the cap with bright colors, the torso – black. On the front draw the eyes and beak.
Attach a bright pom-pom to the hat of the finished penguin and tie a scarf made from a piece of cloth or knitted from the remnants of yarn.
Zhu-zhu-zhu
In order to make a bee, you need to prepare:
- 2 plastic bottles;
- 10 containers from Kinder Surprises;
- bending wire;
- acrylic paints and brush;
- scissors or utility knife;
- glue;
- awl;
- black marker;
- cardboard or plank for stand.
Use one bottle as a whole with the cap (this will be the bee’s nose). Paint it yellow, and when dry, apply black transverse stripes. Draw eyes and a mouth with a marker. From the second transparent bottle, cut out the wings and use a marker to make veins.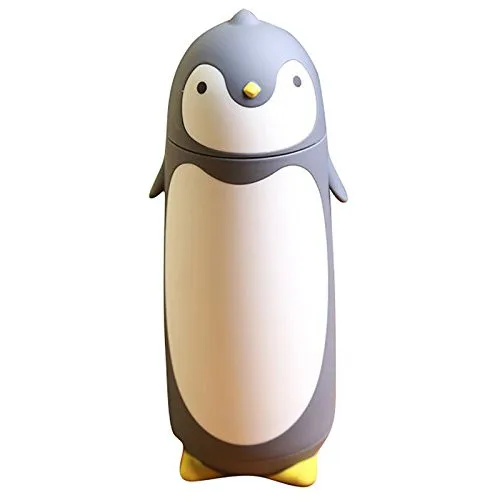 Glue the wings to the body. With an awl, pierce four holes in the lower part and insert the wire, bending it in the form of paws.
Glue the halves of the kinders onto a wooden or cardboard base. These will be honeycombs. Place the bee on the honeycombs and read a funny poem:
Bee, bee,
Zhu-zhu-zhu!
I’ve been following you for a long time.
I was told,
What the bee has
Honey in the house
On every shelf.
And that’s why bears
Don’t mind living
Neighbors with you!
(V. Gvozdev)
Ladybug, fly to the sky
To make ladybugs you will need:
- 5 plastic bottles;
- 5 ping-pong balls;
- wire;
- scissors or utility knife;
- glue;
- acrylic paints and brush.
Cut the bottoms off the bottles. This will be our cows. Paint them red, and after drying, draw black dots and a stripe in the middle.
Paint the balls black, draw eyes and mouths on them and insert wires – these will be antennae.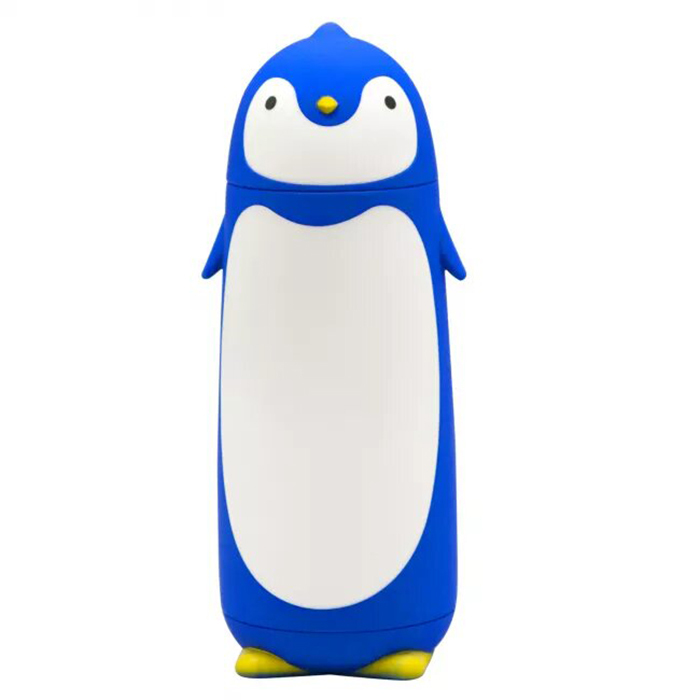 Glue the balls to the bodies. The “cow herd” is ready to graze on the grass.
Bottle Mosaic
Bottles can be used to make an original mosaic for a small child. Cut off the bottoms of all available bottles (the more, the better). Paint in multiple colors. The kid will be able to lay out pictures from them, “write” letters or numbers. With the help of the “bottle mosaic” you can easily teach the little one to count, explain what is “more” – “less” and other mathematical concepts.
Pleasant knick-knacks
On the eve of any holiday, make a few little things together with your baby that will be a wonderful gift for loved ones.
Apple casket
This original casket will come in handy for your grandmother to store needles, buttons and other little things. Need to take:
- 2 plastic bottles;
- scissors;
- acrylic paints and brush;
- ribbon or lace;
- glue.
Peel the bottoms off the bottles.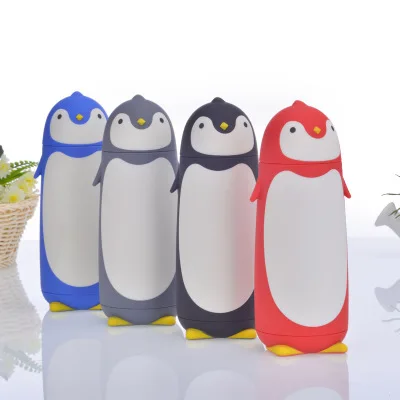 From the rest, cut the petiole of an apple with a leaf. Two bottoms are two halves of the box. Paint them yellow and make the apple a ruddy barrel. Insert the petiole into the upper part and secure with glue. Glue a ribbon or lace around the perimeter of each half.
Plastic bottle bracelets
Simple and beautiful bracelets can be more than just a gift. The kid himself will be happy to wear them.
An adult must make the base for the bracelet. To do this, circles of any width are cut from a plastic bottle. Then the workpiece enters the hands of the child, and then everything depends on his imagination. The bracelet can be decorated:
- paint or paint with colored markers;
- stick on rhinestones, beads and beads;
- braid with wire;
- tie with colored thread or braid;
- decorate with shells or artificial flowers;
- stick on lace.
Of course, the baby should work under your supervision, but entrust the choice of ideas to him. Do not forget to praise the little one, say that you will definitely arrange an exhibition of all his works. This will not only raise the child’s self-esteem, but also serve as an incentive for further creativity.
Playground ideas
Plastic bottle crafts are a great way to spice up your yard or playground with original mini sculptures.
Everlasting Flower Garden
Cut off the neck or bottom of plastic bottles, depending on what kind of flower you want to make. Then cut the blank and use scissors to make petals of various shapes. The finished flower can be held over a candle flame so that the petals curve intricately. This operation should only be performed by an adult. But entrust the kid to color the finished flowers. To do this, give him acrylic paints and a brush.
Attach bright flowers with wire to stems cut from green bottles and place in a flower bed. By the way, a fence for a flower bed can also be made from plastic bottles dug upside down.
Three little pigs
In order to make these cute animals, you will need:
- three 6-liter eggplants;
- 12 1 liter bottles;
- paints and brushes;
- utility knife or scissors;
- wire.
Large containers will be our pigs, and corks will be our pigs. Cut small bottles in half, the necks with corks will turn into piglets’ legs. From the remains of the bottles, make ears and tails.
Paint all parts pink and fasten with wire. Draw eyes and a mouth. If you cut a hole in the back of the pig and fill the container with earth, then the three little pigs will turn into original flower beds that will decorate any site.
Invite your child to plant and care for the plants in these beds. We are sure that this activity will bring a lot of pleasure to the kid.
Mischievous sun
A cheerful sun made from an old tire, a piece of plywood and plastic bottles can become a playground decoration.
Place the tire on the ground. Cut a circle out of plywood and place it vertically on the wheel. Paint the plywood circle and plastic bottles (their number depends on the size of your composition) bright yellow. Fasten the bottles around the perimeter of the circle – these are the rays of the sun. On plywood, draw a perky face.
Making various crafts together with adults, the child not only acquires the skills of cutting, gluing and coloring, but also:
- enriches his inner world;
- learns to think independently;
- develops intellect, improves its individuality;
- develops finger and hand motor skills.
Dear readers! Be sure to send us photos of the plastic bottle crafts that you will make with your children.
If our article was useful for you, then recommend it to your friends in social networks.
We wish you all the best! Goodbye!
DIY plastic bottle crafts [step by step, photo]
DIY plastic bottle crafts step by step for beginners, original ideas for children
Plastic bottles are a real find for people involved in creativity.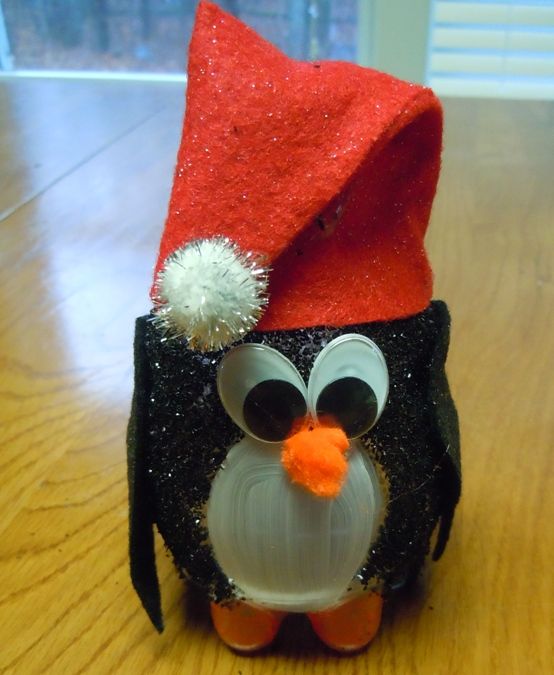 Even beginners with no experience can independently make a variety of crafts from this material. Recycling plastic not only makes the raw material practical, but also saves the environment, improving the ecology. Unusual ideas with a step-by-step description will help you make crafts to decorate the garden and decorate your summer cottage.
Original ideas for crafts from plastic bottles to the garden step by step
Plastic bottles are considered affordable raw materials, no creative skills are required to make funny figurines. As additional tools, you need scissors, paints, a clerical knife, as well as other improvised materials. To get beautiful crafts, it is recommended to stock up on other plastic products – cups, plates, spoons.
Flowers: how to make an open bud
Buds of daisies, roses, bluebells and lilies of the valley – all this can decorate a garden space without much effort. Large flowers made from five-liter plastic bottles look great. To get started, you need to prepare the bottoms of the bottles, scissors, and acrylic paint. Step by step, the process looks like this:
- The bottom of the bottles must be cut along lines that are clearly visible. The incision is not made completely, 2-3 cm remains in the middle.
- Cut 1-2 thin strips from each petal and twist them nicely towards the center.
- Fire is used to shape the flower. You can take matches or a lighter: the bottom of the bottle is brought to the fire and turned in the right direction. The bottle begins to melt, taking on a different shape.
- At the final stage, the product must be painted with acrylic. You can use a brush or foam sponge – this way you will not see stains.
The photo shows that such products are suitable for decorating flat surfaces. You can decorate the fence with plastic flowers, lay them out in the garden near the house, and also equip them with a tiled path.
Palm tree – an exotic garden decoration
A palm tree made from plastic bottles will help to add a touch of the tropics to the country house.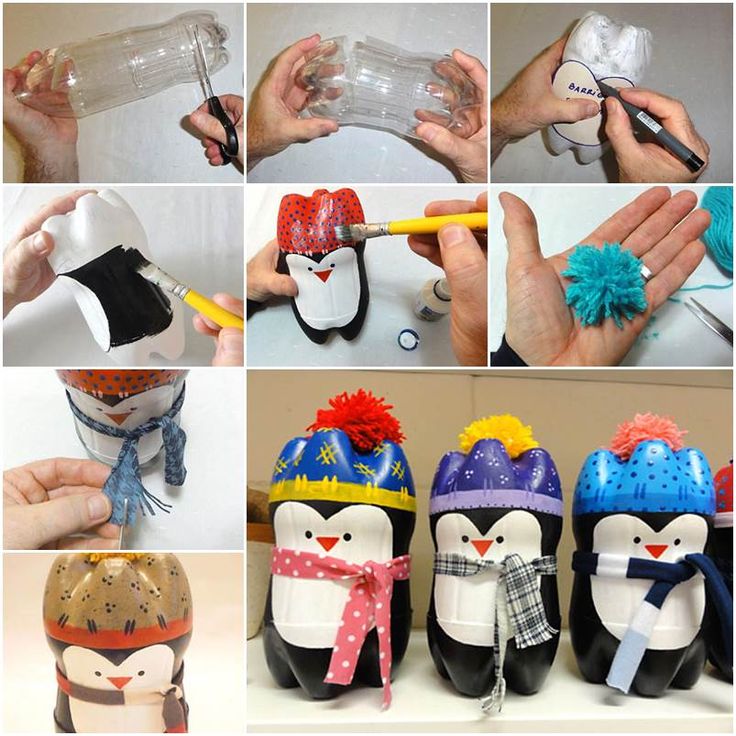 It is not difficult to make such an object of garden decoration, the main thing is to follow the sequence of stages. First you need to prepare the materials: a large number of brown and green plastic bottles, a clerical knife, adhesive tape, a tube for decorating the trunk and a thick rope. Step by step, the master class looks like this:
- Creating leaves.
- Creating a stem.
- Assembly of all parts of the structure.
To make the crown of a palm tree, it is necessary to cut off the bottom of the green bottles, and cut the upper part into small strips and bend them in the other direction. The lid and neck do not need to be touched. Depending on the number of bottles, the palm tree will be thicker or vice versa. After that, you need to take brown bottles, cut off the bottom and make stripes from it towards the neck. There should also be a lot of bottles. To assemble the tree, a rope is tied to each lid, fixed inside. A palm tree will serve as an excellent decoration for an inconspicuous corner on the site.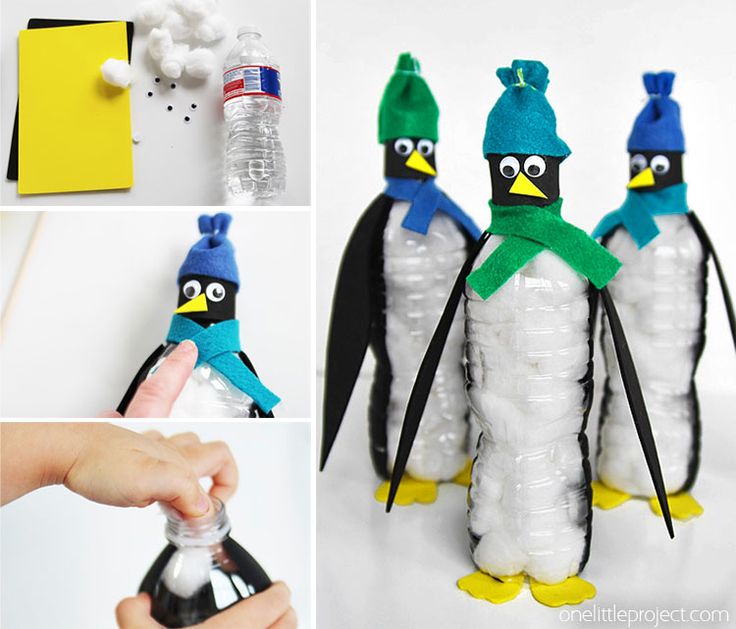
Swan: decorating the pond area
White bird – the most common craft in garden plots. It is easy to make, and the output is an original figure. To get started, you need to prepare one five-liter bottle, as well as a knife, a mesh for decorating wings, putty. An interesting swan is created like this:
- The side of a plastic bottle is cut off along the horizontal side.
- A hole is made through the lid, a thick wire is inserted, bending it – this will be the neck.
- To give the product a round shape, it is covered with sand.
- Make a stand: putty is laid out in an even layer on polyethylene and waiting for solidification.
- Small rolls of putty are rolled into a bundle and shape the bird’s neck.
- Using a spatula, the material is applied to the bottle itself, making feathers.
- To make the wings, a metal mesh is used – it is inserted on the sides and also puttied.
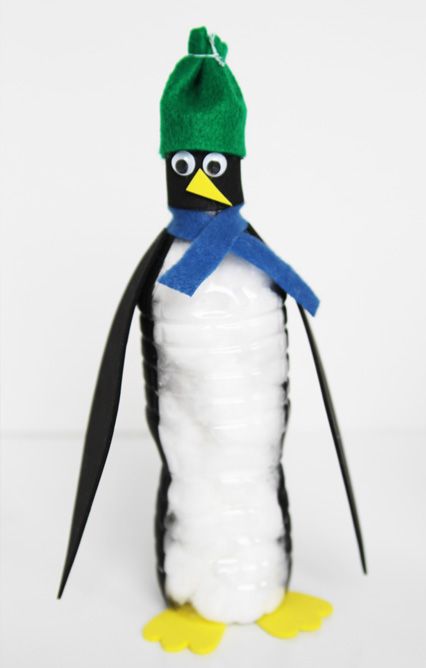
The swan will look beautiful if you draw eyes and feathers on the body.
Pig: Easy Tutorial
Another easy garden decorating tutorial using plastic bottle recycling. The pig looks original if you organize a small flower bed for summer flowers inside. To make a pig, you will need one five-liter bottle, as well as a knife, spray paint, brush, pencil, wire, black marker, cardboard and plastic glue. Steps to take:
- Cut out a piglet’s ears from cardboard and paint them pink.
- Leg blanks can be made from cut off tops of 0.5 liter plastic bottles.
- In a five-liter bottle, cuts are made with a knife: for the ears, for attaching the legs and for the tail.
- The wire is twisted in a convenient way, inserted into the hole.
- Finally spray paint the pig in the chosen color.
Soil can be placed inside the pig and small flowers can be grown by cutting a hole below the ears, making an oval.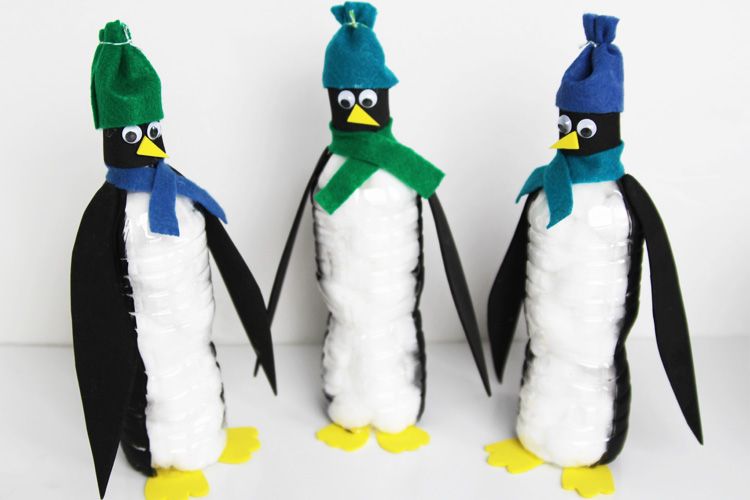
Minions: making cartoons come true
Modern plastic bottle crafts step by step for beginners involve making popular cartoon characters. These master classes are for children, so an adult will cope with the task without problems, connecting a child to the process. You can try to make a beautiful and funny minion:
- You will need one or more (according to the number of minions) bottles of 1.5 liters or more.
- There is no need to cut anything here, because the man himself has an oval shape, it is enough to depict the face of the minion as accurately as possible.
- The top of the bottle is dyed yellow, the bottom is blue.
- Eyes are drawn on a yellow background, like minions.
Several wires can be pulled out of the cover – these will be funny human hair. Such figurines will decorate the garden and bring a touch of humor to the exterior.
Flower bed: how to make a base for growing flowers
The easiest way to make a garden bed is to use a tire from a wheel.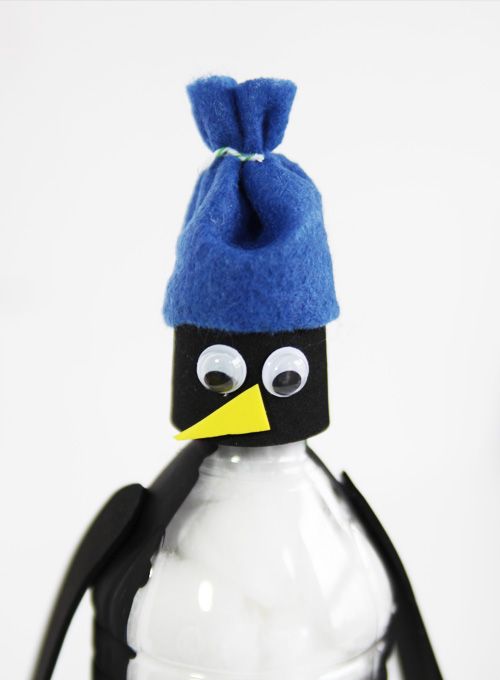 The output is a large flower bed in which you can plant flowering plants. To work, you will need a large number of small bottles of the same type, glue for plastic, a tire from a wheel. Paint may also come in handy if you want to change the color of the bottles.
The prepared wheel is installed in the desired location of the future flower bed or garden. The tire can be painted in any color, you can leave it black. Bottles are gradually glued onto the top of the wheel row by row. The neck of the flower bed will be a little narrow towards the top, so you will need to properly fill the earth for future plants. If you do not want to leave the bottles transparent, they can be painted in the selected shade before work.
Decorative ball – an original figure in the garden
In order to make a dense and openwork ball with your own hands, you will need to prepare several dozen plastic containers from under the water. It is advisable to take bottles with a volume of at least 1 liter.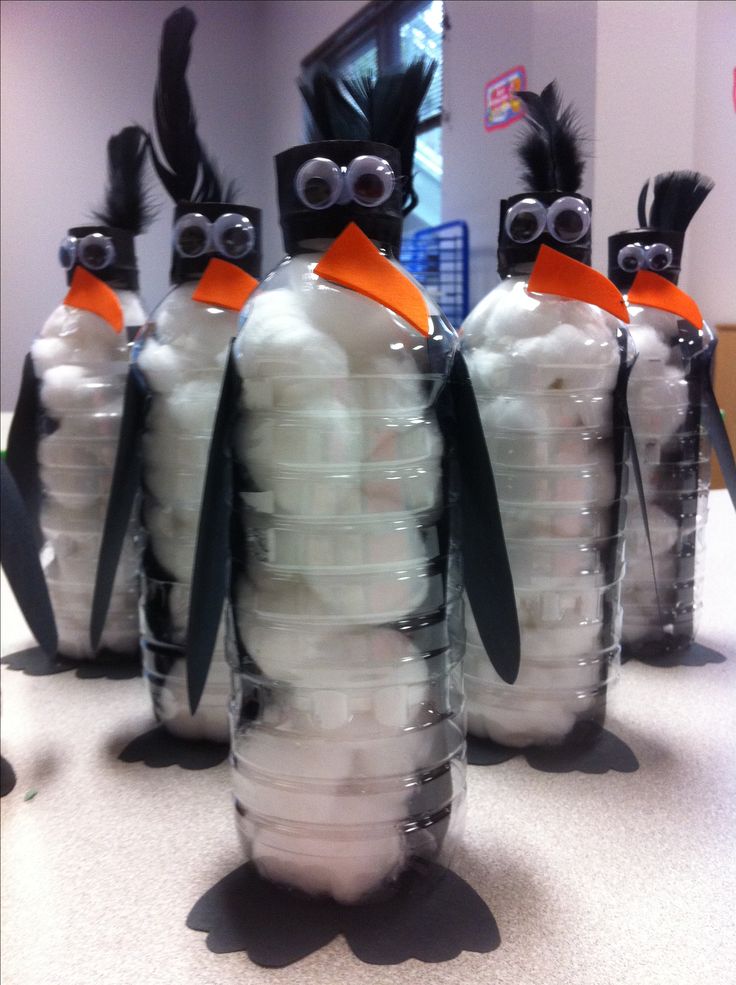 The basis for sticking bottles will be a ball of cement, it is not difficult to make it. To do this, mix water and cement with sand in a ratio of 1: 3. Further, the process looks like this:
- The bottoms of all bottles are cut off.
- Each bottom is painted in a certain color, you can use several shades and make a rainbow ball.
- When the bottoms are ready, they are attached to the cement base.
- You can fix the products with a strong adhesive or insert them into the cement while it has not yet hardened.
The result is an original and unusual ball that will decorate the space near the house. The sphere can be placed near the gate, and also made the center of the composition in the garden.
Sheep: how to make step by step
Elongated bottles are useful for creating a sheep. It is necessary to prepare containers:
- 1.5 liters – 4 pcs;
- 2 liters – 11 pcs;
- 1 liter – 3 pcs;
- 2 liters – 20 pcs. with shaped bottom.
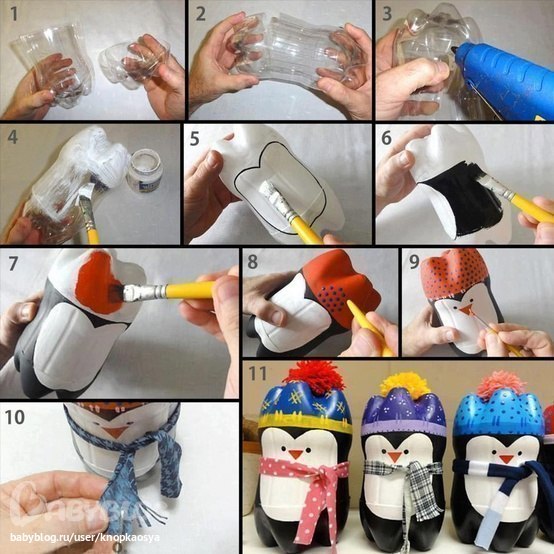 with shaped bottom.
 Also need bending wire, can of white or gold paint. The tops with necks are cut off from liter bottles, one bottle is inserted into another. Creation process:
- Ears are cut out of a liter container and fixed with wire.
- The torso and neck are made from two-liter bottles.
- The head is fixed on the neck, the legs of the lamb are made from 1.5 and 2-liter containers.
- For curly wool, the lambs connect the curly bottoms with wire.
At the final stage, the sheep is collected and covered with paint. The eyes and nose are made from corks in a contrasting color.
Owl: decorating trees
In order for the country house to shine with new colors, it is important to properly decorate the yard space. Another idea for this is to create an owl figure out of pvc bottles. To do this, prepare 5 brown containers, tin lids, a transparent container, a glue gun, pliers, acrylic paints and threads.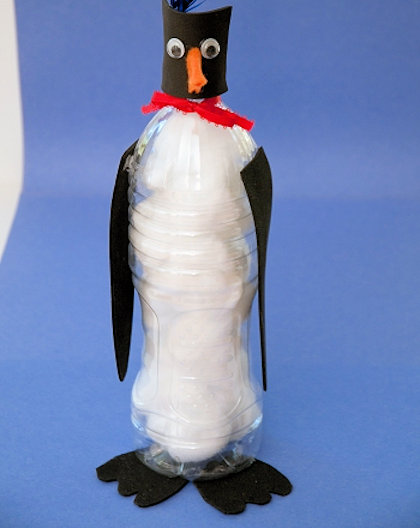 Instructions:
- The bottom and throat are cut off, cuts are made along the edges.
- The cut fringe is pulled together with a thread: the top of the bottle will serve as the head, and the bottom as the tail.
- The remaining bottles are useful for making wings: they are cut into rectangles and painted white.
- Use a glue gun to fix the wings to the base.
- Eyes are made from tin caps – they can also be touched up and pupils can be drawn.
Night bird will fit perfectly into the design of the site, it can be placed on a tree branch.
Peacock – an unusual solution for the site
Another colorful, but no less easy-to-make bird is the peacock. Its beautiful and colorful feathers will amaze the guests of the country house, because the peacock will become the center of the composition. In order to make it yourself, you need to take pieces of foam – they will be the base and body. The remaining elements are made from plastic bottles:
- Feathers are cut out of containers of different sizes, after which they are painted with acrylic and glued along the perimeter of the tail.
- Fringed feathers can be made with thin scissors on a green bottle.
- The beak is made from the top of the container by cutting out a triangle, fixed on the head with nails.
- Feet are made from the tops of small bottles with necks and wire.
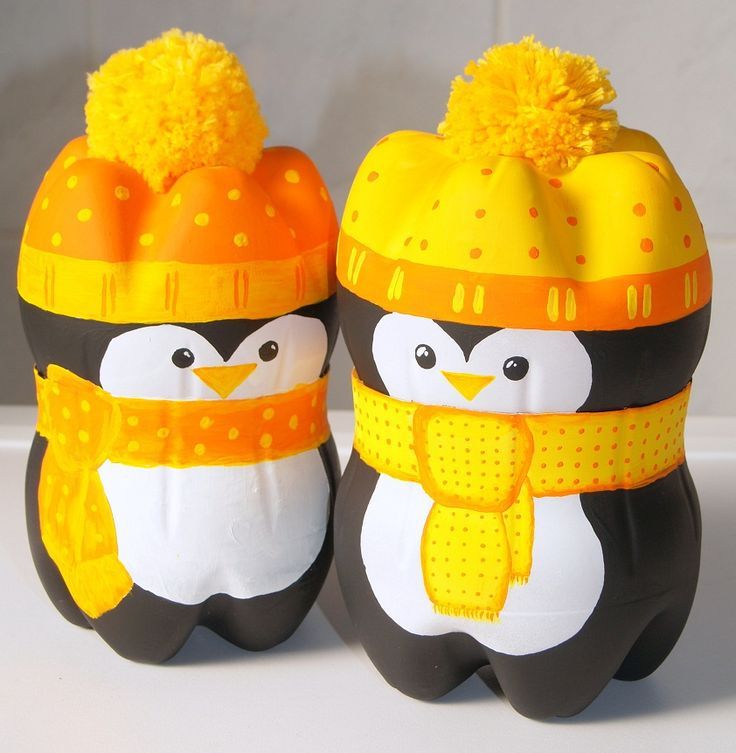
At the final stage, the bird must be assembled: the paws are attached to the body, after which it is glued with feathers. Next, wings and tail are attached – the peacock is ready!
Donkey: a decorative figure with your own hands
Continuing the theme of animals, you can make a donkey out of bottles. It can be installed near a fruit tree, arranging a beehive there. If desired, the donkey is used as a flower bed, attaching a cart of wooden branches to it from behind.
The body is made from a five-liter container, the front and hind legs are made from containers from kefir or milk. The muzzle of an animal can be made from a bottle-keg of beer or kvass.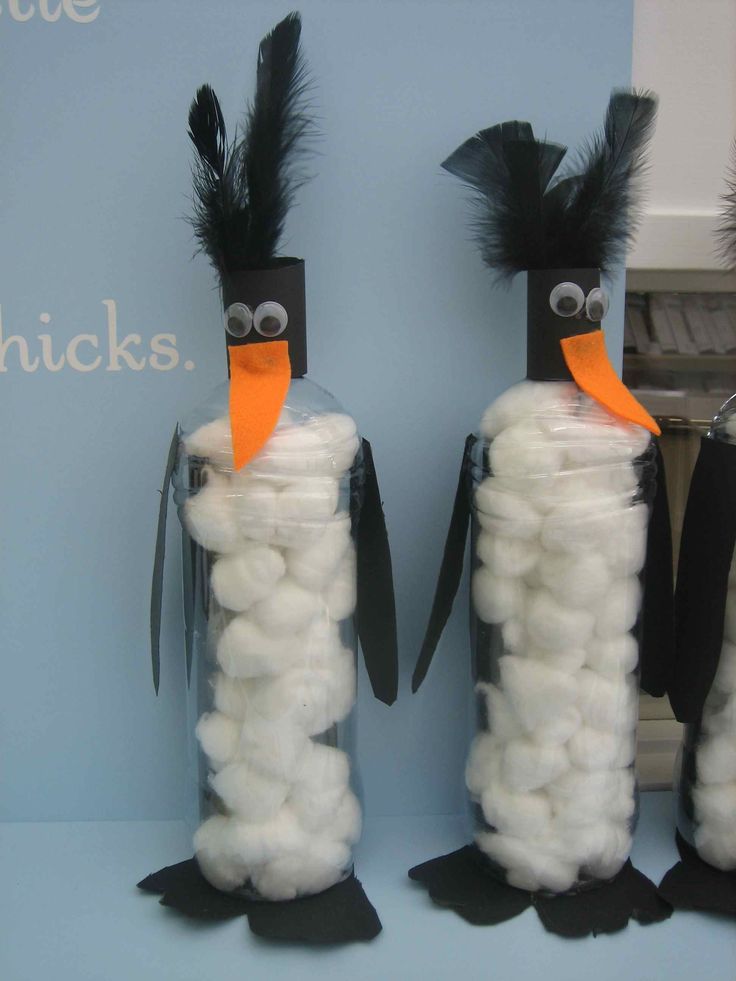 Ears are made of plastic or cardboard. The whole donkey is covered with gray spray paint, a braid is attached to the muzzle, a cropped bottle with earth is hung on the side and a flower is grown there. Another simple option for self-production is the use of polyurethane foam in combination with bottles.
Frog: composition for an artificial reservoir
A frog figurine will be appropriate where there are reservoirs or artificially equipped fountains on the site. It can coexist with a swan, turtle, fish, ships. All that is required to create is two two-liter bottles, in which the top is cut off. For work, only bottoms are needed. Paws are made from flat parts – cut out according to a pre-designed template.
The crucial moment is painting the frog. First, the background is tinted green, this may require several layers. Then, with a thin brush, draw out the eyes, muzzle, draw the phalanges on the paws. If desired, the frog can be made a crown – it is also made from a plastic bottle.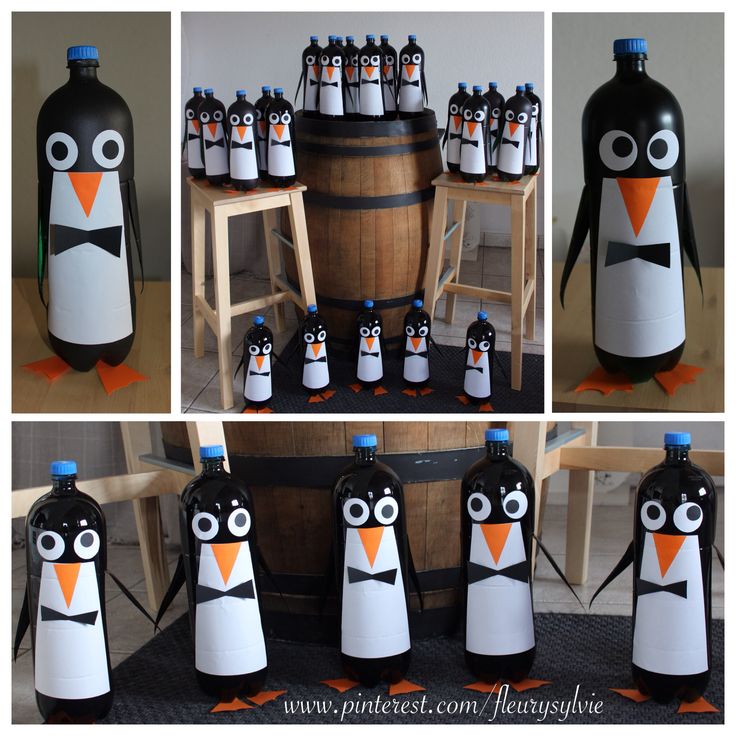 The neck is cut off, forming arrows, painted in golden color – the crown is ready.
Other ideas
The fantasy of gardeners does not end with the above ideas – original crafts from plastic bottles for the garden are replenished with such workshops:
- butterflies;
- snowmen;
- locomotives;
- candy;
- robots;
- penguins;
- cats;
- dogs;
- males;
- towers.
Plastic packaging is distinguished by the fact that it does not rot after precipitation: the gardener can safely leave for the city for the rainy season without worrying about the appearance of the products. To prevent the paint from slipping, after staining, you need to cover the figure with varnish. Such original and simple garden figures will delight the inhabitants of the site for many years.
Forty original ideas for using plastic bottles to design and decorate your home and garden
a little – empty plastic bottles, scissors plus your imagination.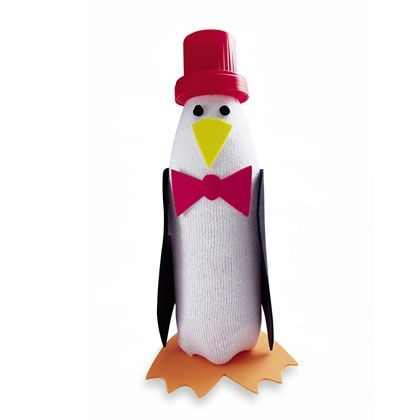
And some ideas have already been put into practice. Perhaps you will like some of this as well.
1. The easiest thing to do is seedling pots or a hanging bird feeder. If you have collected a large number of bottles, you can make the same original crafts as in this photo.
2. Graceful curtains from the bottoms of transparent plastic bottles, fastened together with a strong thread.
3. A solid base for a comfortable ottoman made of plastic bottles – light and durable.
4. These bright flowers, created from ordinary painted bottles, bloomed on the fence.
5. And again the bottoms of the bottles – now for the decoration of lamps.
6. A curtain made on the same principle.
7. Plastic decorations for hanging lamps – very simple and beautiful.
8. Bright flower pendants can brighten up any occasion.
9. And these are real chandeliers.
10. Great organizers for storing all sorts of little things.
11. Large old plastic bottles will successfully replace portable plant containers in the beds.
12. Plastic bottles can even be used to build a fence…
13. … or a light garden fence.
14. You can make such an original canopy.
15. View of the canopy from above.
16. And here he is in all his glory.
17. An old bottle makes a great garden sprinkler…
18. … and just something – connect the neck of the bottle with a hose and cut several small holes closer to the bottom.
19. For Christmas, you can make such a bright wreath on the door.
20. Large opaque or colored bottles can make a whole cat company on your windowsill in the form of flowerpots.
21. Plastic bottles are an excellent material for creating greenhouses and greenhouses.
22. Original bottle cap curtains.
23. New Year’s snowflakes on the Christmas tree – bottle bottoms are in use again.
24. And here is the Christmas tree.
25. A plastic zippered box is a good idea not only for household trifles, but also for travel.
26. Here is such a “rocket engine” can be made for a small pilot.
27. From two-liter bottles you can make a cascading vase for sweets .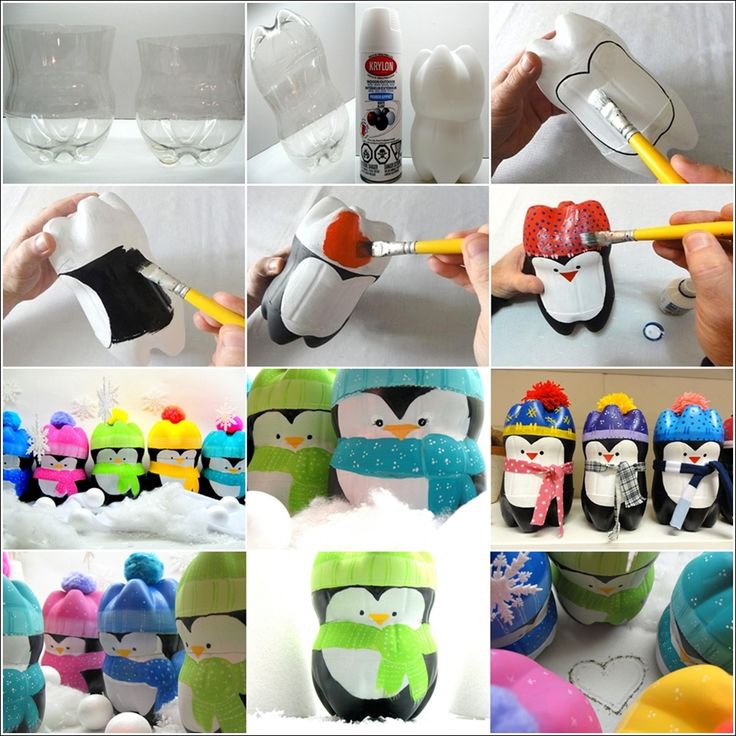 ..
..
28. … or a hanging wall garden.
29. A great idea for camping is a “solar” lamp from a bottle filled with water and bleach.
30. And so familiar to everyone is a pig – a piggy bank – also from a plastic bottle.
31. You can entertain the kids by launching these bubble kites by placing a soapy solution in a bottle and making a few small holes.
32. Bright butterflies from transparent plastic bottles will decorate your interior – paint them with paints and make a bead body.
33. Multi-tiered jewelry stand made from bottle bottoms.
34. A funny penguin will turn out from two bottle halves connected to each other.
35. And again the hanging garden – only here the bottles are already arranged vertically. If you pass thin hoses with holes through them, connected to a container of water, as in this photo, your garden will be constantly supplied with water.
36. Original packaging in the form of an apple for a small gift, sweets or various small items.
37. A great ball organizer that needlewomen will love.
38. Cute gnomes – for seedlings and greenery.
39. Toilet paper holder from a large bottle for giving.
40. Bottle feeder for small birds in cold weather.
Did you like these things? Perhaps they will inspire you to be creative, and you will create something completely new and original!
Do-it-yourself crafts from plastic bottles for summer cottages, gardens, gardens, kindergartens, schools. Instructions, photo, video
Contents
Plastic bottles are means of unlimited space for the realization of creative ideas of adults and children.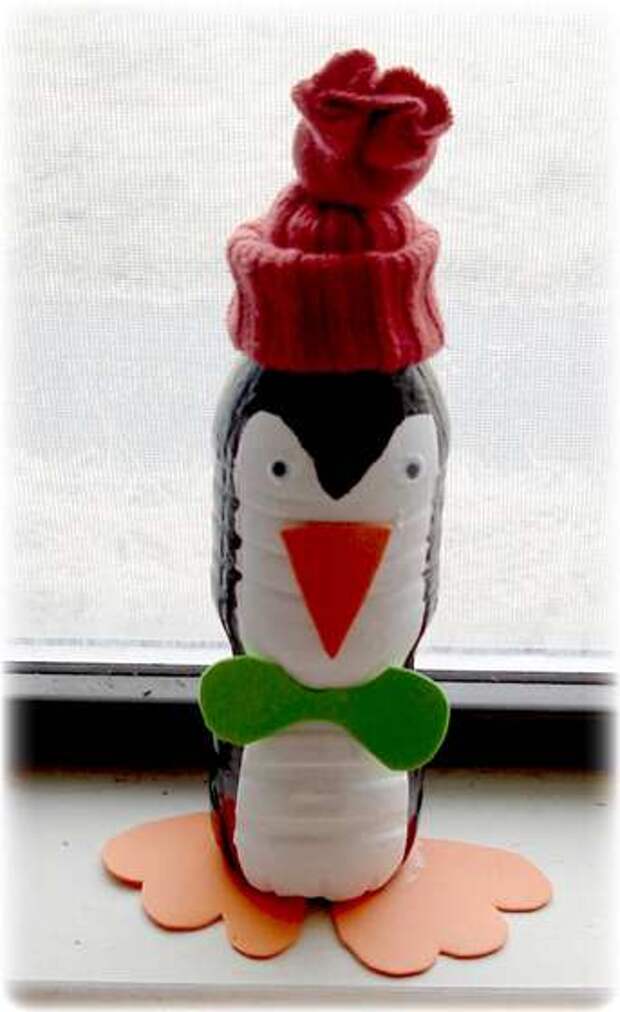 DIY crafts allow you to add originality, creativity and a positive mood to the interior of your home and garden.
Features of plastic as a material for making crafts
Material features are:
- Material availability.
- Low cost (or free use).
- The pliability of the material (it bends, melts, paints, does not get wet).
- Keeps its shape (when not heated).
- Durability (plastic retains its properties up to 100 years).
- Large variety of shapes and colors.
- Non-toxic.
- Not eaten by insects, animals, birds.
- High strength and wear resistance (does not break down in water).
Advantages
The main advantage for man-made plastic crafts is a long service life without loss of original properties.
Also, a wide choice of colors, sizes, shapes of plastic dishes against the backdrop of a meager cost create ideal conditions for creative people.
Disadvantages
A small range of temperature stability is the main disadvantage of plastic. At negative temperatures in the cold season, plastic products become brittle, crack, break when pressed. Therefore, especially valuable products are recommended to be stored in heated rooms.
Materials and tools for working with plastic
To make neat and unusual crafts, you may need:
- accessories).
- Several types of scissors (large, manicure) for the convenience of cutting out details.
- A utility knife will come in handy if you have to cut canisters or cut bottle necks.
- Hammer, nails (for fixing some elements to wooden sticks).
Standard set of materials and tools for making crafts from plastic bottles
- Candles, matches for melting the edges of plastic parts or giving the desired shape, as well as for making holes with a hot awl.
- Remains of wire, rope, fishing line are needed to fasten parts or fasten mustaches to figures in the form of animals.
- Washcloths are an excellent wig for voluminous figures (horse’s or donkey’s mane).
- Needlework eyes for small figurines when they are difficult to draw.
- Fast-drying paint – the main element for creating color.
- Glue is selected individually based on the author’s idea.
- Nail polish (transparent and not only) is an excellent substitute for paint in small crafts, such as butterflies.
- Felt pens or markers are needed to draw cut lines on the plastic or to finish drawing parts of the body.
- Stapler and staples for fixing elements.
- Tape (if needed) and awl.
- Gloves for hand safety.
- May require a sewing kit.
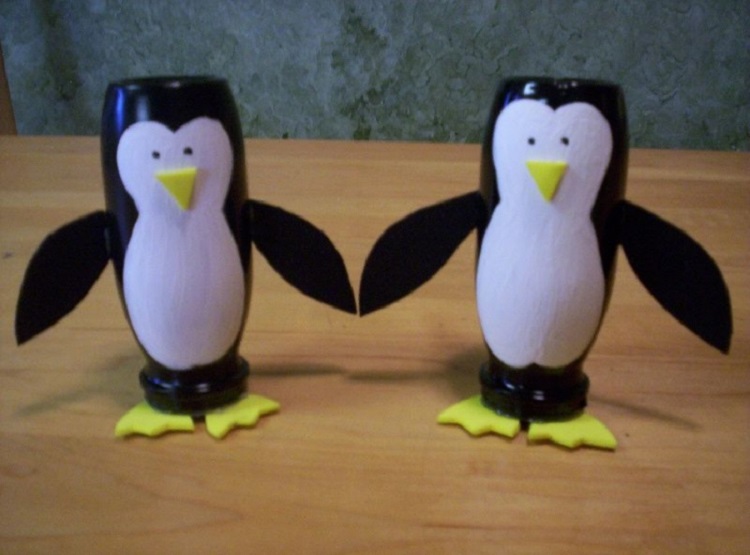
What can be made from bottles for kindergarten or kindergarten? Step-by-step instructions
Plastic bottle crafts are a great way to decorate a playground for toddlers in kindergarten.
Colored bottles can be used to make life-size flowers or cartoon characters from popular films.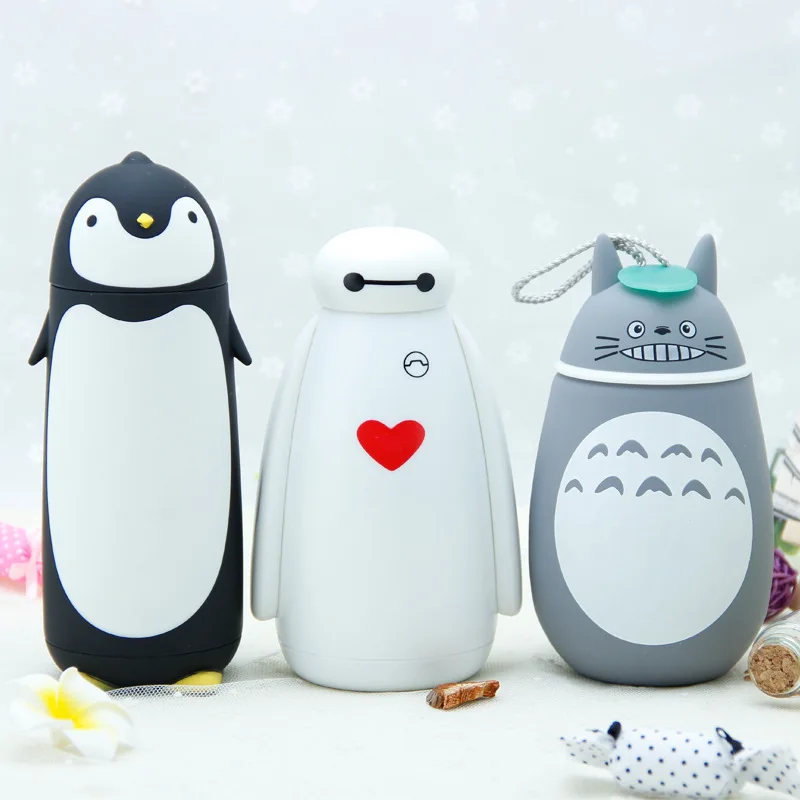 Children will be more than happy to explore and play with plastic characters, especially if they are the same height. Installing elements and characters of one cartoon on one site will allow children to plunge into a fairy tale and feel like the main participant in the events, like Alice in the “wonderland”.
Also, from jars of drinking yogurt and other fermented milk products, children together with their parents create animal figurines, New Year’s toys, nesting dolls and other masterpieces for competitions in kindergarten.
Chamomile
A simple craft that does not require painting, but nevertheless looks very impressive in a full-length bouquet.
For its manufacture you need to have:
- Several white plastic bottles from kefir, milk, drinking yogurt, 1-2 liters. (for petals).
- 3-5 yellow plastic or metal lids from a 3 liter jar.
- 2-3 green bottles (for foliage).
- 3-5 pieces of hard wire (to make flower stems).
- Glue and scissors.
- Green duct tape.
 (for petals).
 Process for creating daisies:
- Cut out identical ovals (petals) from the side walls of white bottles, along with part of the neck.
- Glue the petals with their necks to the inside of the yellow lids. Spread the bud so that all the petals are in the same plane. If desired, make a terry chamomile (if you make 2-3 rows of petals).
- From green bottles, cut off the necks (3-5 pcs.) with a grip of 5 cm of plastic and glue it to the yellow cap from the inside (creating a tapering green part of the bud, and then the stem will be inserted into the neck).
- Cut out leaves from green bottles and attach them to the wire (stem). Do this with sticky tape.
- Wrap the wire (stem) with green electrical tape.
- Insert the stem into the neck of the bud (for a strong fixation it is worth wrapping more tape around the end of the stem so that it fits tightly into the neck of the bottle) and fix it with tape.
- Ready-made flowers put in an outdoor vase or placed in a flower bed.
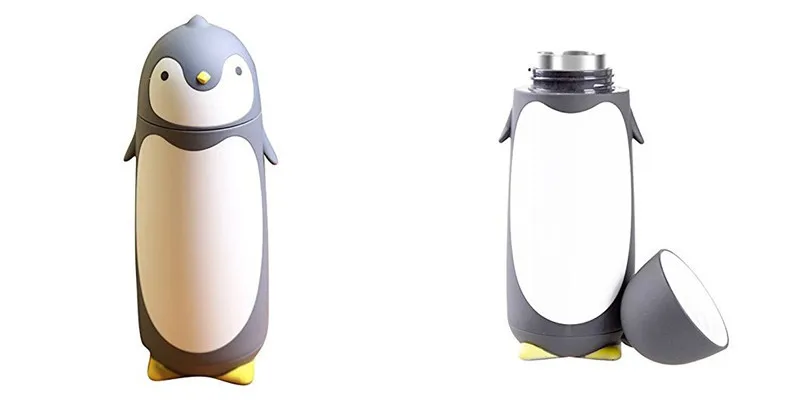
Penguin
Amazing bird figurines can be made from several bottles without cutting them, all you need is paint (black, white and red) and a few miniature hats (which are quickly created from children’s socks or sleeves of unwanted clothes).
Steps for making a family of penguins for the street:
- Take 2-3 plastic bottles (of any color or colorless) with an isthmus.
- Use a marker to draw the wings and muzzle of the penguins.
- Paint most of the bottles black (back and sides of the birds), front – white.
- Let the paint dry and paint on the eyes and beak.
- Put baby socks or doll hats on the neck of the bottles.
- If desired, the penguin girl can wear red beads with an elastic band and a handbag (which is easy to make from a container from a chocolate egg, a piece of wire and red paint). A penguin boy will look beautiful if he is tied with a small tie or bow.
- Completed figurines are recommended to be filled with sand and placed on a platform in a flower bed, under a tree or near a garden pond.
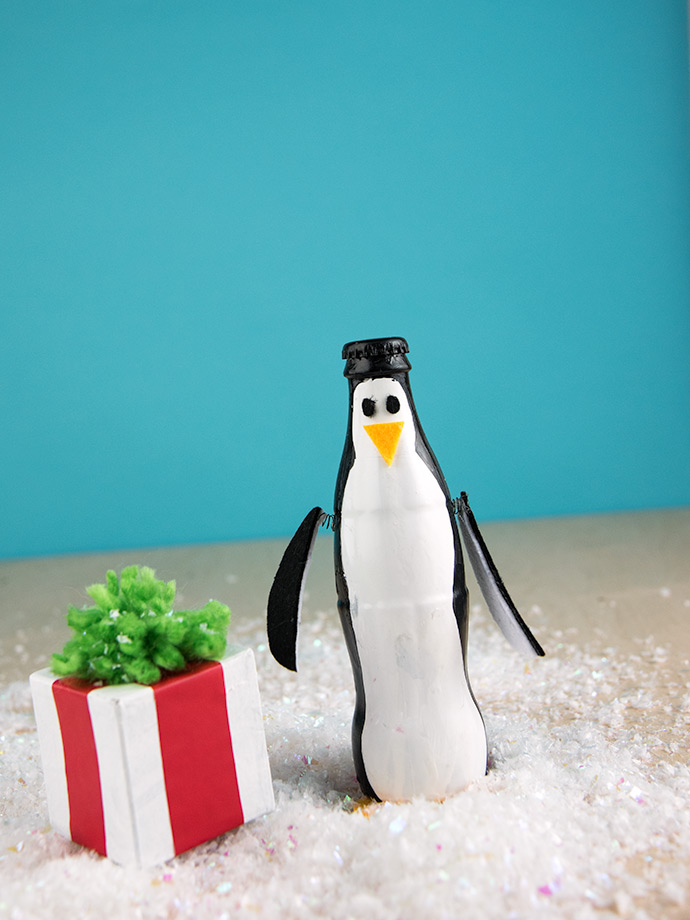
Another option for making penguins from plastic bottles is suitable as a craft for a kindergarten competition. These crafts can be made by a child with a little help from an adult.
How to make them with your own hands – step by step description:
- scarf fabrics.
- Cut off the bottom of one bottle (this will be the penguin’s hat) and cut the other in half.
- Connect two parts of the bottles with the bottoms in opposite directions and fix with adhesive tape along the seam, as shown in the photo:
- Color the penguin.
- After the paint has dried, tie up a scarf from a piece of fabric and glue on the pompom.
- If desired, glue beads or rhinestones onto the hat. The penguin is ready.
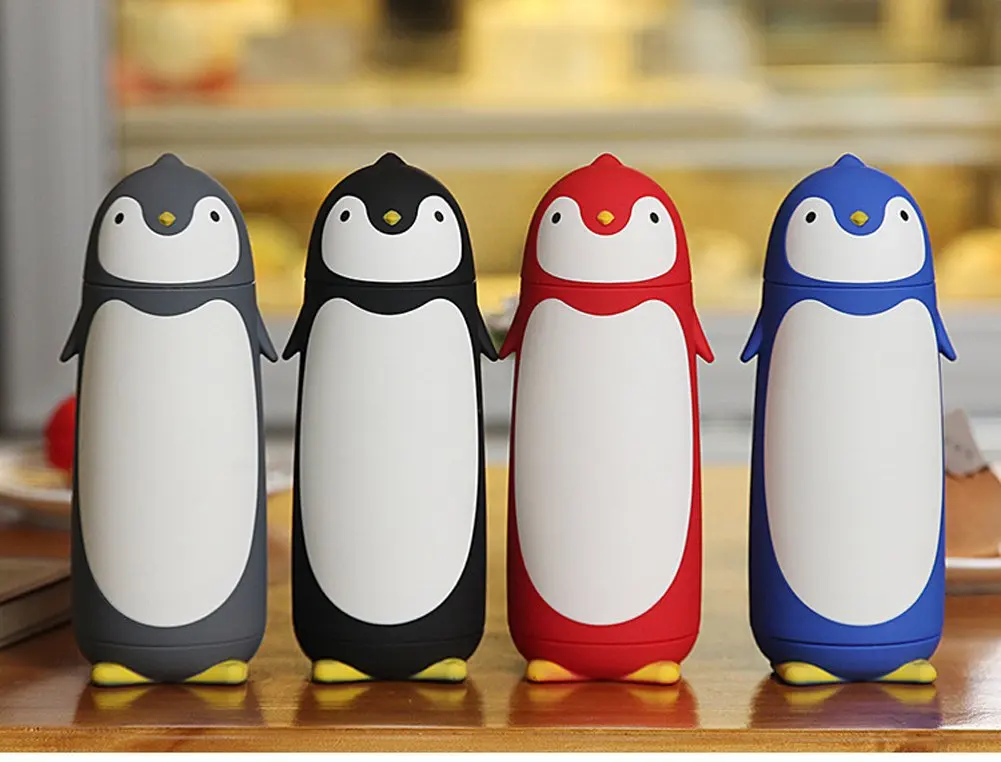
Crocodile
Crafts from plastic bottles, due to the availability and cheapness of the material, there are a wide variety of sizes and complexities. From simple children’s figurines from one or two containers to huge compositions from dozens of bottles. The figure “Crocodile” refers just to such crafts. Here are examples of two works, one can be done by a child of 3-5 years old, and not every adult can master the second.
For kindergarten, a small crocodile figurine will be more optimal. To make it, you will need:
- 2 plastic bottles with a long narrow neck.
- 8 caps (preferably green).
- Eyes.
- A sheet of green cardboard (or stiff felt).
- Green paint (acrylic, unscented or can), adhesive tape.
Making a crocodile:
- Cut off the bottoms of both bottles and connect them with adhesive tape so that the necks point in opposite directions.
- Glue 4 caps on the belly (previously make cuts in the bottle so that the figure becomes stable and the paws are in the same plane).
- Glue 2 covers in the eye area (these will be the eyelids).
- Color the shape green. Let dry.
- Make short longitudinal cuts along the back of the crocodile (the comb will be inserted into them).
- Cut triangles out of cardboard or felt and insert them into the slits on the back (you will get a characteristic comb).
- Glue eyes and eyelashes on the eyelids (optional).
- Glue cardboard or felt fingers to the paws (3 fingers per cover).
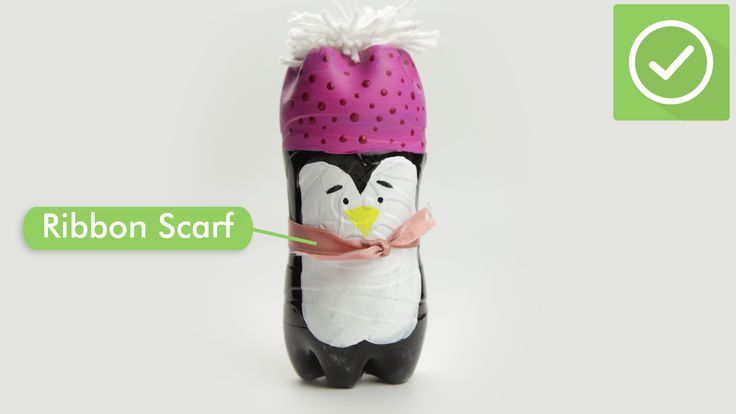
To intimidate the figure at the stage of collecting two bottles, it is possible to cut one of them lengthwise and cut out the reptile’s teeth with nail scissors. And when painting teeth to make white. Such a craft will definitely not go unnoticed among others in kindergarten.
Bees
The fascinating process of making small bees will surely captivate all family members and inspire further creative fantasies from plastic. To decorate a children’s corner on the playground, a small swarm of bees hanging on a tree looks great.
Materials needed: small transparent plastic containers, up to 1 liter, black electrical tape, yellow paint, thread, scissors and felt-tip pen.
Production:
- Pour a little yellow paint into the bottles, close the lid and shake to paint all the walls from the inside. Drain off the rest of the paint.
- Open the lid and let the paint dry.
- Wrap the bottles with black electrical tape, imitating stripes on the body of a bee.
- Draw eyes on the lid.
- Make 2 cuts on the back of the bees and insert transparent wings (ovals made of transparent plastic).
- Hang insects on a tree.
Such bees will serve for a long time, decorating the site, and will not bite.
Butterflies
Crafts made from plastic bottles can become real masterpieces of art, indistinguishable from living insects. An example of this are the most beautiful handmade butterflies made from transparent bottles, candles and nail polish.
Manufacturing instructions:
- Cut out the middle part of the transparent smooth bottle.
- Draw the pattern of the desired butterfly on paper or print it from the Internet.
- Transfer template to plastic.
- Then cut out the outlines of the butterfly and color with nail polishes.
- At the request of the author, decorate the body of the insect with beads planted on glue.
- Melt the edges of the craft over a candle flame to make it smoother.
Hedgehogs
All children love these funny animals. Crafts from brown plastic bottles are no less charming and very similar to a living hedgehog.
For the hedgehog you need:
- Collect several identical brown bottles with a corrugated bottom. Leave one bottle whole (this will be the basis of the craft), and cut off the bottoms of the rest and cut them in the form of needles.
- Attach the bottoms to the hedgehog’s body with glue or nails. If the mount is chosen with nails, then the base of the hedgehog must be cut from the side of the abdomen and when screwing the nail, use small wooden blocks.
- Glue on the eyes and screw on the black cap (this will be the nose).
- Glue 4 black caps to the belly to make the figurine stable, which will act as paws.
Helicopter
A miniature helicopter is easy to make from a baby yogurt bottle, 3 straws and a tennis ball.
Assembly sequence:
- Cut off the top and strip from the bottle.
- Make a round hole in the lid and insert a tube with a bent end into it.
- Attach the strip to the part of the bottle with a stapler, and then attach it to the halves of the tubes.
- Insert the ball into the bottle. Draw the cockpit with a marker.
- Form propeller blades from two straight tubes and attach them to the cockpit with a pin.
Matryoshka
A wide variety of matryoshkas and dolls can be painted on bottles that require only cutting off the bottom, taking paints and turning on your imagination.
The bottle must first be drawn with outlines to facilitate coloring. In a similar way, you can create big chess and teach your child to play.
Fly agaric
Bright mushrooms are regular guests of any garden plot. They look great in bunches under trees in the grass. Making them is easy.
Materials for 1 mushroom:
- Bottle with grooved bottom.
- Red, white and beige.
- Brush and glue.
Production:
- Cut off the top part with cap and bottom from the bottle.
- Turn the bottom part over and put it on the lid, fixing it with glue.
- Color the mushroom (beige stem, red hat with white polka dots).
- At the base of the stem of the fly agaric, finish the grass with a green marker (optional).
The mushroom is ready.
Plastic bottles in garden decor
Crafts made from plastic bottles have become an integral part in the arrangement of a personal plot. Scoops, planters, lamps, brooms, animals in a children’s corner, furniture, and even greenhouses and boats are made from plastic containers. A pleasant bonus of such a hobby is the durability of the invention and, of course, its low cost.
Beautiful flower beds
With plastic containers you can create stunning flower beds. They are both traditional and hanging (or wall). The latter allow you to revive and decorate with benefit the empty walls of the fence or structures.
By hanging a few bottles with a cut-out window and filling them with earth, you can grow greenery or hanging flowers all year round. Such a green wall will decorate any interior and create a feeling of airiness. The new airport in the Crimea (Simferopol) is decorated in this technique, striking with its beauty all the guests of the city.
Traditional flowerbeds are decorated with plastic bottles no less original. They are usually framed with painted and filled with sand or water bottles, half buried in the ground. When implementing this idea, it is worthwhile to carefully approach the selection of material (all bottles are desirable to have the same size and type.
Flowers, palm trees
Flowers of amazing beauty are obtained from empty containers for shampoos, shower gels, household chemicals, since plastic already has a bright and rich color and doesn’t need to be dyed, and thick yogurt packs make excellent bases for white daisies.0003
An example of flower buds from shampoo packages (author’s work):
Instructions for action: If a plastic container with a corrugated bottom is lying around in the country house, then the bottoms of the bottles can be used for flower arrangements, for example in the picture:
colors by cutting the plastic material. Make a hole in the center of each with a heated awl.
Palm tree – southern tree, reminiscent of a vacation at sea. To make it in your garden you will need: Do-it-yourself palm tree making algorithm: along, cutting the edges of the leaves. Chart reference:
Large plastic water bottles make cute animals that will decorate the children’s corner and enliven the space in the garden. They can be made empty or in the form of small flower beds. Miniature piggy beds with succulents or blooming petunias look funny, creating a creative hairstyle for the animal. Piglets are made very quickly, it requires several large bottles and paint. If the pig is planned in the form of a flower bed, then it is better to make it without legs, and if in the form of a decoration, then with hooves. Work process step by step: Another interesting character is obtained from 1.5-2 liter bottles – a large crow that can be placed in a nest on a fruit tree. It is made from several long bottles and paint (black and gray).
If desired, the foliage can be increased.
Animals for the garden
Steps for making a crow:
- From one bottle, cut out the head of a crow, cutting off the neck and forming a beak.
- Make a hole in the neck area, the diameter of the neck of the second bottle.
- Use the second bottle whole. In it, you only need to make 2 cuts on the sides for the wings and one for the tail.
- Connect the crow’s body to the head.
- Cut out the tail and wings from the third bottle.
- Paint all parts of the bird and join.
- Attach a bow to the head for decoration.
Air curtains for the garden
One of the most unusual and chic interior decor ideas is bottle bottom air curtains. With patience and collecting a lot of identical bottoms, you can create a real masterpiece that will please the eye for more than one year. If you hang them as curtains in an open gazebo, guests will be delighted.
How to create a similar curtain, algorithm of actions:
- Collect many bottoms of the same size and color by cutting them out of the same bottles and melt the edges with a candle (so as not to get hurt during further work).
- Cut out flowers from the bottoms.
- Use a heated awl to make 3-4 holes in each flower (in the petals), this is necessary to fasten the parts of the curtain together.
- Connect the bottoms of the fishing line at the same distance from each other in a checkerboard pattern.
- Hang the resulting fabric on the hooks.
Lamps and chandeliers for the garden
A similar method (like air curtains from the bottoms) can make very beautiful lamps for summer cottages, especially if you use colored plastic containers.
To implement the idea, you need to find a chandelier frame (a circle with a cartridge), to which you can hang a part of the air curtain (description given above) and place it in the right place. Another way to create an unusual garden lamp is to use a 10 liter bottle as a base.
Crafts from plastic bottles: garden lamp
The sequence of steps for making a chandelier from a large container and plastic flowers (as in the second photo):
- Cut off the top with a neck from a 10-liter bottle.
- Cut out flower buds from 2 liter transparent bottles, melt the edges and create curves (heating over a candle flame). Collect 5-7 buds.
- Glue or otherwise attach flower buds to the edges of the bottle.
- Insert the cartridge into the neck.
- Make a round hole in the cover and thread the wire through it. Screw on the cover.
- It remains to check the lighting dynamics and hang the resulting chandelier.
It is not recommended to use powerful bulbs in plastic lamps, as this can lead to excessive heating and deformation of the structure.
Bottle Path
Creative gardeners can build a garden path out of any material at hand and get admiring glances from all the neighbors as a result. An example of this is the methods of making paths from plastic containers.
Types of paths and their manufacturing features:
| Used material | The bottles are placed perpendicular to the ground and buried with their necks in the ground, thus creating a ridge fence. | Need to have many containers of the same type and need to secure bottles (concrete pouring) so they don’t fall apart |
| The corrugated bottoms of the bottles | cut off the bottom are laid up the convex side at the same distance from each other to dry concrete | due to the airiness of the design and partial fullness of the convex bottom, the track may deform |
| The brightest and most labor-intensive method, requiring a large number of covers. |
||
| Combination of all materials | Combination of all the methods and materials described above. | An excellent option if you have a lot of source material, time and desire. |
Any walkway requires formwork and ground preparation to keep its shape.
Greenhouses from plastic bottles
It would seem that making a greenhouse or greenhouse from plastic bottles is a ridiculous idea, but the owners of unusual structures appreciated their advantages, namely:
- The bottles transmit and diffuse light very well.
- The material is strong enough, in contrast to film covers.
- Low cost and minimal labor.
- Light weight and excellent mobility (quickly dismantled and moved by one person if necessary).
- There are no restrictions on the size of the structure.
Examples of finished greenhouse and greenhouse:
To create a compact greenhouse you need:
- 1.
5-2 liter plastic bottles, approx. 200 pcs.
- Wooden frame (as in the second photo). Manufactured to your specifications.
- Rope or heavy rope.
- Tools (nails, hooks, loops, hammer, screwdriver).
Making a greenhouse-book:
- Screw the loops around the perimeter of the frame in the form of a book (the distance between them should be equal to the thickness of the bottle used).
- Cut the cord into equal parts (each part should hold about 5 bottles in length and have a small margin for strings).
- In all bottles, make holes for the cord in the bottoms.
- String 5 bottles on each cord (according to the principle of assembling beads) and fix them so that they do not move.
- Tie threads with bottles to the frame and pull.
- The finished greenhouse is open on both sides. If necessary, similarly make side triangular doors.
To assemble a larger greenhouse, the same technology is used on a wooden frame with the addition of hinged doors and a roof. The greenhouse can be made entirely of bottles or partially covered with foil. A greenhouse measuring 2 * 2 * 2 m will require from 500 to 1000 bottles.
The foundation is necessary in this case, but it must be separately built according to standard rules and connected to the plastic structure for the period of active use. A finished greenhouse or greenhouse will last for several years with careful use.
Pergolas from bottles
An economical and original way to create a pergola with your own hands is to use plastic containers. The structure is being built according to the principle of a greenhouse or greenhouse (described above), but more airiness is provided.
For a variety of ideas, it is recommended to decorate the entrance to the gazebo with a curtain made of covers or an air curtain. The result is a cozy place to relax, as in the picture above.
Household supplies from plastic bottles
Plastic bottles in the form of various crafts help gardeners and gardeners to make life easier and save money. Washstands, scoops, devices for watering plants and other necessary accessories that are very necessary in the garden are quickly created from ordinary plastic bottles, and can last for several years.
Washbasins and boxes
If you have a used 5 liter bottle on the farm, you can turn it into a washstand if you purchase a special valve for water supply. The bottle needs to be turned over, fixed to a tree or a rigid structure, cut a hole in the bottom (for replenishing water) and insert the valve into the cap.
If there is a need to make boxes for storing inventory, then large bottles or canisters are needed, in which the lid is cut out and the clasp is sewn on.
Scoops and spatulas
The most necessary and durable thing in everyday life is created from a dense canister with a handle, in which part of the wall is cut out and the lid is screwed on.
Use of such a device will be very convenient for pouring soil into pots, spreading fertilizer or other work with loose objects. And if you add a wooden blade to the scoop, you get a full-fledged spatula.
Slippers
These shoes are created from one bottle more often as a decorative decoration of a garden house.
To make a slipper you need:
- cut out 3 blanks shown in the photo from the bottle;
- glue 2 parts of the sole;
- sew on toes;
- Decorate with plastic flowers if desired.
Rodent and Insect Repellent
A handy and effective item is made from several plastic bottles to repel moles and annoying insects. In each bottle, square windows are cut out (three cuts) and folded outward. Then the bottle is mounted on a metal pin and stuck into the ground.
It turns out like a spinner, when moving from the wind, the bottle creates noise that scares away moles and insects within a radius of 1-2 meters. On the entire site it is required to put several such turntables.
Tool boxes
Storage spaces in the garage, shed or basement are always in demand. In order not to buy ready-made furniture, save money, and at the same time restore the desired order, plastic canisters will help (they are often thrown away after construction work). By cutting off one wall of the canister and placing it on a shelf or in a specially built box, you get a real roomy cabinet.
Also suitable for easy storage and use of small items (such as nails) is a design made of transparent plastic bottles screwed to the shelf with lids. The bottle is easy to unscrew, items do not crumble and do not take up extra space.
Device for deep watering of plants and their night heating
People who have a summer cottage far from their place of residence are often puzzled by the question of automatic watering of plants. There is a simple and proven way to moisten the ground near a seedling – to bury a plastic bottle with many holes next to it. Moreover, the neck of the container should remain on the surface of the earth.
Then, using a funnel, fill the container with water and do not worry about watering for 2-3 days. In extreme heat, it is additionally recommended to lay hay or straw on the ground around the seedling (this will protect the surface of the earth from quick drying and hardening.
The second option for auto watering plants is to dig an inverted plastic bottle next to the plant (cap down, in which holes are made) , cut off the bottom and pour water in. Gradually, the water will penetrate to the roots of the plant and moisten the ground.0003
A third option is to hang a plastic water bottle over each plant. Make several holes in the lid of the container. Thus, drip irrigation will be carried out.
But if it is necessary to ensure the heating of plants at night, large plastic bottles (2-5 liters) will come to the rescue. Having cut off the bottom of the bottle, the seedling is closed and dug in with earth, in case of windy weather. The individual greenhouse is ready. Adjustment of temperature inside is carried out by unscrewing and screwing of a cover.
Gardening knee pads
Useful item for the elderly to safely and comfortably sit on the ground while kneeling.
To make the knee pads, you will need to cut two rectangles from a smooth bottle and attach the ties (2 for each knee pad).
Pots for flowers
Created in an elementary way, for this, a planter is cut out of a bottle and painted with paints at the discretion of the author. The flight of fancy in this case is unlimited.
If necessary, pots can be hung by making two holes on the side.
Candlestick
For small candles, a corrugated bottle base is ideal.
The cut off part is painted with markers and melted with a candle flame. Romantic craft is ready.
Broom
This is the main device for putting things in order on the territory of the personal plot, especially in the autumn season, when a large amount of foliage falls and it needs to be removed. A broom made of rods in this case is less attractive, since it requires being in a state of inclination, and the rods can break off.
Plastic broom from bottles is a godsend, it is durable, does not break, does not bend and looks very presentable. To make such a broom, you will need several 1.5 or 2 liter bottles (4-5 pcs.), As well as a wooden stick and nails.
Procedure:
- Remove all labels from the container.
- Cut off bottoms of bottles.
- Cut the bottles into lengthwise strips (not reaching the neck).
- Cut off the necks of all but one bottle.
- Flatten all bottles in the same plane.
- Put all the other cut bottles on the bottle with a neck
- You will get a broom blank so that it does not spread, you must constantly hold it with one hand or press it down with a stone.
- Take another bottle and cut off half of it, take the upper part to work.
- Slip the cut half over the assembled workpiece.
- Use an awl to make two holes in the whole structure through all the bottles (this is necessary to fix the craft).
- Sew the broom with nylon thread.
- Fasten the thread inside.
- Insert a wooden stick into the necks.
- Drive 1-2 nails through plastic and wood to secure the handle.
- Cut the pile and the broom is ready.
Funnels
Household funnel is a necessary thing in any home. However, it is not often used, which is why many housewives forget about it until the moment when it is necessary to pour liquids or pour something from one container with a narrow neck into another.
In such cases, a plastic bottle of any size will always come to the rescue. It is enough to carefully cut off the top of the bottle with a neck and apply as needed. The main thing to consider is that you need to cut off the bottle at an angle, which will facilitate its use.
These funnels are very convenient for motorists for pouring gasoline or engine oil, as well as for pouring antifreeze liquid in winter.
Bird feeders
This is probably the easiest craft that you can quickly make from 2 bottles (5 l and 2 l).
Sequence of actions:
- Cut out 3 windows from a large bottle, stepping back 5-7 cm from the bottom and bend the resulting “roof” up (this will protect the birds from rain).
- Cut off the bottom of the 2 liter bottle and remove the cap. Then insert it through the window inside a large container with the neck down (this will be a grain tank that will protect the food from wind and snow).
- Hang the feeder and pour grain through the neck into the small bottle.
- Screw cap on large bottle.
- The feeder is ready. As the birds eat food from the bottom of the large bottle, the grain will automatically be poured from the small container.
DIY crafts made from plastic bottles can not only last for many years and be very useful in everyday life, but also become real masterpieces of art, decorating any house with a garden plot.
Article design: Natalie Podolskaya
Video about crafts from plastic (plastic) bottles
Crafts from plastic bottles – options for ideas:
basic ideas and options for using household plastic (90 photos). Cases and organizers from plastic bottles
Plastic bottles are a material available in every home. If you have not yet figured out how to “put them into action”, the Motherhood portal offers craft ideas for joint activities with a child!
Plastic bottles can be used to make a variety of things, from animals and toys to sports equipment, from delicate flowers to lampshades and curtains.
Plastic bottle toys
1. 5 liter plastic bottles can be used to make animal figurines. Look what a wonderful dog turned out of green bottles!
Try to simulate an airplane. You can glue the frame with colored paper and make portholes with passengers. Or just put your favorite toy in a special slot.
A plastic bottle, cocktail straws and a ping-pong ball can be used to construct a helicopter with a stapler.
A real floating catamaran for dolls can be made from two plastic bottles.
A more complex craft using heat and melt parts of the structure looks just gorgeous. Look, it turned out to be a real Frog Princess!
By heating and melting plastic, you can make a naturalistic crayfish, and then “settle” it in an aquarium.
A series of colorful nesting dolls can be made from plastic bottles pasted over with colored self-adhesive paper. The second option is paints for glass surfaces.
From several bottles movably fastened together with screws, you can get a bright and memorable snake or shark, as you like.
For a Christmas theme, try making adorable colorful penguins from the bottoms of plastic bottles. We cut them, put a “hat” on the penguin, color it, add bright details: a pompom and a scarf.
If you need a craft with a Christmas theme, try making an Orthodox church out of plastic bottles. The dome tops are easiest to mold from plasticine, crosses are made from wire, and then wrapped in golden metallized paper. White edging of window openings on colored plastic gives a special elegance to the craft. They can be done with a “stroke” corrector, or a thin strip of white plasticine.
In a similar way, you can build a whole castle. Plastic bottles will form the frame for the four corner towers. Slots are made in them for windows or loopholes, on top they are coated with plasticine, on which the texture of brick and “white stone” decorations are applied. The walls of the castle are made of cardboard and also coated with plasticine. This impressive craft is sure to bring a lot of joy to your child.
Insects
Children are interested in insects. Together with them, draw and cut out a beetle, butterfly, cockroach or caterpillar from a plastic bottle. They must love it!
If you approach the issue more carefully, you can build an insect from bottles in all details.
Starry sky in a bottle
Inside an ordinary bottle, you can create a magical and fabulous galaxy. We will need: wat, glycerin, colored sparkles and a little dye. We put a piece of cotton wool inside a transparent jar or bottle, add sparkles. Pour in a jar of glycerin to obtain the effect of viscosity. Then add food coloring. You can make several shades inside one container. But at the same time, each time we add cotton wool and sparkles. Carefully fill everything with water. We glue the bottle cap along the edge so that it is airtight.
Homemade flowers
You can make a bouquet of lilies of the valley in a vase from an ordinary green bottle. To do this, cut the bottle according to the scheme. We put large foam balls on thin twigs-stalks.
Cutting and melting the necks of plastic bottles produces gorgeous flowers.
With some skill, you can depict cacti and other indoor plants.
Would you like to add color to a dull winter landscape and plant fabulous plants right on the snow? Plastic bottles come in handy!
Asters can be made from colored plastic cups. To do this, cut off the rounded edge, make cuts, wrap the edges of the cups and connect them according to the scheme.
Vases and stands
Using the lower parts of plastic bottles, we model flower vases. Such homemade vases are not inferior to real crystal ones!
Household handicrafts
Practical craftswomen are offered to make handicrafts that occur in everyday life.
Make a beautiful needle holder. A wonderful gift for mom or grandmother, easy to make and affordable even for a small child.
Schoolchildren and teenagers can please their mother or girlfriend with a unique mobile phone holder while charging. Such a useful hand-made, painted with stained glass paints according to your own sketch, will undoubtedly bring joy to your loved ones!
A housewife always needs a transparent container in which it is easy to find the right thing. Such a storage box can be made by a boy as a gift to his mother. To do this, you need to cut a plastic bottle, walk along the future joints of the box parts with a heated awl, forming holes. It remains to connect the parts of the product with lacing or a zipper.
If you are a schoolboy and are thinking about what to give your dad or brother, pay attention to these homemade dumbbells for sports. You will need several bottles, two wooden sticks for the handle, glue, electrical tape and regular sand. A fun and useful gift is guaranteed!
A plastic bottle with a handle makes it easy to make a handy dustpan.
Even slippers can be made from a plastic bottle. This product looks unusual. But the question of convenience remains open.
Jewelery stand can also be made from plastic bottle bottoms.
Interior details
You can surprise and amuse guests at a theme party by making wall compositions-heads from canisters and plastic bottles.
Plastic from bottles can be cut into such delicate and elegant panels that the audience will hardly guess what it is made of.
Using plastic bottles, you can create a lamp, night light or chandelier.
And you can make a lampshade from plastic cups.
Using the bottoms of transparent bottles, you can create original and stylish curtains.
Christmas crafts from plastic bottles and disposable cups
A Christmas tree made from disposable cups and tinsel can decorate your lobby or classroom.
The top of the bottles make stylish Christmas bells.
Having painted the bottoms of the bottles of bluish plastic, we create a round dance of snowflakes.
A plastic bottle can serve as a frame for a funny Santa Claus. We make the face of the New Year’s grandfather from a napkin or colored paper, hair and beard from cotton wool.
And such a snowman can be made by the whole group in kindergarten. Success at the review of New Year’s crafts is guaranteed!
Get inspired and start creating! After all, there is so much more to do before the New Year!
Photo sources:
Hello everyone, friends!🙌💖
For a long time today I thought about what topic to write a review on. And after reviewing a lot of material, I came to the conclusion that the article would be about homemade products for plots and at home. It would seem a plastic bottle, throw it away and everything else that can be done with it. And, it turns out a lot of interesting and original.
For example, from them, you can make flowers, a feeder, a planter, decorate a flower bed with extraordinary works and much more. And in this article we will try to show you the most awesome ideas for creativity. So, eggplants, as people call them, we don’t throw them away, they will be useful to us for crafts in the garden or can be a decoration for a country house, garden or vegetable garden. In a word, one hundred percent will be useful in everyday life.
Tell us how you decorate your soda lots? Maybe you have original ideas for landscaping a summer house or a house. We are very interested, please write to us in the comments. 😉😊 Show your imagination and success in any business is guaranteed.
Get comfortable in your chair because the review will be long and exciting.
Crafts from plastic bottles for summer cottages, gardens and gardens (photo with description)
The heat is getting closer and gardeners are already thinking about how to improve their favorite land. Let’s see the most popular ideas that are easy to do with your own hands. And as an option, we propose to start making a flower bed a train.
For work we need:
- plastic bottles of various sizes;
- paint.
- scissors.
Paint the driver’s cab blue and draw the eyes, nose and smile on the locomotive. Then take the eggplants and cut out one side with a rectangle. We paint with waterproof paint, we make the wheels of a steam locomotive from logs. We put the wagons close to each other. We fix the pipes with hot glue.
Found a colorful flowerbed caterpillar. It is made on the same principle as a steam locomotive, only the legs are cut out of linoleum, the muzzle is drawn on a wooden circle, the antennae are made of plastic eggs and wire.
We liked two garden figurines. Good, right?
An interesting option seemed to us pigs. And, they are convenient in that they are mobile portable pigs – the flower beds look amazing. It won’t be hard to make them.
For work we need:
- 6 liter plastic bottle;
- 4 bottles of 1.5 or 2 liters;
- spray paint;
- hot glue.
Take 1.5 liter 4 bottles and cut off the tops of all as in the picture below. They will serve us as the legs of the pig.
Apply hot glue to the drawn circle and glue the legs. Then, using a ruler and a felt-tip pen, we draw lines in order to cut out the back. This is necessary in order to be able to plant flowers inside.
Don’t forget to make small holes when watering the flowers to drain unwanted moisture. We cut out the ears and tail of the pig from plastic, fix them all with hot glue. We take the paint and apply it to the craft.
Draw eyes and heels. mobile flower bed is ready. We draw eyes and heels. Mobile flower bed is ready. You can put it anywhere and anywhere.
If you want the paint to last much longer, then choose a waterproof one, but better cover it with a good varnish.
All people have different fantasies, and creative works are amazing and never cease to amaze. For the next creativity, we need a large plastic container. We cut off her upper part, and then process the outside with a degreaser. We paint with acrylic paint imitating brick laying. The cache-pot (flower bed) for the flower is ready. We plant beautiful flowers. Then you can do everything as in the photo, or you can leave it like that. It will also look very nice.
And how do you look at the number of swans in your area? Looks very interesting and beautiful.
In fact, all the works are wonderful, what distinguishes them is that some are easy to make, while others are more difficult.
If you have a large plot and you do not plan to plant it completely, but it is a pity to leave it, then the following ideas are for you.
I liked the idea of swans on the pond. Amazing work, do you like it?
We found a photo for you with a description of how to make a lily with your own hands, for a pond. All this is of course a lot of work.
From a plastic container, you can make a product for watering flowers, the local area where beautiful green grass grows. In addition, you will save water, which is very good. Drip irrigation from above and under the root.
From this material, there can be not only beautiful works for decorating the garden, but also useful ones. There is no way to buy a lawn irrigation system, so it does not matter. We will make everything you want.😊😉
Cheap and the lawn is green. Class! Since we are talking about usefulness, I bring to your attention charming feeders, besides, they will decorate the garden. I really like them, they are just amazing. And by the way, they are suitable for decorating a kindergarten.
Let’s take a closer look at how to make an interesting bird feeder. And so we cut off the top of the bottle, as in the photo.
Let’s connect two parts and get a feeder with a roof.
We make four holes on the cork, put a wire or rope through them and fasten the feeder to the tree. We fix the roof with hot glue.
We paint the craft, dry it, pour millet. We take care of the birds.
You can decorate the feeder as you like. Someone likes to keep everything to a minimum, and someone likes it to look catchy and catch the eye with excellent DIY crafts.
Original Plastic Crafts for Beginners
We often think about what to do with ourselves as a newcomer. We want to develop ourselves, and it is better to do this through creativity and no matter which one you choose. And so let’s move on to work from plastic material, and in our case, these are plastic eggplants.
We were looking for easy work, so that a beginner could create beauty the first time. It’s possible, don’t be surprised. Stock up on patience and desire. Perhaps from the lungs there will be a bird feeder.
Take a 6 liter eggplant, cut out a window from the wall of the bottle. We make small holes on the side, insert two sticks and put cardboard inside. We put grain on it. At the bottom you can crumble bread or seeds.
Let’s move on to another creative work, namely, we will make flower pots.
We need:
- 1.5-2 liter plastic bottle;
- paint;
- scissors
Cut the eggplant into three pieces. Take the upper part, circle the penny around the edge and make a wavy edge. Next, paint in any color that suits your decor. We decorate the second part with different flowers or just paint.
There is another interesting version of a planter from a bottle. They can not only improve the cottage, but also put at home or on the balcony. Take an eggplant cut in half or choose any other height. Using hot glue, glue the cork, and then the eyes. The pot is ready for use. I think it’s very nice.
And you can make something like that. The main thing here is time, desire and fantasy.
If you want to make a vertical garden, then plastic bottles will help you with this.
It’s cool, for example, to grow fox salads. Very comfortably!
What else can a novice master easily make. For flowers, draw a leaf template. Circle around the bottom of the bottle. Cut and unfold leaves. We paint from a spray can in any color, in the center with hot glue we fix the middle of the cork. And, you can make a different flower, paint the center. Two flowers look very nice.
For painting crafts, choose a waterproof paint, and it is better to varnish on top.
We decorate the fence with flowers, see how it will look in the photo below. What else is good is that we make flowers from two parts of the bottle (top and bottom).
We improve the path along the cuts with eggplants. First we paint them, and then we decorate the bottom in the form of a flower.
The bells look amazing and are easy to make.
Workshops on making crafts from plastic bottles
It’s time to move on to the master class. And we will create donkeys from eggplants. You are ready? Then let’s not delay, but go straight to the point.
For creativity, we need the following materials:
- drinking yoghurt bottles 4 pieces;
- one and a half on the neck;
- Two liter donkey face bottle;
- 3 liter eggplant (5 liters can be used) per body;
- One 1.5 l. on the ears;
- paints (gray and white).
We fix eggplants with hot glue or screws. The photo below shows how you should make a donkey.
Let’s show a step-by-step photo of how to make a donkey. We take a container for the body and cut off the top. Attach yogurt lids to one side. We fasten the containers to the lids.
We attach the neck and head to the donkey.
Here’s another photo for you to see how it should turn out.
It remains to add a few details and the craft will already look like a donkey. And, it is we who make and fasten the ears.
The most convenient way to paint with spray paint. When the paint dries, draw eyes. The result is such a wonderful donkey.
How do you like this donkey?
The work process is the same, but the animal is already different, and this time the giraffe. Everyone has a different fantasy, that’s why the animals are individual. And it’s actually really cool!
This is what a giraffe looks like in the country.😊
Elephant, also a frequent visitor to many summer cottages. Don’t believe? See how to make it, and then we’ll show it to you. Ears, legs, torso, tail are all made of plastic containers, but we make a trunk from a rubber hose or a plastic pipe.
Elephant visiting gardener’s dacha.👨🌾
Elephants are so cute, just super. Be sure to make yourself such an unusual guest.
Most often, animals are made from plastic containers. It is interesting to decorate the garden, and it turns out much cheaper than buying garden figurines. Cute penguins look great.😉
How do you like a big family? I really like.
Palm trees, flamingos, storks look original, and just imagine how they will show off in your country house. The beauty!
Any activity is painstaking work, but it’s worth it. Decorate soy plots and be the best!
Interesting ideas from a plastic bottle for children
Let’s start making toys for children from plastic bottles from the simplest ones. Now our children cannot be surprised, but we will try, because it’s healthy to play with new homemade toys in the fresh air. I liked the plane, so let’s create it together.
For the toy we need:
- 0.5 liter plastic container;
- double sided tape;
- colored paper;
Take a plastic container, remove the entire label. Wrap with double sided tape at the top and bottom. We tear off the top layer of adhesive tape, then wrap it in a white sheet of paper. First draw the tail of the plane.
We glue the tail with glue and glue the paper to the bottle. You should get something like the photo below.
Draw two identical wings and glue them to the tail of the aircraft.
You don’t scold me much, even though I have two sons, but I still don’t remember the names of the details on the plane. 🤦♀️🤷♀️ Therefore, we glue two cylinders of colored paper on the sides.
We glue two wings on the sides, our plane is almost ready.
Unscrew the lid, circle, cut out and decorate the aircraft. Let’s not forget about the turntable at the nose of the plane. Easy and simple to make a children’s toy. It is a pleasure to play with such a toy in the country.
You can choose any color. For example, we found such an aircraft. And everyone is good.
And let’s make the plane a little more complicated. You won’t need much materials to create, everything is the same, just add paint from a spray can. We will also need:
- plastic containers;
- white paper;
- cardboard;
- two-sided cattle;
- paint.
We measure the size of the paper for the bottle, then double-sided tape at the edge with glue. We wrap the container.
And immediately form the tail of the aircraft.
Let’s start making wings, we will make them out of cardboard. To do this, first draw in size, and then cut out.
We need more parts. I will not write the dimensions, they are clearly visible in the photo.
We stick to the base of the aircraft with double-sided tape or hot glue. We create four turbines from paper and corks.
Then we glue the turbines to the plane.
We cover everything with paint and let it dry well. This is how you should be. Choose the color to your taste.
We decorate the plane, cut out and add vents, fasten their buttons.
I liked the helicopter made of plastic containers, it also turns out to be an amazing interesting option.
You can make a lot of interesting and fun things from plastic containers for children. You can have outdoor tea. The service is just what you need.
House for dolls in the country is also needed. Idea for inspiration.
For smaller children, we will make such cool turtles.
Piggy bank in the house will not hurt. Cut a hole in the back. And you can decorate the pig beautifully. Children will put money there and learn to collect for their own purposes!
A lot of different ideas and they are all good in their own way. Those who do not want to spend money on expensive sculptures, we suggest you decorate your favorite area with plastic bottle crafts. As you already understood, you can make anything from them – vases, animals, mobile flower beds, toys for children and much more. Everything is simply uncountable.
Now this kind of creativity is gaining momentum more and more, and there is nothing shameful in it. It’s nice when the garden is landscaped with your own hands and it’s really great.
Thank you for your attention!😍 Come visit us and share your impressions and works in the comments. Creative success! And remember everything you do with your hands is exclusive!👨🌾👍💖
Do not rush to throw away used plastic containers, because there are still useful uses for them. In a new review, the author has collected the most interesting and practical examples of what else you can use unnecessary plastic bottles for.
1. Nautical themed decoration
To create a unique marine themed decoration, you will need a small plastic or glass bottle, which should be filled with plain water and seabed attributes: sand, shells, large beads that look like pearls, coins, shiny beads and shards of glass. When all the components of the composition are folded, drop a drop of blue food coloring, a few drops of vegetable oil and some sparkles into the bottle. It remains only to tighten the cork well and the stunning decoration is ready.
2. Stand for books and magazines
Simple manipulations will allow you to turn an unnecessary milk or juice canister into a convenient stand for books, newspapers and magazines.
3. Faucet Attachment
A handy faucet attachment can be cut out of the shampoo bottle, allowing your child to wash their hands or wash their face unaided without flooding the entire floor.
4. Napkin holder
The detergent bottle can be used to create a bright and practical napkin holder, the design of which is limited only by your imagination.
5. Stationery organizer
Instead of just throwing away your regular shampoo and shower gel bottles, turn them into colorful and fun coasters in the form of funny monsters. To get started, just cut off the necks of the bottles and mark the places for future cuts. From colored paper or fabric, you can cut out a variety of decorative elements, such as eyes, teeth and ears, and attach them to bottles using superglue. Finished products are best attached to the wall using double-sided tape.
6. Makeup Containers
Cut plastic bottles are great for making adorable storage containers for makeup brushes, makeup, ear buds and more.
7. Pouffe
You can make a charming pouffe out of a large amount of plastic containers, the process of creating which is quite simple and understandable. First you need to make a circle of plastic bottles of the same height and secure it with tape. The resulting structure must be well wrapped with a sheet of foamed polyethylene, securing all joints with adhesive tape. The base of the ottoman is ready, it remains only to sew a suitable cover for it.
8. Bracelets
Plastic bottles are an excellent basis for creating original bracelets. Use fabric, thread, leather, and any other materials to decorate the unsightly plastic base.
9. Stand for sweets
The bottoms of plastic bottles of different sizes, painted in the desired shade, can be used to create a spectacular multi-level stand for convenient and beautiful storage of sweets.
10. Scoop and spatula
Plastic milk and juice cans can be used to create a practical scoop and a handy little spatula.
11. Protective cap
A simple cap that can be made from an ordinary plastic bottle will help protect your phone from snow or rain.
12. Lamp
A small plastic canister can be a wonderful base for creating an original lamp.
13. Jewelry organizer
An amazing multi-level organizer that can be made from several plastic bottle bottoms strung on a metal needle.
14. Planters
Storage containers for spare parts.
Organize and organize your garage with spacious containers made from waste plastic jerry cans, which are great for storing small parts, nails, screws and other small items.
17. Toy
Armed with scissors, felt-tip pens and paints, you can turn unnecessary plastic containers into fun toys, the process of creation of which, as well as the result itself, will undoubtedly attract the attention of children.
Continuing the DIY theme.
Plastic bottles are considered garbage and are sent to the appropriate places – garbage cans and landfills. But in the right, creative hands, these things can sparkle with new colors. And you don’t have to be a master to breathe a second life into ordinary plastic. You just need to have a little patience and imagination.
Crafts are quite simple and everyone can do these things with their own hands. Or maybe for someone this business will become a real hobby.
Useful things from garbage
Plastic bottles come in different shapes. They are also different in color and size. Therefore, it is quite possible to make small decor items for the garden plot from them. And for a summer residence, plastic furniture or even a summer gazebo built from the same plastic utensils is quite suitable.
And even caps from plastic bottles in skillful hands can turn into real masterpieces – mosaics on the walls, a hot stand, cute toys for a child and other useful little things.
Everyone can make something. This is where fantasy plays the main role. After all, the material for making crafts is almost everywhere. They can be found in the park, on lawns, near the river and in landfills.
And by collecting them for his creativity, a person thereby purifies nature from harmful things. After all, plastic today has become a real disaster that threatens the environment. This material is durable, so the constructed crafts from plastic bottles will serve and delight for a long time.
Getting Started
In every decision, the main thing is the plan of action. In order to start working on a craft, you will need the following:
- a detailed description and photo of crafts from plastic bottles or one separate craft of your choice;
- bottles of suitable sizes and colors;
- additional materials and tools that may be useful: knife, scissors, adhesive tape, glue, paint, fabrics, etc.
Then you just need to be patient and follow the instructions. And soon the children will enjoy the new fabulous playground, the guests will be happy to spend time in the “almost crystal” gazebo, and the hostess will appreciate the unusual practical appliances in the kitchen.
Boxes
You can make an excellent box from plastic bottles, in which it will be convenient to store various little things: hair ties, buttons, paper clips. To do this, you need two lower parts of plastic bottles of the same size. They are interconnected by a zipper, which is sewn along the edges.
Or a simpler option – cut off the top of the bottle where it begins to narrow. The container is ready. It remains to decorate the bottle with decorative ribbon, buttons and beads. They are glued on. Sew a cap from the fabric, which is tightened with a cord and glue it to the edge of the container in the same way.
And it’s not at all difficult to make a convenient and original container for sandwiches, which you won’t be ashamed to take to school or work.
The main thing is to decorate it with a plan. And it is done in just a few steps.
The bathroom also has a place for a plastic box in which you can put all the necessary accessories: toothpastes and brushes, washcloths and shampoos. If these boxes are hung on the wall one above the other, then you can free up space.
Plastic bottles can make an unusual holder for pencils and pens. It is enough to cut it in a circle in the shape of a muzzle of a cat or an owl and paint it. In the same technique, a vase for flowers is made. Only for its stability, a handful of small pebbles should be poured onto the bottom.
Playground toys and decorations
To decorate playgrounds, they make decorations in the form of plants, animals and even insects.
For a palm tree, you need about 15 brown bottles, from which the trunk of a palm tree is made, and 7-10 green bottles for leaves. The barrel is assembled from bottles cut across, stringing them on a frame made of a strong rod.
To create leaves, green bottles need to be cut lengthwise to form the desired shape. To make longer leaves, you need to attach an additional one to the main sheet using a stapler.
You can decorate your garden even in winter. Funny penguins in colorful hats and scarves will cheer you up on a cold winter day. You can make penguins of different sizes. For one bird, you need two identical bottles that have a “waist” at the bottom.
This bottle must be cut in half. This will be the body of the penguin. At the second bottle, you only need to cut off the bottom with a small margin – these are the legs. Connect the two parts with a glue gun, paint. Make a pom-pom out of wool and a scarf out of a strip of fabric.
Such crafts are not stable, as plastic is a very light material. In order for the penguins to stand quietly in the chosen place, they must be filled with sand or small pebbles before gluing the parts.
Even plastic lids turn into cute ladybugs in skilled hands. You just need to color them accordingly and stick funny eyes.
If the plastic lids are joined to each other by the edges in the form of a small circle, then you get an original stand for a hot pot or kettle. Such a device is useful in the kitchen.
Flowers and plastic bottles
Flower beds can also be decorated in an original way with the help of plastic bottles. If you take the lower parts of the bottles, paint them in different colors and stick them into the ground next to each other, you can create a flower bed that will “bloom” all year round.
Bottle tops with caps can also be used as flower pots. They are not stable, but in the form of flower pots they will look fabulous.
Plastic bottles with a volume of 3-5 liters will make a bright flower bed-train. In each bottle, you need to cut one side part. Paint in different colors. Fill the bottles with earth, transplant garden undersized flowers into them. Lay them horizontally and lean against each other, creating wagons.
Furniture and buildings
The construction of a summer gazebo will require more costs and effort. After all, for construction, you will first need to make a frame of wood or metal. The walls are built from whole bottles, which are strung on a wire or rod.
First, a hole is made in the bottom of the bottle, the cap is unscrewed. A rod with strung bottles is attached to the frame in a horizontal or vertical position.
Bottles can be used to create a sofa, armchair, ottoman. Here you must first make separate blocks: seat, armrests, backrest. Then connect them, according to the design. Blocks are best made from 2-liter identical bottles.
On the top of the bottle (where the cap is) you need to put on the bottom of the other bottle so that you get the bottom of the bottle on both sides. All bottles, blocks are attached to each other with adhesive tape.