


Discovery bottles preschool: Easy Science Discovery Bottles – Little Bins for Little Hands
Easy Science Discovery Bottles – Little Bins for Little Hands
Easy discovery bottles with a science theme! The possibilities are endless and I have so many here for you to try. Here’s a few simple ones to get you started. Hope you enjoy! Take one of our science experiments and give it a twist by making a discovery bottle out of it. It’s fun to explore the same simple science concepts in different ways to reinforce learning and keep it fun and playful. Science discovery bottles are all about learning and having fun together.
Fun and Easy Science Discovery Bottles for Kids
WATTLE BOTTLE SCIENCE PROJECTS
Scientific bottles or discovery bottles allow kids of multiple ages to enjoy exploring easy science concepts together! Plus plastic science bottles are great to leave out in a basket at a science center at home or school. Sit down on the floor with young kids and allow them to roll them gently around.
TIP: You can tape or glue caps if needed!
Yes, I have used glass jars and I made sure to supervise my son closely. Please use plastic if that is best for you! We have started using the VOSS plastic water bottles for our discovery bottles and really enjoy them!
ALSO CHECK OUT: 21 Sensory Bottles For Kids
DISCOVERY BOTTLES FOR KIDS
Check out the following science discovery bottles ideas below. A few simple materials, a plastic or glass jar and you have your own learning in a bottle. Fun discovery bottles made from what you already have on hand!
MAGNET DISCOVERY BOTTLE
Fill a bottle with water and add pipe cleaners, paper clips and magnetic counters! Grab a wand and observe what happens.
SOAPY SCIENCE BOTTLE
Make an easy science discovery bottle with water, coloring and dish soap. Get shaking! Experiment with different soaps or ratio of water to soap for a more in depth science experiment!
SINK AND FLOAT DISCOVERY BOTTLE
Make a simple classic sink and float scientific bottle with stuff around the house. Have your child think about and predict what will sink and what will float. Turn the bottle on it’s side for a change of view.
YOU MAY ALSO LIKE: What dissolves in water?
OCEAN DISCOVERY BOTTLE
Check our ocean in a bottle post for how to make this easy ocean waves discovery bottle!
WATER ABSORPTION
1 tablespoon of water and two small sponges. Cover shake and watch the water disappear. Squeeze out the sponges and start over! Try different amounts of water and sponges for different results!
TORNADO IN A BOTTLE
Read the full post for details on how to make this very cool tornado science discovery bottle.
OIL AND WATER BOTTLE
Simple fun with just a few ingredients. Find out how to make your own homemade lava lamp here.
Looking for easy science experiments and science process information?
We have you covered…
—>>> FREE Science Activities For Kids
MORE FUN SCIENCE FOR KIDS
- SIMPLE ENGINEERING PROJECTS FOR KIDS
- WATER EXPERIMENTS
- SCIENCE IN A JAR
- SUMMER SLIME IDEAS
- EDIBLE SCIENCE EXPERIMENTS
- PHYSICS EXPERIMENTS FOR KIDS
- CHEMISTRY EXPERIMENTS
- STEM ACTIVITIES
Awesome and Easy Discovery Bottles For Kids!
Click on the image below or on the link for our complete list of science experiments for kids.
Creative and Educational Science Discovery Bottles
Save this idea for later so you don’t forget to use it!
95
shares
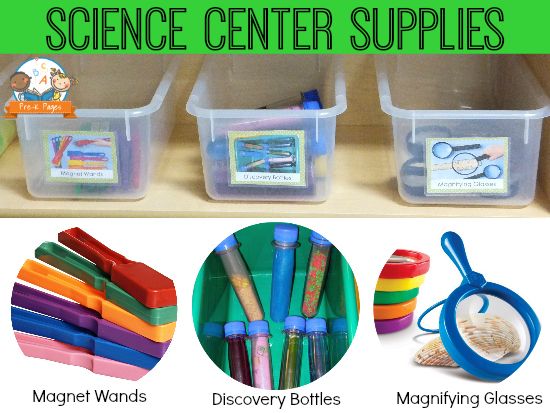
We love hands-on STEM activities for kids, but sometimes you need a quick science experiment for kids that is mess-free. When this is the case, we love using science discovery bottles to quickly learn about a concept with less mess.
You can re-use most of these over and over again and keep them in your science center for self-directed learning. There is a surprising number of things you can learn about with a discovery bottle, from weather to color mixing!
Try these fun bottles in your classroom or home today! After trying these ideas, use your imagination to create discovery bottles for all kinds of science themes! Try placing a plastic skeleton in a bottle when learning the names of bones, or try growing a water plant in a bottle to observe the growth of water plants up close! You could even make an ant farm discovery bottle with live ants. It’s the perfect addition to your spring STEM activities!
How to Make a Discovery Bottle
This post contains affiliate links for your convenience.
You don’t have to follow the same formula to make your science discovery bottles, but we like to use plastic bottles with screw-on lids. Gluing the lids closed will help prevent unwanted spills and make the bottles reusable. We usually use Smart Water bottles for our discovery bottles, but another popular option is VOSS water bottles, or you can even find little plastic craft storage bottles that work great for this. Glass bottles will also work well for older kids, which provides greater visibility for some projects.
The shelf life for most discovery bottles is between one and six months, depending on what they are made of. Using distilled water will prolong the life of your bottles, but eventually, the materials will break down in your discovery bottles, particularly if you are using natural materials like wood or flowers in your bottles.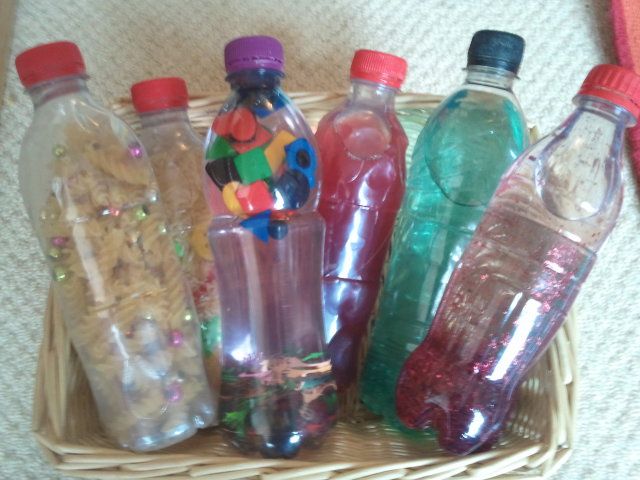 Bottles with natural materials may have a shelf life of only a few days.
If you want your materials to be suspended in the container, a thicker liquid, like clear glue or corn syrup (and even clear hair gel!) can be used to keep materials suspended in the jar longer. Baby oil is also the preferred oil for jars using oil, as it is easier to see through than vegetable oil.
Creative and Educational Science Discovery Bottles
Try these creative ideas for science discovery bottles for quick science lessons in your classroom!
Everyday Science Discovery Bottles
Magnetic Discovery Bottle from Schooling a Monkey
Scented Discovery Bottles from Pre-K Pages
Magnetic Powder Discovery Bottle from Left Brain Craft Brain
Magnetic Wand Discovery Bottle from Preschool Inspirations
Galaxy Discovery Bottle from Kids Activities Blog
Sink or Float Discovery Bottle from Little Bins for Little Hands
Lava Lamp Discovery Bottle from Little Bins for Little Hands
Robot Discovery Bottle from Fun a Day
Animal Discovery Bottles
Turtle Discovery Bottle from Sunny Day Family
Diving Fish Discovery Bottle from Schooling a Monkey
Fossil Discovery Bottle from Little Bins for Little Hands
Jellyfish Discovery Bottle from Schooling a Monkey
Specimen Discovery Bottles from Little Bins for Little Hands
Color Mixing Discovery Bottles
Color Changing Bottles from Preschool Inspirations
Color Mixing Discovery Bottle from Play Trains
Marble Color Mixing Discovery Bottle from Still Playing School
Rainbow Discovery Bottle from Preschool Inspirations
Light Discovery Bottles
Light Discovery Bottle from Left Brain Craft Brain
Night and Day Discovery Bottles from Two Daloo
Glowing Discovery Bottle from Play Trains
Weather Science Discovery Bottles
Weather Discovery Bottles from Two-Daloo
Water Cycle Discovery Bottle from Little Bins for Little Hands
Hurricane in a Jar from One Time Through
Ecosystem Discovery Bottles from Parenting Chaos
Tornado Discovery Bottle from Familylicious
Water Science Discovery Bottles
Oceans Discovery Bottle from Happy Hooligans
Absorption Discovery Bottles from Lemon Lime Adventures
Viscosity Discovery Bottles from Lemon Lime Adventures
Oceans Discovery Bottles from Little Bins for Little Hands
Nature Discovery Bottles
Fresh Flower Discovery Bottle from Little Bins for Little Hands
Nature Discovery Bottles from Little Bins for Little Hands
Desert Flower Discovery Bottle from Preschool Inspirations
Pine Needle Discovery Bottle from Teach Preschool
Layers of the Earth Discovery Bottle from One Time Through
Fall Leaf Discovery Bottle from Kids Play Box
Growing a Plant in a Jar from Violet Paper Wings
More Science Activities to Try
Classic Science Experiments
Candy Science Experiments
Active Science Experiments
Save this idea for later so you don’t forget to use it!
95
shares
A manual “Magic bottles”
Municipal educational institution
Probleborisov secondary school
(preschool groups)
allowance
“Magic bottles”
Educator: Astana E. A.
A.
2020
Development of observation, ability to compare,
analyze, generalize, develop cognitive interest in children in the process of experimentation.
Tasks.
- Expand children’s understanding of the properties of the world around them.
- Introduce various properties of objects.
- Teach children to draw conclusions from experiences.
Glitter bottles
What are the children doing?
Inside the shiny bottles, children find an extremely volatile world that they want to watch for a long time and in which they would like to immerse themselves. With each movement, the glitters in the bottle move, and the children are happy to follow them. They are very interested in looking at each of these tiny particles. The pebble in the bottle rattles when shaken, and the particles mix especially well.
What are they researching?
Gravity . Almost everything falls down. By slowly lowering the floating sequins, children can observe this process very well.
Rotation. After the bottle has been rotated several times, the sparkling sequins make a circular motion – a truly mesmerizing sight.
Order . When shaking the bottle, its contents move randomly. But if the bottle is motionless, then the order inside it is restored again.
Bottle operation.
- Rotate and move the content.
- Rolling or descending an inclined plane – find out the inertia of the mass.
- Shake to shake up the glitter and then let it settle again.

- Hold in the light – watch the play of light.
- Shake hard – listen and feel the pebbles rumble.

How it’s done
You will need
Empty, narrow plastic bottles that are easy for a small child to hold, a funnel, a small spoon, and of course, water. In the departments of goods for creativity, you can buy colored sparkles, as well as decorative stones. Additionally, you will need glue to securely glue the cover.
Procedure
Use a spoon to put the glitter and pebbles into the bottle. Fill with water using a funnel. Before screwing the cap on, you need to add a little glue to the threads so that children cannot open the bottle. The toy is ready!
9000 9000 Creator Magic Penet
It looks empty at first, but then blue foam fills it up to the lid.
How it’s done
You will need
Bottle, dish soap, paint and funnel. Pour some water, paint and detergent into the bottle. If the bottle stands for a while, then a multi-colored mixture will settle at the bottom.
Bottle operation.
The more the baby shakes the bottle, the more it will fill with foam, which then slowly settles.
Oil floats on top
You will need
To create the bottom layer, color the water with blue food coloring and add glitter.
Fill the bottle with oil as the bottom layer. Screw on the lid and seal it.
Bottle operation
- Shaking vigorously, the layers mix and turn into a cloudy, uniform porridge that clears and separates within a few minutes.
- If the bottle is moved carefully, the two layers remain separated.
- If the two-coloured bottle stands still for some time, you can see an ordered world inside it: yellow liquid at the top, a luminous blue mixture with floating sparkles at the bottom.
The magic of (in)visible pearls
Pearls made of gel make this bottle wonderful. They can be purchased from the home decor department.
These pearls are almost invisible in clear water.
But as soon as you put the bottle on its side, barely visible pearls “turn” into hard pebbles!
Overpass of two bottles
What are the children doing with it?
Things travel back and forth: children can watch the process thanks to the two-bottle design that resembles an hourglass. Children quickly learn that this process can be influenced by tilting the bottle more or less. They are fascinated by the sight of material flowing from top to bottom from the first to the last particle.
What are they researching?
Cause and effect . Depending on how much we tilt the bottle, the speed of movement of the filler changes.
Differences and similarities . It doesn’t matter what’s in the bottle – sand or water: one or the other will find its way down, but in different ways and at different speeds.
Fall trajectory . It doesn’t matter what the baby does with the bottle: in the end, the contents still end up at the bottom.
Double bottle operation
- Turn upside down – and observe the movement of the material.
- Try to keep both parts of the structure in balance – the contents of the bottle should be divided into two halves.
- Use the structure as an unusual vehicle by rolling it down an incline.
How to do it
Procedure
Pour material (sand, flour, cereals) into one bottle. Then we glue together two bottles 9Ol000 ideas for working with waste material (plastic bottle).
MC participants: educators – young professionals, educators – mentors, interested persons, voluntary participants and assistants.
Room requirements : space for free movement of guests, (assuming that the working areas are stationary, and the demonstration area is mobile and has free access from all sides), good natural lighting.
Materials and equipment: we create 1 demonstration area and several workers (2 or 3, depending on the number of participants)
Content of the demonstration area:
- containers of different configurations)
- Ready-made objects made of plastic bottles (toy-container “Penguin”, “House for bees”, surprise experiments “Snowfall” and “Ocean in a bottle”, etc.
Filling of working areas:
It is desirable to choose work surfaces with a small width so that the participants sitting opposite the workshop can work in pairs
- Paper napkins, wet wipes to remove excess glue and restore order
- White cotton wool non-sterile, cotton pads (only cotton pads are available)
- Glue -pencil or PVA, (double-sided adhesive tape option to save time)
- Permanent blue markers, green, can be red)
- Plastic bottle, transparent, up to 1 l.
- Scissors
- Doll eyes (if available)
Participants are invited to continue to refine and decorate the proposed basis on their own.
To warm up the “Open – Close” you need to pick up several different hats (to create the image of a “cap”)
To create a mysterious creative atmosphere: music center or laptop, audio recordings of sounds of nature (options: murmur stream, the sound of the sea, the sound of rain or wind).
Item MK: plastic bottle toy with custom design.
Tasks:
- Create a mysterious creative atmosphere.
- Learn how to recycle a plastic bottle.
- Discuss the safe “transformation” of the bottle.
- Arouse the desire to make models and toys not only by adults, but also with children.
- To intensify the use of such toys in their professional activities.

Work plan:
Participants enter the hall with quiet music.
1. Greeting guests. circle of attention.
Q. Offers to play the game “What does it look like?”
Condition: Please pass your bottle to the neighbor on the right.
Now say, “What does the neighbor’s bottle look like?”
(…participants answer…)
The music is muted.
2. Introduction to the topic of conversation.
Working in the demonstration area. Game “Magic bag”
Task: put your hand into the bag, feel for the container and guess what was stored in it. (Offer to several guests)
Plastic containers, in particular bottles, are presented in the modern world in various modifications: they try on different shapes, sizes, colors , are made of different quality and purpose plastic.
We take places in the working area.
Presentation of the collection of finished products.
- Storage systems (pencils, containers for small items…)
- Decorations for home and outdoors
- Souvenirs
- Models
- Toys
Warm-up.
Task in pairs: open and close the bottle. (one participant is a bottle, the second is a cap). Change roles and repeat the exercise.
Note: The bottle is standing and the cap is first turned counterclockwise (open), then clockwise (close). The one who plays the role of the bottle can choose a headdress to make it visual.
We had a little rest, had fun, and continue our work.
3. Practical part.
Problem: When making products from split bottles, a sharp edge is exposed. This is very dangerous when working with children.