


Popsicle stick lanterns: Craft Stick & Tissue Paper Lantern
Create a Cute, Glowing Lantern With Popsicle Sticks
DIY for Moms
By
Jessica Gregg
Popsicle sticks are a timeless crafting material, especially for kids. They are the source of endless baking and popsicle stick treats, craft endeavors and 3D creations. The simple, wooden sticks are certainly shining bright in my family’s latest project, a DIY popsicle stick lantern.
Advertisement
Kids and tweens will love this project, and can do most of it themselves. If you have a younger child, they can be the artist, and you can help assemble the lantern. For those looking for that awesome homemade gift this holiday season, you can’t go wrong with one-of-a-kind art on display (or twinkle lights, for that matter, if you ask me).
Let’s get started to you can get these lanterns lit.
DIY Popsicle Stick Lantern
Materials:
- Popsicle sticks (the thicker ones like this)
- Hot glue gun and hot glue
- Vellum paper
- Scissors
- Sharpie pens
Directions:
Step 1: Paint the popsicle sticks white, or whatever color you want. My daughter used washi tape on the popsicle sticks for an extra pop of color (and she didn’t feel like painting).
Step 2: Find photos or words you want to trace online or from a magazine, or make your own piece of artwork. Cut the vellum to the size you want to use, and then place the image under the vellum. Trace with a pencil.
Optional: If you want to use a real photo (think about grandparents who love photos on holidays), you can print photos with a printer on vellum paper.
Step 3: Once the photos are traced or drawn, color them in with a Sharpie. If you don’t have Sharpies, marker will work fine.
Step 4: Glue the sticks together with hot glue. To do this, set two sticks down parallel to each other. Next, dab the glue on the ends of another stick, and glue it on top of the parallel sticks. Repeat on the bottom. You should end up with a square, or a rectangle.
Step 5: Add hot glue along inner part of the bottom and top sticks. Quickly press the vellum art on the glue so it stays in place.
Step 6: Now, glue the sides together. Begin with two sides to form an L. Add glue along the length, and add it to the other piece. Now, glue it side by side until a square forms. If it doesn’t feel secure, add a “seam” of glue on the inside on each corner seam.
Step 7: Add battery operated tea lights or twinkle lights, and let it shine bright all season long.
More Holiday Crafts for Kids:
- DIY Play Dough Party Favors for Christmas
- Easy DIY Dip Dyed Bottle Brush Trees for Christmas
- Holiday Decorating Video: Sparkly Branches
Subscribe to our Newsletter
Email Address
TRENDING
Related
Gobble Up The Cuteness of This DIY Pumpkin Turkey
Although the ghosts, goblins and bats have flown away until next Halloween, the pumpkins scattered around my house remain. When…
When…
Family
Crafting With Kids: DIY Chunky Clay Rings
If you’re looking for a summer craft that will not only be fun to make, but a statement to wear, I’ve…
Family
Dads Will Love This DIY Painted Popsicle Stick Planter for Father’s Day
Father’s Day often sneaks up on families and it results in last minute scrambling for DIY projects for the kids…
DIY for Moms
DIY An Edible Fruit Wreath For Christmas
I love Christmas more than the average person. The decorations, food (especially Christmas desserts), shopping, gift giving, time with family and…
DIY for Moms
Pretty Diwali Popsicle Stick Lanterns with Asian Paints TRUGRIP CR-8
Sharing is caring!
126
shares
Make Colorful Diwali Popsicle Stick Lanterns or Paper luminaries using wax paper, popsicle sticks, and some beautiful Diya art!
Diwali is almost here and I can’t contain my excitement anymore. In India, Diwali is one of the most popular festivals, full of delicious foods, gifts, lights, and love from our families and friends.
The five-day festival symbolizes the victory of good over evil and light over darkness.
This is after all the Festival of Lights. Lanterns and kandils add that element of festivities in the air. Seeing them hung from balconies, windows, and indoors fills me with a warm and fuzzy feeling.
What better than handmade Diwali lanterns? I’m sharing a really easy Paper lantern that even kids can assemble using materials that are available in your local stationery shop. Make and gift them to friends and family.
DIWALI POPSICLE STICK LANTERNS
SUPPLIES I USED TO MAKE THE LANTERN
THE ASIAN PAINTS TRUGRIP CR-8 GLUE
STEP BY STEP INSTRUCTIONS TO MAKE THE DIWALI POPSICLE STICK LANTERNS
DIWALI POPSICLE STICK LANTERNS
*Full Disclosure This is a sponsored post in partnership with Asian paints. All opinions expressed herein are my own. Thank you for supporting brands that support Artsy Craftsy Mom!
SUPPLIES I USED TO MAKE THE LANTERN
• Popsicle Sticks – 16 pieces
• Wax paper or Tracing paper
• Markers
• Scissors
• Black Marker
• Free Printable Diwali Design Template and
• ASIAN PAINTS TRUGRIP CR-8 GLUE
THE ASIAN PAINTS TRUGRIP CR-8 GLUE
Before I tell you how to make the Lantern, I wanted to talk about an exciting new product that I got a chance to try – The new Asian Paints White Glue – TRUGRIP CR-8 Orb.
TRUGRIP CR-8 is a water-soluble glue from the house of Asian Paints. It comes as a set of 10 really cute orbs, that’s vibrant & fun!
It works really well for all my crafting needs. Gluing Craft paper, cardboard, chart papers, and various other craft-related items with ease. The thin tip allows for precision & the rubber orbs are ergonomic and very comfortable to squeeze.
This Super-Saver pack contains 10 orbs in 5 vibrant colors, each with 15gms of white glue. Buy it here – https://www.asianpaints.com/online-shop/Adhesives/asian-paints-trugrip-cr8-orb-adhesive.html
I can’t wait to see my craft class kids fall in love with them.
STEP BY STEP INSTRUCTIONS TO MAKE THE DIWALI POPSICLE STICK LANTERNS
Step 1 – Start by applying glue dots using the TruGrip CR-8 Orb at the two ends of a popsicle stick. Now stick two popsicles sticks on top of each end to form an L shape.
Step 2 – Repeat at all edges to make a square. I kept 2 sticks down & 2 on the top. Press hard till it dries and the frame is sturdy.
Step 3 – Make four squares the same as above. I used 16 sticks in total to make 4 squares that will eventually form our cube.
Step 4 – Measure the width of the square frame and cut out a long rectangular strip of tracing paper equal to the width of the frame and more than 4 times the length.
Apply glue to all four sides of the craft stick frame and carefully stick the tracing paper on top of it.
Step 5 – Now glue the second stick-frame onto the tracing paper by placing it carefully next to the first one. I like to leave a 1 cm space between two frames so that it can be folded later.
Step 6 – Glue all four squares on the tracing paper as shown in the picture. I left a 1-inch extra paper at one of the ends. This can be used to connect all the squares from a flat lay to a 3D cube shape.
Step 7 – Now comes the fun part. You can draw or trace a design using a black marker. Just keep any pattern, could be a mandala design or a free hand Diya drawing, under the wrapping paper and trace away!
Feel free to download the printable design that I used.
Step 8 – I used colorful markers inspired by the TruGrip glue orbs, to color my design.
Without applying too much pressure, fill in all details. If your kids are going to join in the coloring, make sure they don’t press too hard and be careful that the paper doesn’t tear.
Step 9 – I made two lanterns. For one I used the template and for the other, I drew a Diya free hand.
You can leave all other sides plain or draw waves in different colors directly as I did. Once all 4 sides are colored, the lantern is now ready to be assembled.
Step 10 – Apply glue on the extra piece of tracing paper at the end and stick the first frame to the last to form a box.
There! You have your lovely Diwali lantern ready and all you need to do is pop in some tealight candles inside and make a pretty tablescape that’s ready for a Diwali party!
These Diwali Popsicle Stick Lanterns are perfect to add the warm ambiance and glow for the battery-operated candles (caution: don’t use real candles to avoid creating a fire hazard).
It is important to spend time with our children – not just when they are small, but also in their teenage years. Time spent together will help the family build memories – these are the things your kids will remember when they’re grown up and start their own families.
You can make this craft easily as a family, with each person adding their own design to each face of the lantern. Crafting with your child is also a great opportunity to have a chat, to ask them about their day, and connect with them.
There are a lot more homemade Diwali decoration ideas that you can do, but we hope these Diwali Paper Lanterns can help you add the DIY touch this Diwali.
Do share your lovely creations with us at @ArtsyCraftsyMom on Facebook & Instagram and don’t forget to leave a comment telling me which design you liked best.
100+ crafts made from ice cream sticks with your own hands
Advertising
Devouring “Eskimo” with appetite, few people imagine the further fate of his stick in their imagination. Surprisingly, even such an unsightly little thing can work wonders in interior design, and also serve as a source material for the most original crafts.
Interesting? Then let’s start learning the art of decor and crafts from ice cream sticks! For you, we have collected the most original ideas for turning a simple wand into a charming accessory.
Cute nursery frames
9 0004
Bracelets, boxes, earring stands
velvet figurines for jewelry
These wonderful bracelets will be an inexpensive but definitely exquisite unique decoration not only for a little princess, but also for a young lady
And these cute boxes and cute stick decorations are made for each other 90 003
Brightly colored puzzles are a great replacement for store-bought ones. Drawing and then assembling is an insanely exciting double game for you and your child
An even more interesting idea is to use interesting photographs as images for puzzles
The fascinating world of colorful toys and animals is an amusing game for the baby.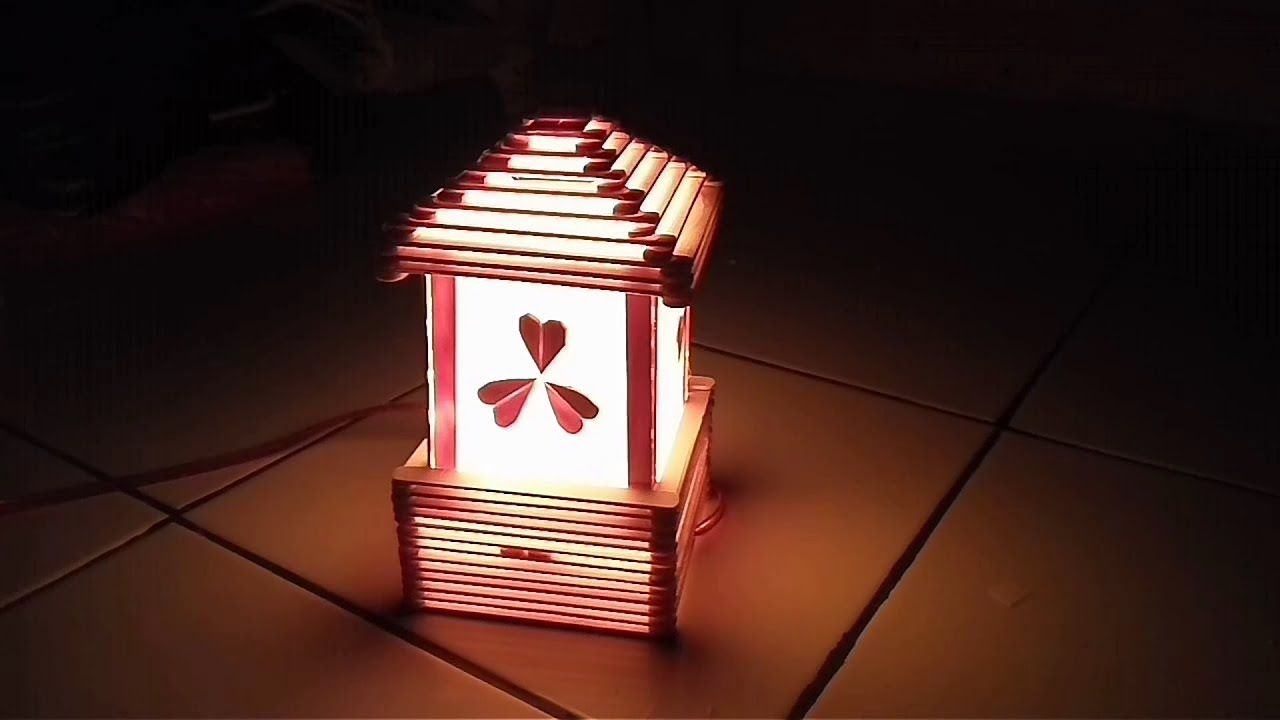 Why not try to build a funny crocodile out of a stick or a cute hare out of two, because it’s so easy! Such an activity perfectly develops children’s imagination and fantasy 4
Why buy expensive Christmas toys when you can make them yourself? Soulful Christmas crafts look much more interesting than store-bought ones, especially when the basic material is available to absolutely everyone
9000 4
These cute decorative snowflakes will create the atmosphere of a Christmas fairy tale in your home
Using all the same magic ice cream sticks, you can feel like a real artist Such lessons will bring a lot of pleasure and certainly will not bore the child
Large and small letters
Counting
Learn colors
Children’s geometry book or memo pad? Don’t be upset. After all, you have ice cream sticks, which will be an excellent material for a chic and, most importantly, unique replacement for it
Pen and pencil holder
Universal decorative box – a real work of art
Miracle Fan
Pretty Flower
Baby Rattle
All the same wand can be used as intended yuh, only this time not for ice cream, but for cake
Cute bookmark for books
For notes, quotes and all kinds of inscriptions, all the same sticks will come in handy!
Decorative flower vases
Feeders and birdhouses
Just cute houses in the interior can set the whole design idea and become a symbolic exclusive accessory in the house 900 03
Cup coasters
A little bit of imagination, effort, desire, and in front of you is a real architectural work, the main role of which is just an ice cream stick
Charming chairs
900 03
We build bridges
Pleasant little things and all kinds of children’s trinkets – not the whole story of the use of this wonderful material . It’s hard to believe, but even the most real interior items can be designed from sticks from your favorite treat!
Chic shelves
Glam Lanterns
90 004
Creative disc boxes
Sophisticated and stylish composition
Heart geometry for decoration
9 0003
And the most unexpected use of ice cream sticks can be found even in music! Harmonica – what you need for beginners, little lovers of funny melodies
10 awesome ideas on how to use wooden popsicle sticks
Are you done with popsicle? Wash the stick and put it in the box. When you accumulate enough, you can make several household appliances from them! We share 10 brilliant ideas, each of which you can easily implement.
Tags:
Netlenka
life hack
life hacks
Life hacks for home
Home and DIY
Unsplash
You will definitely want to repeat these life hacks!
Hot Rack
The most essential item in the kitchen is the Hot Rack. And why buy it in stores when you can make it yourself from a variety of materials! For example, a stand made of wooden sticks will look very aesthetically pleasing, and besides, it will serve you for a very, very long time. To make it, you only need hot glue. Glue the sticks to each other in the form in which you yourself come up with – let your imagination run wild!
Plant marking
When planting seedlings, especially at home, wooden ice cream sticks will come in handy more than ever. Firstly, with their help it will be possible to check the soil moisture, and secondly, the name of the planted plant can be written on them. Now you definitely won’t confuse the flowers!
Photo Frame
A cute photo frame with a unique design that you can make with your kids. First you need to color the sticks and let them dry. Then fold into a square shape and glue with superglue or hot glue. The photo that you want to insert into this frame can also be glued to the back of the frame and hang the whole composition on the wall.
ADVERTISING – CONTINUED BELOW
Counting sticks
Counting sticks are great tools for kids to develop fine motor skills and math thinking in a fun way. You can use sticks for this business both in pure form and in painted form. The second option is more preferable, since bright colors attract the attention of children more than dull ones.
Pencil holder
If you have a tall tin can and wooden sticks, you can combine them and get a convenient stand for stationery. First, wash the jar, dry it and decorate it either with paint or colored paper. Then paint the wooden sticks in the same style. As soon as they dry, they need to be glued to the outer wall of the jar – all over the circle. If necessary, the length of the sticks can be adjusted by simply cutting off the excess at the top or bottom.
Tape bookmark
To avoid the hassle of finding the end of the tape, attach a thin wooden stick to it. It can be glued both completely and only the cut off part, which will match the width of your adhesive tape.