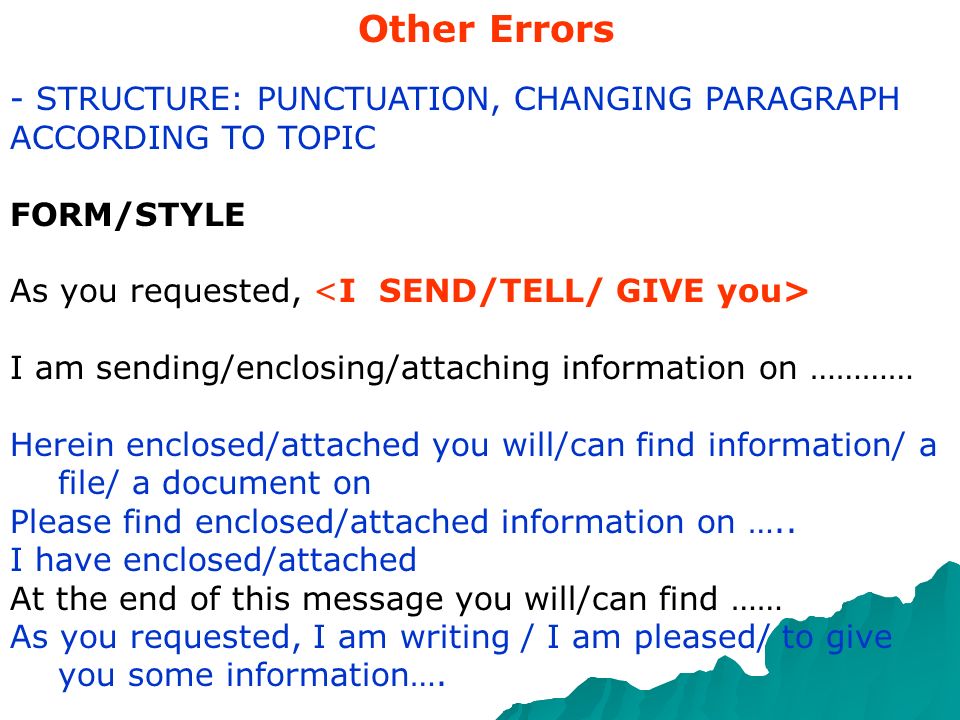
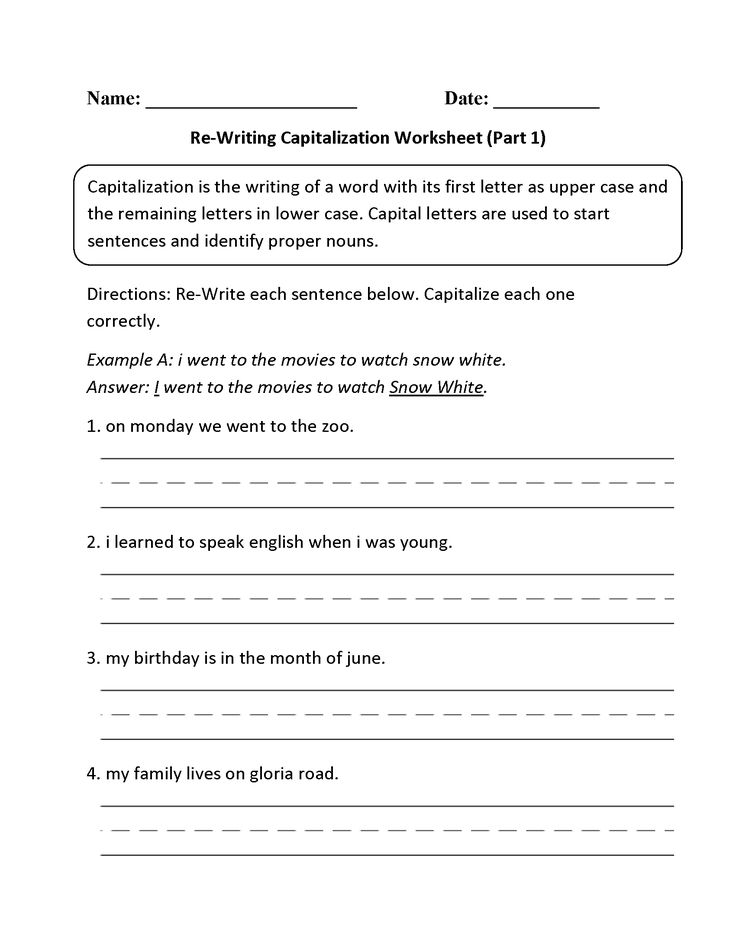
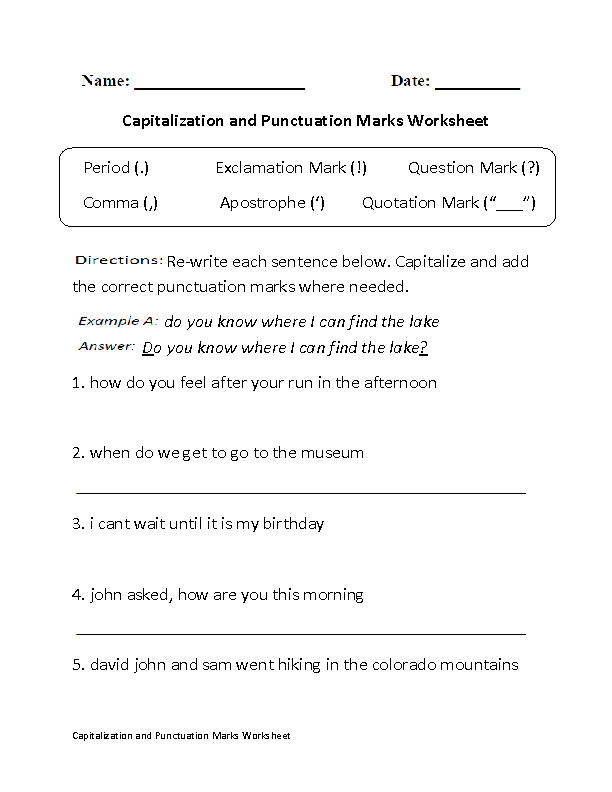
Paragraph punctuation: Punctuating a paragraph | 4th grade, 5th grade Writing Worksheet
Free Punctuation Checker – Writer
Use Writer’s free online editor to correct errors in
punctuation, grammar, spelling, and more.
Enter your English text here
You’ve reached the limit of 2K words. To check more content, sign up and try Writer for free.
Issues 0
Checking your text…
Issues detected in your text will be shown here.
Get more edits for this text and all of your writing
Get the Chrome extension
Use our leading punctuation checker to make sure your writing is the best it can be. Check punctuation, grammar, spelling, vocabulary, and other writing mistakes. Our advanced writing assistant, powered by artificial intelligence, thoroughly scans your text to make sure your content is well-written, error-free, and uses correct punctuation marks. Writer’s online punctuation checker is the top writing tool for students, teachers, professionals, companies, and writers.
The free punctuation checker
trusted by leading brands
Go beyond standard grammar checks
Be sure your copy is free of common and not-so-common English grammar errors.
Perfect spelling and punctuation
Em-dashes are not scary, but a missing comma is. Nail both with Writer.
Tone, voice, and style
Writer was built for writing at work, where clear and concise writing is critical. Communicate crisply with Writer.
Word choice and terminology
Whether you are trying to connect with your audience or follow guidelines at work, always choose the right word with Writer.
Frequently asked questions
- How does the Writer punctuation checker work?
Do you ever confuse the difference between em dashes, en dashes, and hyphens?
Unsure whether to use a semicolon or a comma? If you answered yes to either question, Writer’s punctuation checker is the tool for you.
Our punctuation tool makes sure that you’re using correct punctuation, such as periods, commas, colons, semicolons, quotation marks, apostrophes, and dashes. Writer’s proprietary AI ensures that your writing uses consistent punctuation and sentence structure.

- Why use Writer’s punctuation checker?
Clear, well-written content is more important than ever before. In today’s competitive world, quality writing is often the difference between getting the top grade, the best performance review, or the most-read website content.
Writer’s punctuation checker helps you get ahead in work, school, and life by ensuring that you’re communicating effectively. Using incorrect punctuation could cause your reader to become confused or worse yet, frown upon your writing. With the Writer punctuation checker, you can be confident that your writing uses correct punctuation in addition to correct spelling and grammar.
- How do I check for punctuation in Google Docs?
With so many students, schools, and companies using Google Docs to create reports and documents, we developed Writer’s technology with Google Docs top of mind. Sign up for a free trial of Writer and install the Google Docs add-on, making it super easy to check for grammar and punctuation errors right in the Google Doc.
- Who uses Writer’s punctuation checker?
Everyone and their sister can use the Writer punctuation checker. Writer is the preferred tool among professionals, and leading brands like Twitter and Intuit. Writer’s punctuation checker is also used by students, universities, professors, and professional writers for proofreading their content.
- Why is Writer the preferred Grammarly alternative for professional users?
Professional users need an AI writing assistant that provides consistently excellent corrections and suggestions everywhere they write online. Writer achieves that for professional writers by providing the following features:
- Grammar AI that understands some rules are meant to be broken: You have a style and we get that. Not all grammar rules are meant to be followed. Writer’s false-flag rate is lower than any other tool, because the underlying machine learning models are trained on data from people writing at work — not students or people just starting to learn English.
- Brand voice guidelines: Customize Writer’s voice suggestions to suit you. Are you formal, but approachable? Or friendly and casual? Make sure everything you write is aligned with your brand voice preferences.
- Customizable content styleguide: Your editorial guidelines should be your own. From date formats to punctuation use to capitalization preferences, select your own, and then share them with a team. Writer is the most customizable writing assistant available, and the choice of professional writers.
- Grammar AI that understands some rules are meant to be broken: You have a style and we get that. Not all grammar rules are meant to be followed. Writer’s false-flag rate is lower than any other tool, because the underlying machine learning models are trained on data from people writing at work — not students or people just starting to learn English.
Works everywhere you write
-
Writer for
Google Chrome -
Writer for
Google Docs -
Writer for
Microsoft Word
What does our free punctuation checker do?
Our free punctuation checker proofreads your text to make sure it’s clear, consistent, and error-free. We automatically catch everything from typos to nuanced grammatical errors and vocabulary improvements. And punctuation mistakes, too, of course.
Is there a
punctuation
checking app?
Yes! When you sign up for Writer, you’ll get access to a powerful and easy-to-use web app and extensions like a plagiarism checker, styleguide builder, tone detector, and more.
Get the Chrome extension
Does Writer
correct sentence
structure?
Yep. This isn’t just a spellchecker – it’s a writing tool powered by AI. We’ll catch more nuanced errors that improve the style of your writing. From punctuation to vocabulary, your content is improved with Writer.
Who is Writer for?
Writer is great for anyone who wants to get their point across in writing. Our tools are trusted by copywriters, UX writers, marketers, product teams, and more.
Drafting an important email? Run it through Writer to catch mistakes. Putting together a marketing page for a product? Let Writer analyze it for voice and tone to make sure it’s on brand and persuasive.
Take Writer with you everywhere you write.
Get the Chrome extension
Punctuation Checker – Free Grammar And Punctuation Check!
Free Online Punctuation Checker!
Grammarlookup.com uses artificial intelligence to check grammar and punctuation mistakes in your writing, eliminate spelling errors and highlight 1000s of style issues to make your writing exceptional among other writers. Ease of Use and faster checking make it the best proofreader for everyone. It’s Free and will Always be, Try it.
Save Your Proofreading Time with the Best Punctuation Checker Tool
Are you a student with lengthy assignments to submit today and have no time to proofread what you have written? Fret not! We all know typos and grammatical mistakes are common. However, they can change the whole meaning of a sentence.
The good news is there are grammar and punctuation corrector online tools that can save your time and effort while improving the readability of your academic paper.
Here’s how to use this tool:
- Type or Copy (CTRL+C) & Paste (CTRL+V) the text in the Editor.
- Click the Lookup button.
- Spelling, Grammar, and Punctuation mistakes will be underlined.
- Hover your mouse cursor on each word for correct Options.
- Use The Deep Lookup button for a thorough check through our partner grammar check.
GLU’s AI Tool: Check For Punctuation Errors
GLU’s AI Tool can check for below punctuation marks misplacements in your writing, Simply Copy & Paste your text and type in the editor and click the Lookup button.
- Period (.)
- Question Mark (?)
- EM-Dash (-)
- Slash (/)
- Ellipses (….),
- The comma (,),
- Apostrophe (‘)
- Semicolon (;)
- The exclamation point (!)
- Angle brackets (<>)
- Parenthesis ()
- Square brackets ([ ])
- The hyphen (-)
- Colon (:)
- Braces ({})
- Quotation marks (“” )
No matter how fluent you are at English, blunders, and typos are mostly inevitable which trouble the readers.
 Even those whose mother tongue is English make silly blunders. Therefore, you don’t have to get embarrassed, however, proofreading can always improve your document in readability and earn you some extra points.
A professor checking your paper or the publisher posting your article on a site can’t always ignore the mistakes made assuming they are just human errors. Therefore, it is recommended that you use a credible Grammar checker like GrammarLookup for the best correction possible.
Why Use GrammarLookup’s Punctuation Checker?
This amazing tool does not scrutinize the paper for punctuation mistakes, but it also suggests correcting the grammatically incorrect sentences. Now, what can be better! The tool saves your time and makes the article easier to read and understand for the readers. Thus, you get better feedback and engagement from the readers in return.
GrammarLookup is best for checking all sorts of content including academic assignments, business proposals and even articles full of technical jargons.
 So, you can imagine the strength of the software and its ability to check and correct even the toughest terms.’s
Here is What This Tool Does:
If you want to improve your grammar and punctuation checking experience, consider the following features in a tool and avoid any hassle:
A Perfect Fix for All Errors
The main aim of such a tool is to make your content free from any blunders, either big or small. Keep in mind that the checks might differ regarding the dialect you use.
The best tool would be constructed in a way it copes with every English dialect and other renowned terms and languages at the same time.
GrammarLookUp has incorporated this feature to provide you with the best results.
Help For a Better Academic Performance
The tool might not help you in all the aspects as an online academic writer would, however, it is still a great help for students and even professional writers.
An online free grammar check will not only help in making your academic performance better, but consistent use of it can also improve your writing style with time.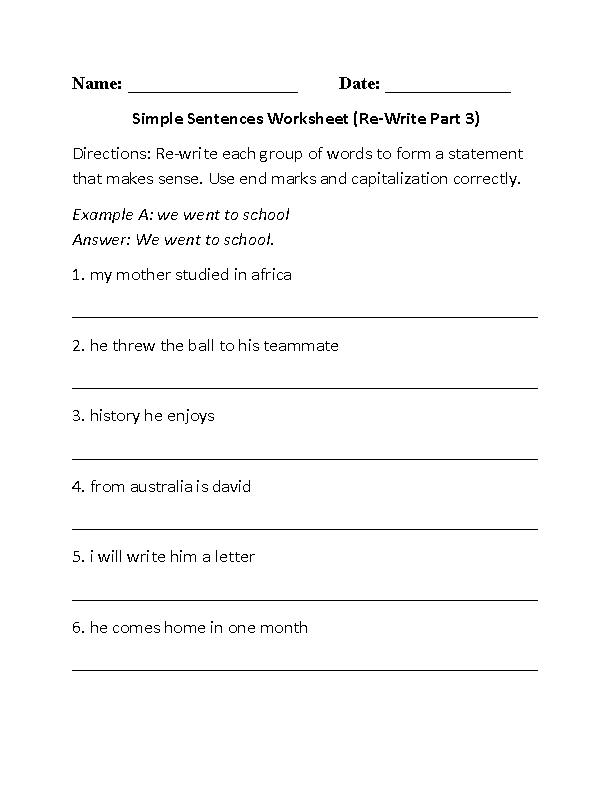
Using such a service ritually will also help you learn from your mistakes and avoid them
Simplicity is the Key
The best software is the one that anybody and everybody can use, no matter how little they know about information technology.
We have constructed this tool keeping this in mind and therefore we assure to give you hassle-free service.
We have done the part by making a user-friendly tool. Now, it depends on the user too to understands the tool
Google Punctuation Checker
Wouldn’t it be great if there is a Google punctuation checker? We hope so one day Google will make an AI proofreader, for now, this is the best you have got.
We would suggest you check your academic papers regularly for getting rid of the unavoidable human errors immediately.
Keep in mind that after all a tool is just another robot that cannot always help you get a perfect piece of paper.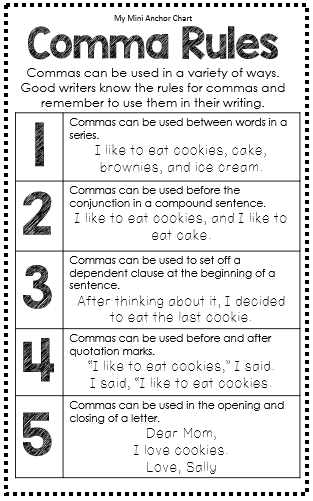 There will be times when it requires you to decide, for example, selecting a word that is the most suitable in a sentence.
As a cherry on top, the best feature of our tool is that it covers several languages, enabling you to make your piece of work a unique and perfect one. With the regular use of GrammarLookup, you turn not only your piece of work into an error-free one but you also gain a lot of knowledge and a better grip on the language. So what are you waiting for?
Try Now!
FAQS: Frequently Asked Questions
Can This Tool be used as Comma Checker?
Yes, Grammarlookup can check for comma errors, It can also detect comma splices placements.
Quote Checker: Can this do a Quote Check?
Yes, GLU can detect punctuation marks: “quotes” (single and double quotes) and can be used as such.
Is this sentence’s punctuation correct?
Check if a sentence is punctuated correctly, copy & paste your text in the editor and click checkup.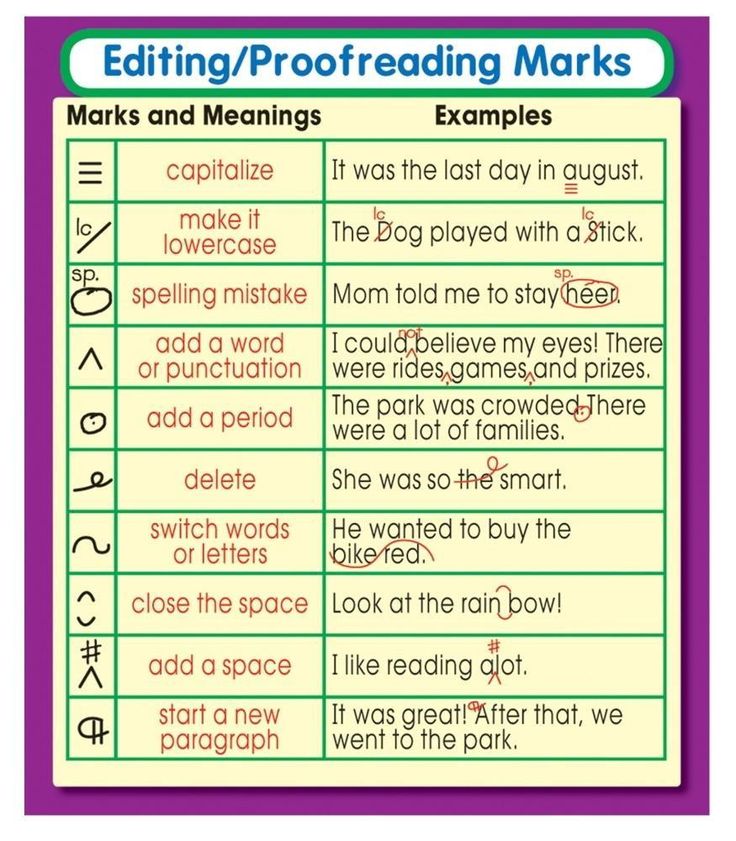
Can I check apostrophe errors with GLU?
Yes, GLU is an apostrophe checker and can check for apostrophe issues.
How do I check for the punctuation mark “colon”?
To check for colon issues, use the GLU colon checker editor at the top of this page.
Can I download the GLU Punctuation checker?
No, GLU can only be used directly in the browser, no Google chrome extension or software installation is required.
Is GLU’s grammar and punctuation checker free?
Yes, Grammarlookup is a free online grammar and punctuation checker.
Punctuation Overview // Purdue Writing Lab
Summary:
When speaking, we can pause or change the tone of our voices to indicate emphasis. When writing, we must use punctuation to indicate these places of emphasis. This resource should help to clarify when and how to use various marks of punctuation.
When speaking, we can pause or change the tone of our voices to indicate emphasis.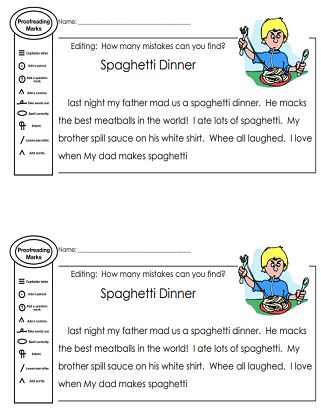 When writing, we use punctuation to indicate these places of emphases. This handout should help to clarify when and how to use various marks of punctuation.
Independent clause: a clause that has a subject and a verb and can stand alone; a complete sentence
Dependent clause: a clause that has a subject and a verb but cannot stand alone; an incomplete sentence
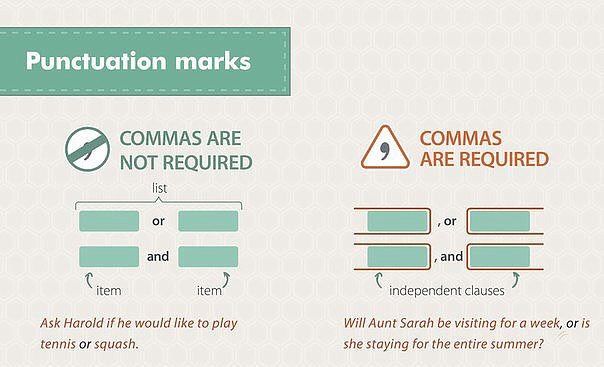
Comma
Use a comma to join two independent clauses and a coordinating conjunction (and, but, or, for, nor, so).
Road construction can be inconvenient, but it is necessary.
The new house has a large fenced backyard, so I am sure our dog will enjoy it.
Use a comma after an introductory phrase, prepositional phrase, or dependent clause.
To get a good grade, you must complete all your assignments.
Because Dad caught the chicken pox, we canceled our vacation.
After the wedding, the guests attended the reception.
Use a comma to separate elements in a series. Although there is no set rule that requires a comma before the last item in a series, it seems to be a general academic convention to include it. The examples below demonstrate this trend.
On her vacation, Lisa visited Greece, Spain, and Italy.
In their speeches, many of the candidates promised to help protect the environment, bring about world peace, and end world hunger.
Use a comma to separate nonessential elements from a sentence. More specifically, when a sentence includes information that is not crucial to the message or intent of the sentence, enclose it in or separate it by commas.
John’s truck, a red Chevrolet, needs new tires.
When he realized he had overslept, Matt rushed to his car and hurried to work.
Use a comma between coordinate adjectives (adjectives that are equal and reversible).
The irritable, fidgety crowd waited impatiently for the rally speeches to begin.
The sturdy, compact suitcase made a perfect gift.
Use a comma after a transitional element (however, therefore, nonetheless, also, otherwise, finally, instead, thus, of course, above all, for example, in other words, as a result, on the other hand, in conclusion, in addition)
For example, the Red Sox, Yankees, and Indians are popular baseball teams.
If you really want to get a good grade this semester, however, you must complete all assignments, attend class, and study your notes.
Use a comma with quoted words.
“Yes,” she promised. Todd replied, saying, “I will be back this afternoon.”
Use a comma in a date.
October 25, 1999
Monday, October 25, 1999
25 October 1999
Use a comma in a number.
15,000,000
1614 High Street
Use a comma in a personal title.
Pam Smith, MD
Mike Rose, Chief Financial Officer for Operations, reported the quarter’s earnings.
Use a comma to separate a city name from the state.
West Lafayette, Indiana
Dallas, Texas
Avoid comma splices (two independent clauses joined only by a comma). Instead, separate the clauses with a period, with a comma followed by a coordinating conjunction, or with a semicolon.
Semicolon
Use a semicolon to join two independent clauses when the second clause restates the first or when the two clauses are of equal emphasis.
Road construction in Dallas has hindered travel around town; streets have become covered with bulldozers, trucks, and cones.
Use a semicolon to join two independent clauses when the second clause begins with a conjunctive adverb (however, therefore, moreover, furthermore, thus, meanwhile, nonetheless, otherwise) or a transition (in fact, for example, that is, for instance, in addition, in other words, on the other hand, even so).
Terrorism in the United States has become a recent concern; in fact, the concern for America’s safety has led to an awareness of global terrorism.
Use a semicolon to join elements of a series when individual items of the series already include commas.
Recent sites of the Olympic Games include Athens, Greece; Salt Lake City, Utah; Sydney, Australia; Nagano, Japan.
For more information on semicolons, please see the “90-Second Semicolon” vidcast series on the Purdue OWL YouTube Channel.
Colon
Use a colon to join two independent clauses when you wish to emphasize the second clause.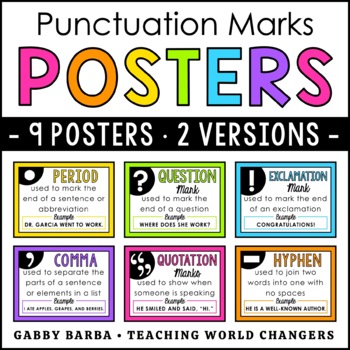
Road construction in Dallas has hindered travel around town: parts of Main, Fifth, and West Street are closed during the construction.
Use a colon after an independent clause when it is followed by a list, a quotation, an appositive, or other ideas directly related to the independent clause.
Julie went to the store for some groceries: milk, bread, coffee, and cheese.
In his Gettysburg Address, Abraham Lincoln urges Americans to rededicate themselves to the unfinished work of the deceased soldiers: “It is for us the living rather to be dedicated here to the unfinished work which they who fought here have thus far so nobly advanced. It is rather for us to be here dedicated to the great task remaining before us — that from these honored dead we take increased devotion to that cause for which they gave the last full measure of devotion — that we here highly resolve that these dead shall not have died in vain, that this nation under God shall have a new birth of freedom, and that government of the people, by the people, for the people shall not perish from the earth.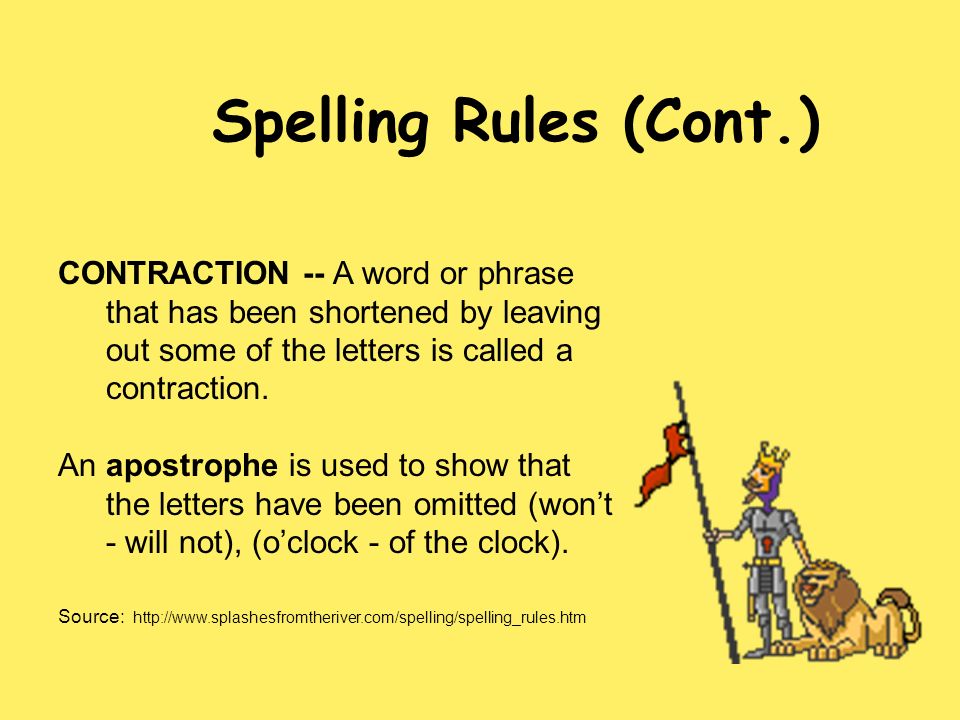 “
“
I know the perfect job for her: a politician.
Use a colon at the end of a business letter greeting.
To Whom It May Concern:
Use a colon to separate the hour and minute(s) in a time notation.
12:00 p.m.
Use a colon to separate the chapter and verse in a Biblical reference.
Matthew 1:6
Parenthesis
Parentheses are used to emphasize content. They place more emphasis on the enclosed content than commas. Use parentheses to set off nonessential material, such as dates, clarifying information, or sources, from a sentence.
Muhammed Ali (1942-2016), arguably the greatest athlete of all time, claimed he would “float like a butterfly, sting like a bee.”
Dash
Dashes are used to set off or emphasize the content enclosed within dashes or the content that follows a dash. Dashes place more emphasis on this content than parentheses.
Perhaps one reason why the term has been so problematic—so resistant to definition, and yet so transitory in those definitions—is because of its multitude of applications.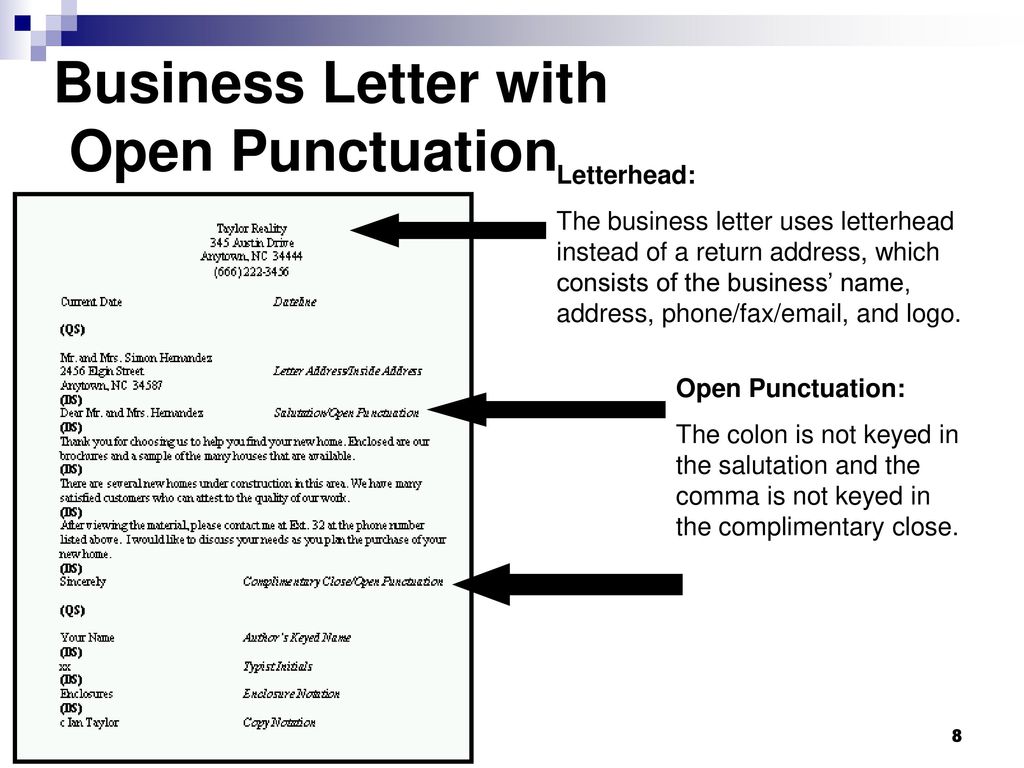
In terms of public legitimacy—that is, in terms of garnering support from state legislators, parents, donors, and university administrators—English departments are primarily places where advanced literacy is taught.
The U.S.S. Constitution became known as “Old Ironsides” during the War of 1812—during which the cannonballs fired from the British H.M.S. Guerriere merely bounced off the sides of the Constitution.
To some of you, my proposals may seem radical—even revolutionary.
Use a dash to set off an appositive phrase that already includes commas. An appositive is a word that adds explanatory or clarifying information to the noun that precedes it.
The cousins—Tina, Todd, and Sam—arrived at the party together.
Quotation Marks
Use quotation marks to enclose direct quotations. Note that commas and periods are placed inside the closing quotation mark, and colons and semicolons are placed outside. The placement of question and exclamation marks depends on the situation.
He asked, “When will you be arriving?” I answered, “Sometime after 6:30.”
Use quotation marks to indicate the novel, ironic, or reserved use of a word.
History is stained with blood spilled in the name of “justice.”
Use quotation marks around the titles of short poems, song titles, short stories, magazine or newspaper articles, essays, speeches, chapter titles, short films, and episodes of television or radio shows.
“Self-Reliance,” by Ralph Waldo Emerson
“Just Like a Woman,” by Bob Dylan
“The Smelly Car,” an episode of Seinfeld
Do not use quotation marks in indirect or block quotations.
Italics
Underlining and italics are often used interchangeably. Before word-processing programs were widely available, writers would underline certain words to indicate to publishers to italicize whatever was underlined. Although the general trend has been moving toward italicizing instead of underlining, you should remain consistent with your choice throughout your paper. To be safe, you could check with your teacher to find out which he/she prefers. Italicize the titles of magazines, books, newspapers, academic journals, films, television shows, long poems, plays of three or more acts, operas, musical albums, works of art, websites, and individual trains, planes, or ships.
Time
Romeo and Juliet by William Shakespeare
The Metamorphosis of Narcissus by Salvador Dali
Amazon.com
Titanic
Italicize foreign words.
Semper fi, the motto of the U.S. Marine Corps, means “always faithful.”
Italicize a word or phrase to add emphasis.
The truth is of utmost concern!
Italicize a word when referring to that word.
The word justice is often misunderstood and therefore misused.
Punctuation Marks and How to Use Them: Full Writing Guide
There are three principles which can lead you to success in writing — style, meaning, and grammar. Clarity and precision are things that always impress those who read and evaluate your texts, and demonstrate your educational and personal qualities. Grammar and punctuation are vital not only for your academic success, but also when you text a date you want to impress, correspond for a job interview, chat with your colleagues, and so on.
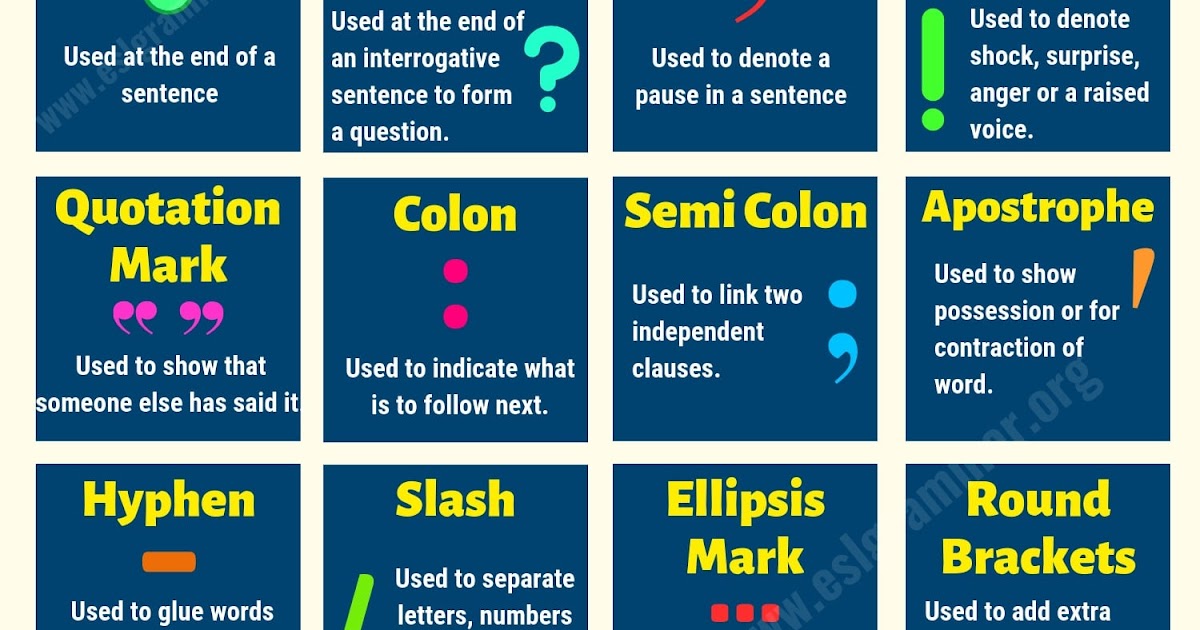
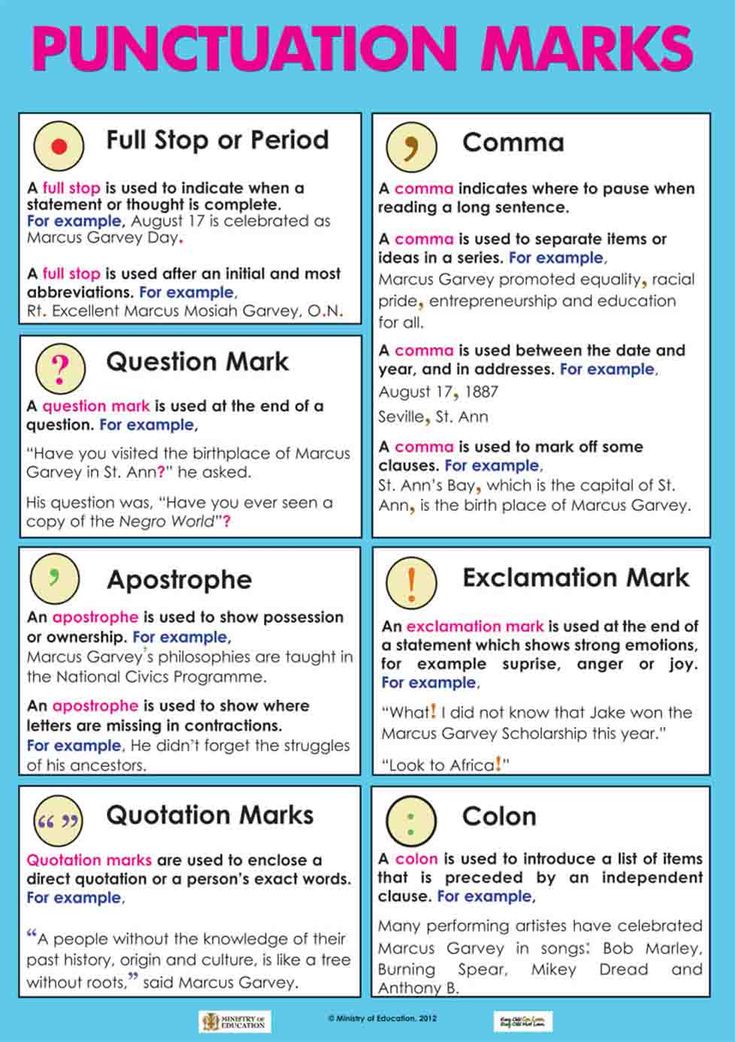
There are 14 punctuation marks used in English grammar. You probably know most of them, but it does not hurt to repeat them. They are the period, question mark, exclamation point, comma, semicolon, colon, dash, hyphen, parentheses, brackets, braces, apostrophe, quotation marks, and ellipsis. If you use them correctly, your writing will be much easier and appealing to read.
Feeling Anxious with Writing a Mistake-Free Essay?
Count on Pro! Whether you need writing or proofreading, our writers create only impeccable, mistake-free essays on time.
Get Help Now
Of course, there are certain differences between punctuation in British and American English.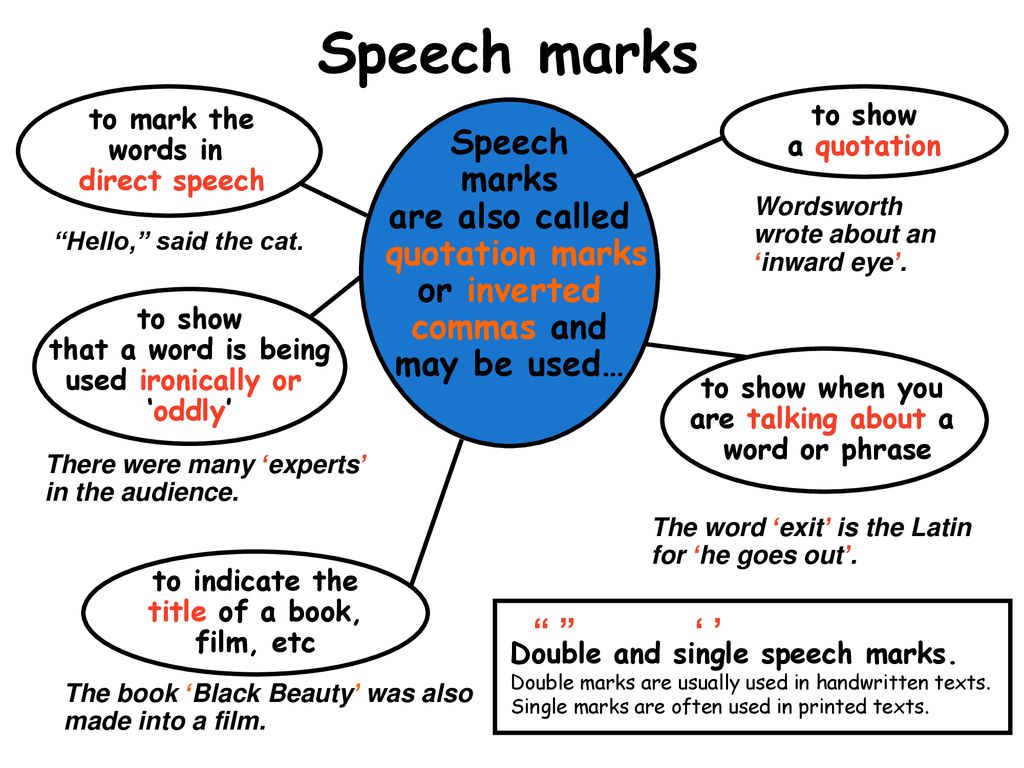 They are not major, but they are still important. For example, in American English, such popular abbreviations like Mr., Ms., and Mrs. have periods. In British however, no periods are used. When writing the time, British English employs periods—where noon would be 12.00. In the same case, the American system uses colons (12:00). The names of the punctuation marks can also be different. Look at the table before we move on to find out how to use them. Let’s go deeper with our custom essay service.
|
|
British English |
American English |
|
The ” . ” symbol is called |
a full stop |
a period |
|
The ” ! ” symbol is called |
an exclamation mark |
an exclamation point |
|
The ” ( ) ” symbols are called |
brackets |
parentheses |
|
The ” [ ] ” symbols are called |
square brackets |
brackets |
|
The position of quotation marks |
Joy means “happiness”. |
Joy means “happiness.” |
|
The punctuation for abbreviations |
Dr, Mr, Mrs, St, Rd, Ct |
Dr., Mr., Mrs., St., Rd., Ct. |
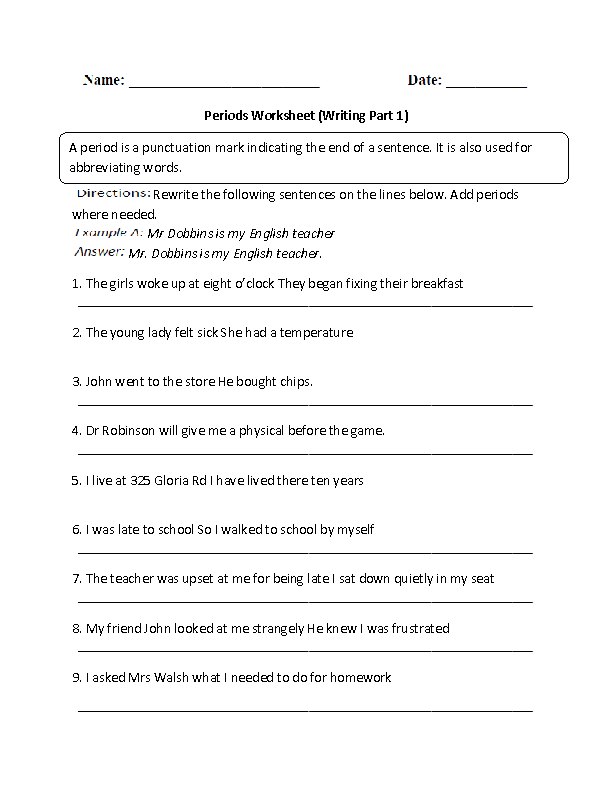
Sentence Endings: The Period, Question Mark and Exclamation Point
Let’s begin with sentence endings. Sentences are an integral part of any text or message. You can end a sentence with the period, question mark, or exclamation point. The period (.) is usually used to end simple declarative sentences. In most cases, they complete statements that do not carry any special emotional meaning and do not infer a question.
Examples: Mary and Tom got married in 2020.
He loves playing baseball.
A question mark (?) usually indicates a direct question and is also placed at the end of a sentence.
Examples: When did Mary and Tom marry?
Does he love playing baseball?
The exclamation point (!) is used to showcase an emotion or to add special emphasis.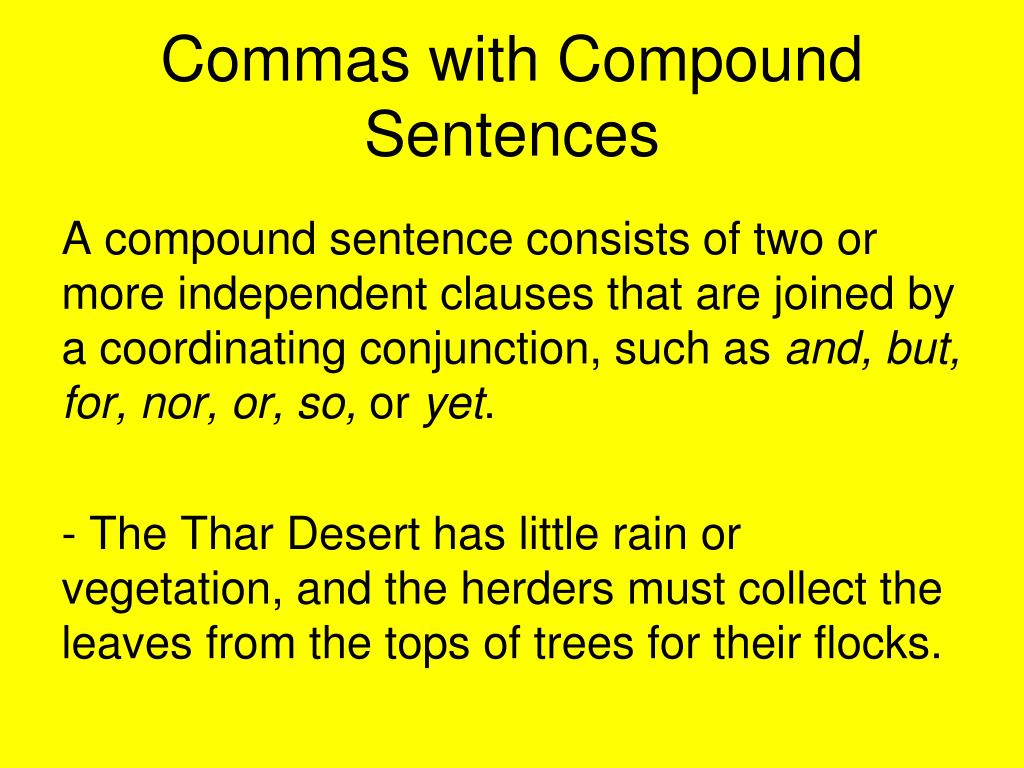
Examples: Wow, Mary and Tom are getting married!
He loves playing baseball so much!
Comma, Semicolon, and Colon
Inside a sentence, there are also plenty of punctuation marks to be used. The most common ones are the comma, semicolon, and colon. They all indicate a pause in the sentence, so they are often misused among each other. Here is how to know when to use each of the symbols:
The comma is used to separate logical parts of a sentence. It includes ideas or elements that are inside the structure of a sentence. A comma can also be used to separate repetitive parts of a sentence, such as numbers, dates, or objects that are similar to each other. A comma is also used after a greeting and the end of a letter, before and after mentioning someone’s name.
Examples:
To separate logical parts of a sentence: When he came home, the sun was shining.
To separate repetitive parts: I love movies such as “Pretty Woman”, “When Harry met Sally”, and “You’ve got mail”.
To indicate a salutation: Thanks for all your help, Mark.
The semicolon (;) is usually used when connecting independent clauses. How will you know when to use commas or semicolons? A semicolon connects extra independent parts of a sentence. If you put a period between them, the sentence will still work. This will not be the case with a comma, where clauses depend on each other.
Examples: Sylvia was happy; she knew that he would fall in love with her pretty soon.
As you can see, these two sentences can be easily separated.
A colon (:) can be used in three cases.
- When you introduce a quotation, an explanation, an example, or a series.
Example: It was up to her to take the following actions: graduate, find a job, and become a partner at her law firm.
- You can put a colon between independent clauses. It’s like the case with a semicolon, but here the second part of the sentence explains the first.
 It’s like the case with a semicolon, but here the second part of the sentence explains the first.
Example: I didn’t want to go to Brazil: I already had plans to go to Italy with my husband.
- The colon can also be used for emphasis when you want to single out one particular part of your sentence:
Example: She was sure of one thing: her friends.
Time, ratio, business correspondence and references — these are other cases where a colon can be used.
‘I want to pay someone to write my essay’ and you can! Our professional writers are ready to help anytime.
Get Help From Our Professional Writing Team At EssayPro
Our reliable essay writing service is well-versed in grammar and syntax, so use them for any and all editing assistance.
Get Help Now
Dash and Hyphen
The dash and hyphen are also quite common punctuation marks. Although they look similar, they are very different.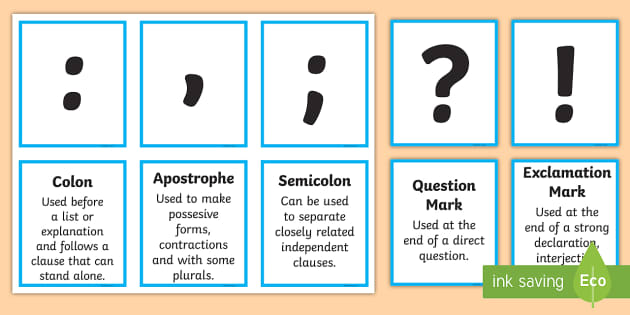
A dash is used to separate words into statements, and also to indicate range or connections.
Example: She said explicitly — Yes!
A hyphen is used to join two or more words together into a single concept. This way we get a compound term.
Examples: She is a well-known doctor working part-time.
I went on a Rome-Paris flight.
Brackets, Braces, and Parentheses
Symbols like brackets, braces, and parentheses are used to include words that are a further explanation of the following part of a sentence or are considered a group. Brackets ([ ]) are notations which are mostly used for technical explanations, or to clarify meaning. The important part about brackets is that if you remove the information in the brackets, the sentence will still make sense.
Example: He [John] was the first one to graduate in the family.
Braces ({ }) look similar but they are mostly used in Math and computer programming to show units.
Example: 2{1+[23-3]}=x.
Parentheses ( ( ) ) are curved notations which are used to showcase thoughts or qualifying remarks. An important point about parentheses is that they can be replaced by commas without changing the meaning—in most cases.
Example: Mary Stuart (whose maiden name was Lockhart) went to buy a bottle of milk.
If you need a physic helper, or have troubles with maths, leave us a notice ‘do my math homework for me’.
Apostrophe and Ellipsis
The final and less used three punctuation forms are the apostrophe, quotation marks, and ellipsis. An apostrophe (‘) is mostly used when: there is an omission of a letter or letters from a word, in the possessive case, or for plurals of lowercase letters.
Examples:
Omission of letters: I’ve wanted to do it for a long time.![]()
Possessive case: Kate’s dog is a Golden retriever.
Plural for lowercase letters:There are 3 p’s in the word “hippopotamus”.
The ellipsis includes three periods (…) and is used in writing or printing to indicate an omission or pause in the thoughts of the writer. Ellipses are also useful for omitting unnecessary words that do not interfere with the meaning of the overall sentence.
Examples: I do not know about that…
She was counting — one, two, three…
Quotation Marks
Quotation marks (” “) are primarily used to quote the words of another person.
Example: “Everything happens for a reason,” she said.
There are several instances in which you can use quotation marks. You can use them with direct quotes to quote someone’s message, with titles of certain works, to show other meanings from what was said literally, and to write words as words.
Quotation marks are usually used for a direct quote. When you change the sentence into the indirect quote, the quotation marks become unnecessary.
Examples:
Direct quote: “I like the snow,” said Alice.
Indirect quote: Alice said that she liked the snow.
So the important rule to remember is: “Quotation marks are used only with direct quotes”. You can quote not only a person, but also a written source.
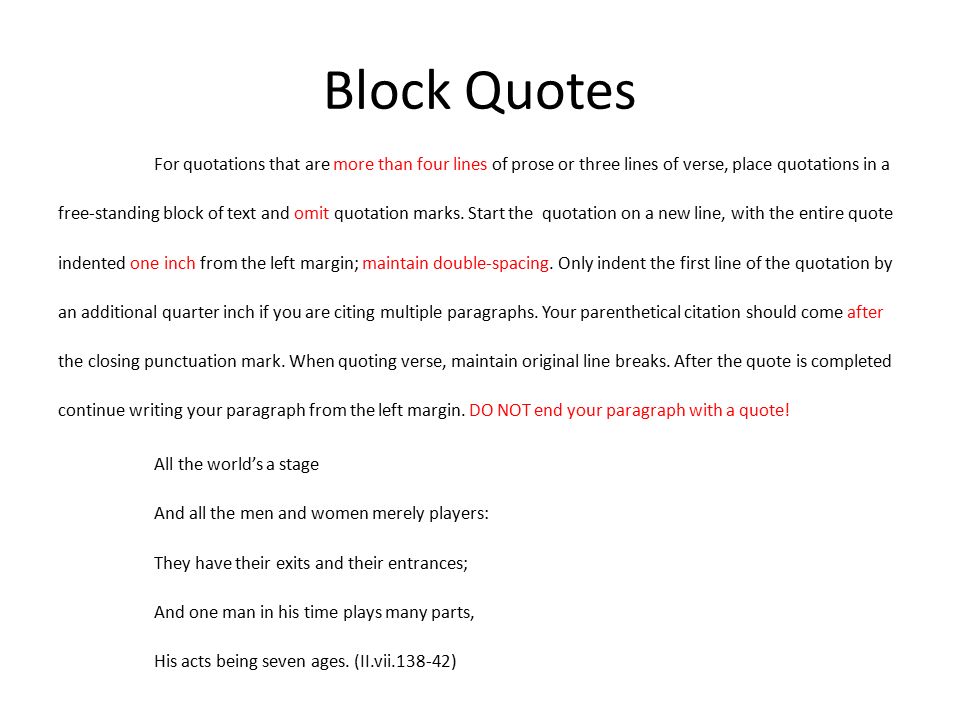
There are two forms of direct quotations: run-in and block quotations. What are they and what is their difference? Run-in quotations are usually shorter. Their format is the same as the surrounding text. Block quotes are longer quotes that are separated from the surrounding text. Block quotations can even appear as a separate paragraph (or a series of paragraphs). They can also have a different font, a change in the line spacing, or have a wider margin.
Examples: The Father said, “Prospects for growth are really good.
In “American History,” the writer supposes,
From the revolutionary war… (3)
 “
“So, the main rules about quotation marks are that if you open them, you need to close them as well. Where the quote starts and where it ends should be clear. Sometimes, the text inside quotation marks is capitalized, in other cases, it’s not. So if you’re quoting a complete sentence, you should start the quote with a capital letter. This is the case even if you start the sentence, not the quote itself.
Example: She used the following phrase: “My life is a miracle.”
But, if you’re quoting a phrase or part of a sentence, you don’t have to start with a capital letter:
Example: She considered them “rich and successful, like Hollywood stars.”
There are also single quotation marks. They look like this – ‘good day’ – and can be used instead of parentheses for translations.
Examples: Her ‘good day’ was Bonjourno in reality.
![]()
He considers the word “Stars” lucky for his company.
There are also differences in formatting quotations in America and British style. Please, see the main differences for yourself.
|
Style issue |
American Style |
British Style |
|
To enclose a quotation, use… |
Double quotation marks |
Single quotation marks |
|
To enclose a quotation within a quotation, use… |
Single quotation marks |
Double quotation marks |
|
Place periods and commas… |
Inside quotation marks |
Outside quotation marks |
|
Place other punctuation (colons, semi-colons, question marks, etc.)… |
Outside quotation marks* |
Outside quotation marks* |
*Place other punctuation inside quotation marks when that punctuation is part of what is being quoted, such as a quoted question.
Request Writing Help
So these are the main rules for using punctuation and quotation marks in the English language. We hope this material was useful to you. If you want to order an academic paper where you do not have to worry about all the punctuation and grammar rules, we invite you to use EssayPro. By getting a paper from a professional writer on any topic, you are sure to get a good grade. We process all “do my math homework” requests fast.
Find Your Writer
Punctuation – English Grammar Today
Grammar > Using English > Writing > Punctuation
The most common punctuation marks in English are: capital letters and full stops, question marks, commas, colons and semi-colons, exclamation marks and quotation marks.
In speaking, we use pauses and the pitch of the voice to make what we say clear. Punctuation plays a similar role in writing, making it easier to read.
Punctuation consists of both rules and conventions.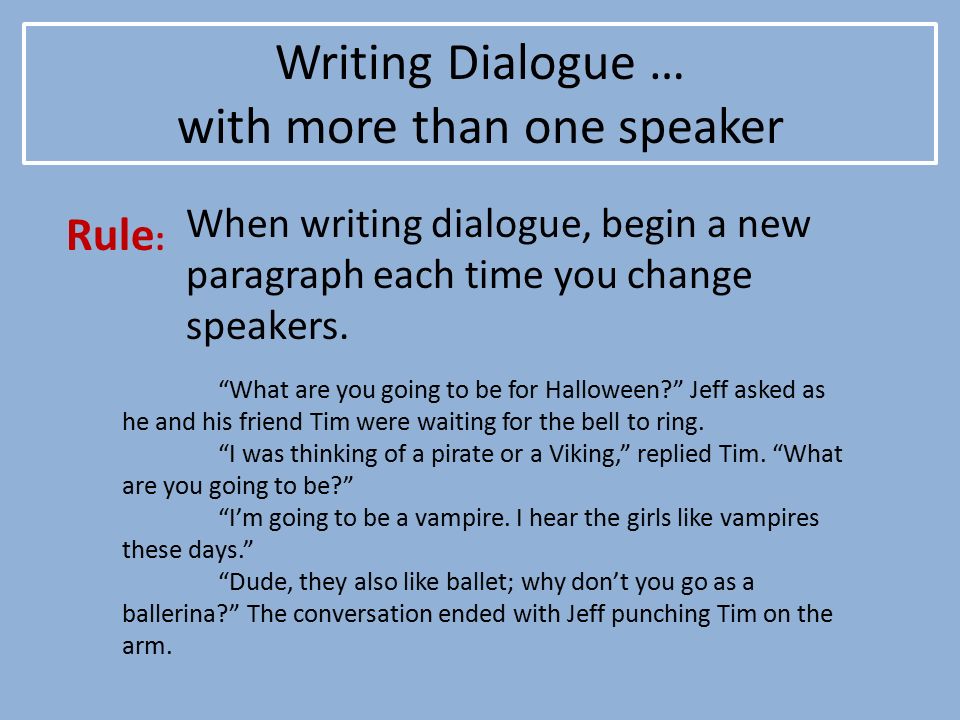 There are rules of punctuation that have to be followed; but there are also punctuation conventions that give writers greater choice.
We use capital letters to mark the beginning of a sentence and we use full stops to mark the end of a sentence:
We went to France last summer. We were really surprised that it was so easy to travel on the motorways.
The Football World Cup takes place every four years. The next World Cup will be held in South Africa. In 2006 it was held in Germany.
We also use capital letters at the beginning of proper nouns. Proper nouns include personal names (including titles before names), nationalities and languages, days of the week and months of the year, public holidays as well as geographical places:
Dr David James is the consultant at Leeds City Hospital.
They are planning a long holiday in New Zealand.
Can she speak Japanese?
The next meeting of the group will take place on Thursday.
![]()
What plans do you have for Chinese New Year?
We use capital letters for the titles of books, magazines and newspapers, plays and music:
‘Oliver’ is a musical based on the novel ‘Oliver Twist’ by Charles Dickens.
The Straits Times is a daily English language newspaper in Singapore.
They are performing Beethoven’s Sixth Symphony.
In addition to closing sentences, we also use full stops in initials for personal names:
G. W. Dwyer
David A. Johnston, Accountant
Full stops are also used after abbreviations, although this practice is becoming less common:
|
Arr. (arrival) |
etc. (etcetera) |
|
Dr. (doctor) |
Prof. |
 (professor)
See also:
-
Noun phrases
We use question marks to make clear that what is said is a question. When we use a question mark, we do not use a full stop:
Why do they make so many mistakes?
A:
So you’re Harry’s cousin?
B:
Yes. That’s right.
We use exclamation marks to indicate an exclamative clause or expression in informal writing. When we want to emphasise something in informal writing, we sometimes use more than one exclamation mark:
Listen!
Oh no!!! Please don’t ask me to phone her. She’ll talk for hours!!!
See also:
-
Exclamative clauses
We use commas to separate a list of similar words or phrases:
It’s important to write in clear, simple, accurate words.
They were more friendly, more talkative, more open than last time we met them.
We do not normally use a comma before and at the end of a list of single words:
They travelled through Bulgaria, Slovakia, the Czech Republic and Poland.
American English does use a comma in lists before and:
We took bread, cheese, and fruit with us.
We use commas to separate words or phrases that mark where the voice would pause slightly:
I can’t tell you now. However, all will be revealed tomorrow at midday.
We had, in fact, lost all of our money.
James, our guide, will accompany you on the boat across to the island.
When main clauses are separated by and, or, but, we don’t normally use a comma if the clauses have the same subject. However, we sometimes use commas if the clauses have different subjects:
They were very friendly and invited us to their villa in Portugal.
 (same subject)
Footballers these days earn more money but they are fitter and play many more matches. (same subject)
It was an expensive hotel in the centre of Stockholm, but we decided it was worth the money. (different subjects)
When a subordinate clause comes before the main clause, we commonly use a comma to separate the clauses. However, we do not always do this in short sentences:
If you get lost in the city centre, please don’t hesitate to text us or phone us.
If you get lost just phone us.
When we use subordinate or non-finite comment clauses to give further details or more information, we commonly use commas to separate the clauses:
You do need to wear a darker jacket, if I may say so.
To be honest, I thought they were very very rude.
We use commas to mark non-defining clauses. Such clauses normally add extra, non-essential information about the noun or noun phrase:
The ambulance, which arrived after just five minutes, took three people to the hospital immediately.
Hong Kong, where the first ASEAN meeting was held, is a very different city now.
The same is true for non-finite clauses:
The storm, lasting as it did for several days, caused serious damage to villages near the coast.
Warning:
We don’t use commas to mark defining clauses:
Barcelona was the Spanish city that was selected for the Olympic Games.
Not: … the Spanish city, that was selected …
See also:
-
Clauses
We commonly separate tags and yes-no responses with commas:
They are going to the party, aren’t they?
No, thank you.
 I’ve already eaten too much.
We also usually separate vocatives, discourse markers and interjections with commas:
Open the door for them, Kayleigh, can you. Thanks. (vocative)
Well, what do you think we should do about it? (discourse marker)
Wow, that sounds really exciting. (interjection)
We use commas to show that direct speech is following or has just occurred:
He said in his opening speech, ‘Now is the time to plan for the future.’ (or He said in his opening speech: ‘Now is the time to plan for the future.’)
When the direct speech is first, we use a comma before the closing of the quotation marks:
‘We don’t want to go on holiday to the same place every year,’ he said impatiently.
See also:
-
Reported speech
We use colons to introduce lists:
There are three main reasons for the success of the government: economic, social and political.
We also use colons to indicate a subtitle or to indicate a subdivision of a topic:
Life in Provence: A Personal View
We often use colons to introduce direct speech:
Then he said: ‘I really cannot help you in any way.’
We commonly use a colon between sentences when the second sentence explains or justifies the first sentence:
Try to keep your flat clean and tidy: it will sell more easily.
We use semi-colons instead of full stops to separate two main clauses. In such cases, the clauses are related in meaning but are separated grammatically:
Spanish is spoken throughout South America; in Brazil the main language is Portuguese.
Semi-colons are not commonly used in contemporary English. Full stops and commas are more common.
Quotation marks in English are ‘…’ or “…”. In direct speech, we enclose what is said within a pair of single or double quotation marks, although single quotation marks are becoming more common. Direct speech begins with a capital letter and can be preceded by a comma or a colon:
She said, “Where can we find a nice Indian restaurant?” (or She said: ‘Where can we find a nice Indian restaurant?’)
We can put the reporting clause in three different positions. Note the position of commas and full stops here:
The fitness trainer said, ‘Don’t try to do too much when you begin.’ (quotation mark after comma introducing speech and after full stop)
‘Don’t try to do too much when you begin,’ the fitness trainer said. (comma before closing quotation mark)
‘Don’t try to do too much,’ the fitness trainer said, ‘when you begin.’ (commas separating the reporting clause)
When we use direct speech inside direct speech, we use either single quotation marks inside double quotation marks, or double quotation marks inside single quotation marks:
“It was getting really cold,” he said, “and they were saying ‘When can we go back home?’”
Jaya said, ‘They were getting really excited and were shouting “Come on!”’.

We commonly use question marks inside the quotation marks unless the question is part of the reporting clause:
‘Why don’t they know who is responsible?’ they asked.
So did they really say ‘We will win every match for the next three weeks’?
We also use single quotation marks to draw attention to a word. We can use quotation marks in this way when we want to question the exact meaning of the word:
I am very disappointed by his ‘apology’. I don’t think he meant it at all.
NEW ‘WAR’ OVER NORTH SEA FISHING PLANS
We sometimes use quotation marks to refer to the titles of books, newspapers, magazines, films, songs, poems, videos, CDs, etc:
There’s a special report all about it in ‘The Daily Mail’.
We can use italics instead of quotation marks for these citations:
There’s a special report all about it in The Daily Mail.
Articles or chapters within books, or titles of short stories, are normally punctuated by single quotation marks:
The longest chapter in the book is the last one called ‘The Future of Africa’.
Dashes are more common in informal writing. They can be used in similar ways to commas or semi-colons. Both single and multiple dashes may be used:
Our teacher – who often gets cross when we’re late – wasn’t cross at all. No one could believe it!
Just wanted to thank you for a lovely evening – we really enjoyed it.
Brackets have a similar function to dashes. They often add extra, non-essential information:
Thriplow (pronounced ‘Triplow’) is a small village in the eastern part of England.
We use brackets around dates and page numbers in academic writing:
Heaton (1978) gives a convincing explanation of how hurricanes are formed (pages 27–32).

We often use forward slashes in internet addresses and to indicate and/or in academic references:
You can find the figures you need on www.bbc.co.uk/finance
Binks (1995/1997) has already researched this aspect of Roman history.
In British English the date is usually given in the order day, month, year.
We use full stops in dates. Forward slashes or dashes are also commonly used:
Date of birth: 1.8.1985 (or 1/8/1985 or 1–8–1985)
In American English the day and the month are in a different order so that 8 January 1985 is written as follows:
1–8–1985 (or 1/8/1985 or 1.8.1985)
We don’t usually punctuate weights and measures and references to numbers:
4kg (4 kilograms)10m (10 metres) 5m dollars (5 million dollars)
Commas are used in numbers to indicate units of thousands and millions:
7,980 (seven thousand, nine hundred and eighty)
11,487,562 (eleven million, four hundred and eighty-seven thousand, five hundred and sixty-two)
We use full stops, not commas, to indicate decimal points:
6.
 5 (six point five)
Not: 6,5
We can punctuate times with full stops or colons:
The shop opens at 9.30. (or 9:30)
Spoken English:
When we speak email and web addresses, we say each word separately. To avoid confusion, we sometimes spell out each letter of a word:
[email protected] = Hannah dot reeves at l-i-t dot com
miles_hotel.com/home = miles underscore hotel dot com forward slash home
www.theplace.org = www dot theplace (all one word) dot org
|
. |
full stop |
X.X |
decimal point (2.2: two point two) |
|
, |
comma |
* |
asterisk |
|
? |
question mark |
( ) |
parentheses (or round brackets) |
|
! |
exclamation mark |
[ ] |
square brackets (or box brackets) |
|
: |
colon |
{ } |
curly brackets |
|
; |
semi-colon |
° |
degrees (40º: forty degrees) |
|
“ ” |
double quotation marks |
% |
per cent |
|
‘ ’ |
single quotation marks |
& |
and (also called ‘ampersand’) |
|
’ |
apostrophe |
© |
copyright |
|
– |
hyphen |
< |
less than |
|
– |
dash |
> |
greater than |
|
+ |
plus |
@ |
at |
|
– |
minus |
✓ |
tick |
|
× |
multiplied by (2 × 2: two multiplied by two) |
X |
cross |
|
÷ |
divided by (6 ÷ 2: six divided by two) |
X_X |
underscore (ann_hobbs: ann underscore hobbs) |
|
= |
equals |
||
|
/ |
forward slash |
\ |
back slash |
See also:
-
Punctuation
-
Spelling
-
01
No sooner
-
02
Nouns, pronouns and determiners
-
03
Spelling
-
04
Adverbs and adverb phrases: position
-
05
Which
-
06
Future: be going to (I am going to work)
-
07
Since
-
08
Word classes and phrase classes
-
09
Dates
-
10
Present perfect continuous (I have been working)
How to Punctuate Dialogue Like a Pro
Most readers and writers have been exposed to countless dialogue lines in print, so why does dialogue punctuation elude so many of us?
The answer is that well-written dialogue, like good book design, operates subliminally.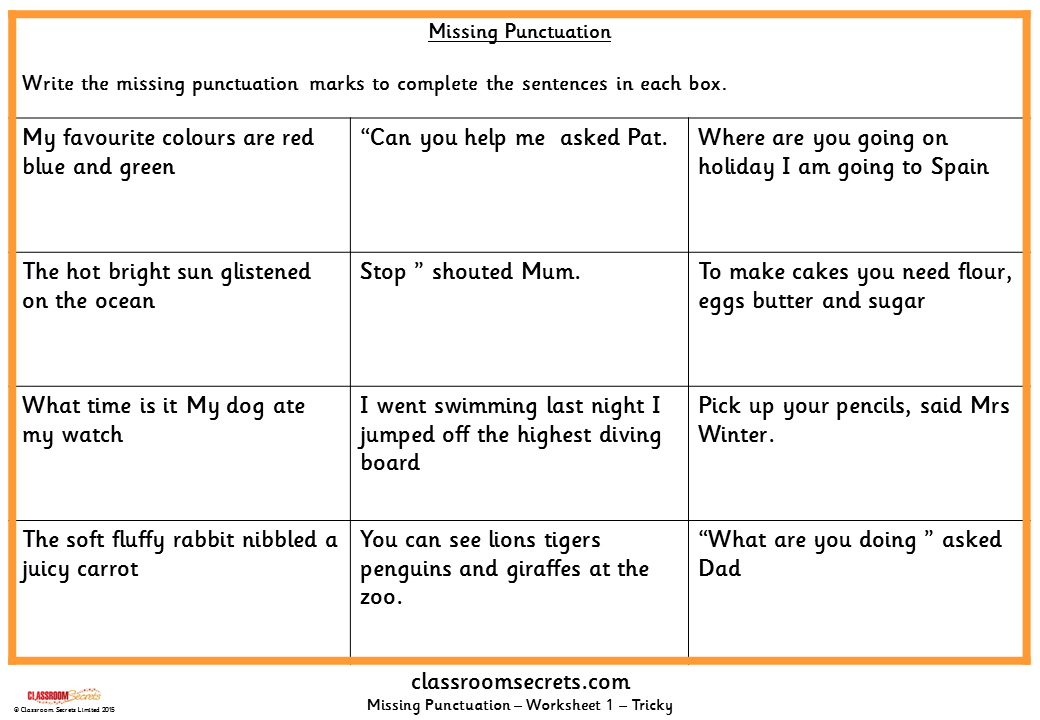 The function of good dialogue punctuation is to bring clarity, flow, and tone to a sentence, by virtue of quietly looking just right and beautifully unremarkable. In this post, we’ll take you through the basic rules for how to punctuate dialogue correctly. By the end, you can be sure that your dialogue never trips over its own commas ever again.
1. Use double quotation marks (if you’re in the US)
In American English, direct speech is normally represented with double quotation marks: “just so.”
In British and Commonwealth English, single quotation marks are the standard.
‘I say, old bean,’ the wicketkeeper said, ‘Thomas really hit us for six. Let’s pull up stumps and retire to the pavilion for tea and biscuits.’
In this post, we’ll be looking at US standards — in particular, the widely accepted standards set by the Chicago Manual of Style. Let’s get to it!
2. Put punctuation inside the quote marks (with some exceptions)
Misplaced periods are the most common mistake writers make when punctuating dialogue.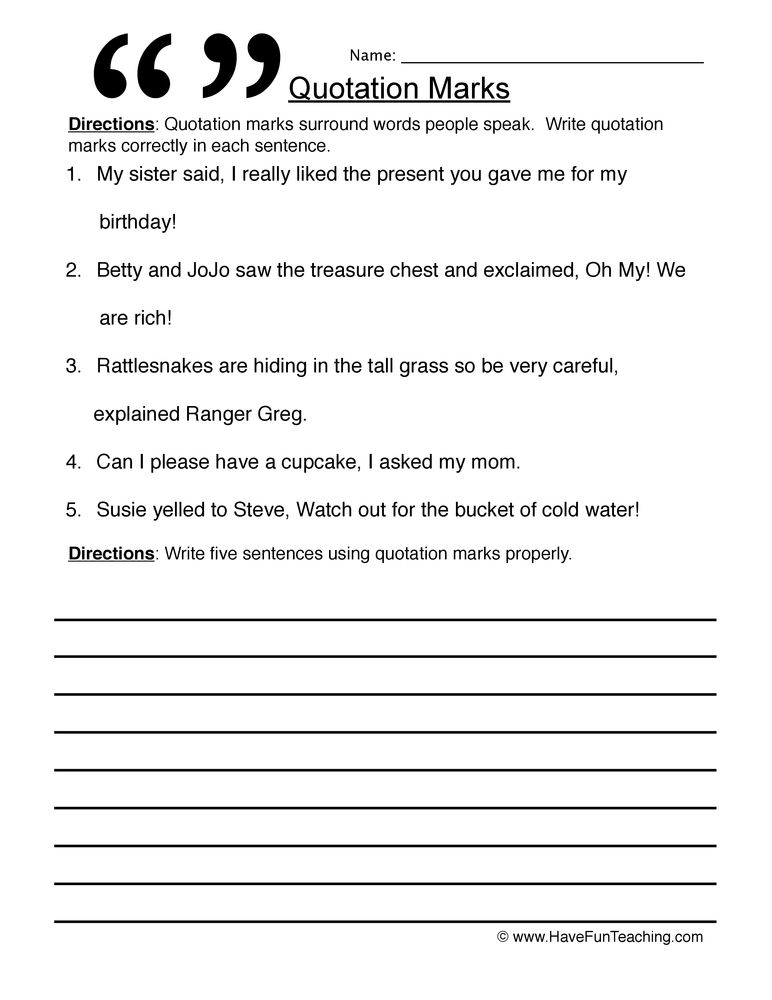 When completing a spoken sentence, you should always have the period inside the quote.
“It’s time to pay the piper.”
You might see British editors occasionally place a period (or full stop, as they say) outside the quote marks. In those cases, the period is not used for spoken dialogue but for quoting sentence fragments, or perhaps when styling the title of a short story like ‘The Gift of the Magi’.
But what about other types of punctuation?
The most common way to indicate speech is to write dialogue in quotation marks and attribute it to a speaker with dialogue tags, such as he said, she said or Margaret replied or chirped Hiroko. This is what we call “attribution” when you’re punctuating dialogue.
When the speaker is attributed after the dialogue, you insert a comma inside the quotation marks.
“Come closer so I can see you,” said the old man.
If the speaker is attributed before the dialogue, there is a comma outside the quotation marks.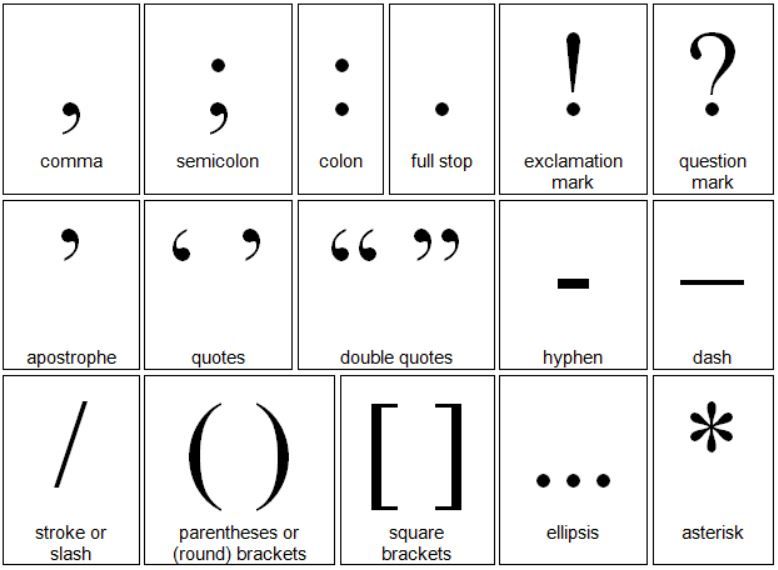
Aleela whimpered, “I don’t want to. I’m scared.”
If the utterance (to use a fancy linguistics term for dialogue 🤓) ends in a question mark or exclamation point, they would also be placed inside the quotation marks.
3. Start a new paragraph every time the speaker changes
This is one of the most fundamental rules of organizing dialogue. To make it easier for readers to follow what’s happening, start a new paragraph every time the speaker changes, even if you’re using dialogue tags.
“What do you think you’re doing?” asked the policeman.
“Oh, nothing, officer. Just looking for my hat,” I replied.
The new paragraph doesn’t always have to start with direct quotes. Whenever the focus moves from one speaker to the other, that’s when change lines. Here’s an alternative:
“What do you think you’re doing?” asked the policeman.
I scrambled for an answer. “Oh, nothing, officer. Just looking for my hat.”
💡Pro tip: Imagine you’re watching the conversation play out in front of you in real life. Every time you feel like you would turn your head and look at a different character, either because they’ve started to speak, or you’re anticipating their reply, that’s when you would start a new paragraph.
4. Indicate pauses by interrupting speech with dialogue tags
Sometimes, writers choose to interrupt a speaker’s line with a dialogue tag before allowing them to continue. If the dialogue tag comes between sentences, cap it off with a period. After the tag, resume the quote with the next sentence (beginning with a capital letter).
“I’m not opposed to change,” said Colin. “If Uncle Simon wants to cook chicken for Thanksgiving, I really don’t care.”
However, if the dialogue tag comes partway through a sentence, then it will be followed by a comma. There is no need to capitalize the first letter of the next quote, as you’re resuming the previous spoken sentence.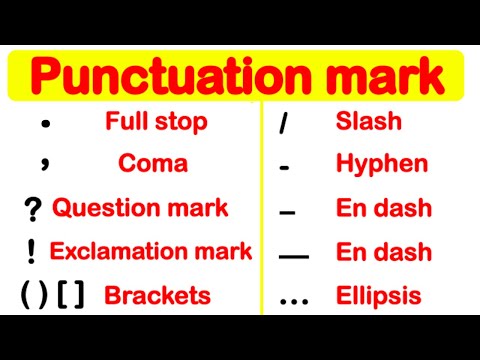
“Whenever mother goes to Paris,” Tetsuo smirked, “she always stops at Ladurée on the Champs Elysées for a dozen macarons.”
This kind of mid-sentence dialogue tag placement can imply a natural pause in speech, so you can use them to control pacing in your writing.
5. Replace dialogue tags with action beats for variety
The primary purpose of a dialogue tag is to let readers know who is speaking. Sometimes, this can be achieved without using a traditional “he said”/”she said” tag at all. Instead, you can break up a line of dialogue with an action beat, which is just a short description of what the speaker is doing while talking. In these cases, the punctuation inside the quotation marks should follow conventional rules.
6. Don’t use end quotes between paragraphs of speech
In all the examples above, each character has said fewer than 10 or 20 words at a time. But if a character speaks more than a few sentences at a time, to deliver a speech for example, you can split their speech into multiple paragraphs.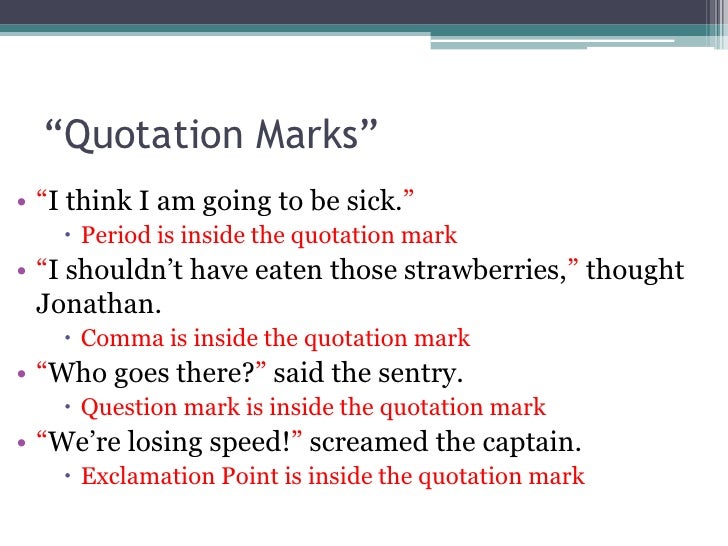 To do this:
- Start each subsequent paragraph with an opening quotation mark; and
- ONLY use a closing quotation mark on the final paragraph.
For example:
“Would you like to hear my plan?” the professor said, lighting his oak pipe with a match. “The first stage involves undermining the dean’s credibility: a small student protesst here, a little harassment rumor there. It all starts to add up.
“Stage two involves the board of trustees, with whom I’ve been ingratiating myself for the past two semesters.”
Notice how the first paragraph doesn’t end with an end quote? This is to indicate that the same person is speaking in the next paragraph. That said, to avoid having pages and pages of uninterrupted monologue, you can always break up any extended speech with action beats.
Want to see a great example of action beats breaking up a monologue? Check out this example from Sherlock Holmes.
![]()
7. Use em-dashes — to interrupt speech
When a speaking character is cut off, either by another person or a sudden event, use one or two em-dashes (alt-shift-dash on your keyboard, or option-shift-dash for Mac users) inside the quotation marks.
“Captain, we only have twenty seconds before—”
A deafening explosion ripped through the ship’s hull. It was already too late.
Or
“Ali, please tell me what’s going—”
“There’s no use talking!” he barked.
You can also overlap dialogue to show one character speaking over another.
Mathieu put his feet up as the lecturer continued. “Current estimates indicate that a human mission will land on Mars within the next decade—”
“Fat chance.”
“—with colonization efforts following soon thereafter.”
Sometimes, the writer/narrator will want to jump in with some narration in the middle of some dialogue. This might be to insert action or show a character’s reaction to what’s just been said. In this case, use the em-dash outside the quotation marks.
“In the blink of an eye” — the detective snapped his fingers — “the burglar was gone without a trace.”
Or
“The president is dead” — the room fell silent — “and I’m the man who killed him.”
8. Trail off with ellipses. . .
Sometimes, people won’t finish their sentences, and it’s not because they’ve been interrupted. You can indicate the speaker trailing off with ellipses (. . .) inside the quotation marks.
Velasquez patted each of his pockets. “I swear I had my keys . . .”
Ellipses can also suggest a small pause between two people speaking.
Dawei was in shock. “I can’t believe . . .”
“Yeah, me neither,” said Lan Lan.
💡Pro tip: The Chicago Manual of Style requires a space between each period of the ellipses. Most word processors will automatically detect the dot-dot-dot and re-style them for you — but if you want to be exact, manually enter the spaces in between the three periods.
In the course of natural speech, people will often directly quote what other people have said. If this is the case, use single quotation marks within the doubles and follow all other rules of punctuating dialogue as usual.
But what if a character is quoting another person, who is themselves also quoting another person? In complex cases like this (which thankfully aren’t that common), you will alternate double quotation marks with single quotes.
“I asked Gennadi if he thinks I’m getting the promotion and he said, ‘The boss pulled me aside and asked, “Is Sergei going planning to stay on next year?”’”
The punctuation at the end is a double quote mark, followed by a single quote mark, followed by another double quote. It closes off: 1) what the boss said, 2) what Gennadi said, and 3) what Sergei, the speaker said.
Quoting quotes within quotes can get pretty messy, so consider falling back on indirect speech. Simply relate the gist of what someone said:
“I pressed Gennadi on my promotion. He said the boss pulled him aside and asked him if I was going to leave next year.”
10. Use italics to indicate thoughts and internal monologue
It’s not uncommon for readers to hear exactly what characters are thinking, especially with close third person limited and omniscient narration. There are two ways to approach this. First, with indirect dialogue:
A crumpled ’39 Cadillac lay burning at the bottom of Runyon Canyon. Richard knew only one guy in town who drove that model: his brother.
If you want to express the exact words a character is thinking, use italics.
Richard spied the burning Caddy. There’s only one guy in town who owns that model, he thought. Jamie.
💡Pro tip: Be careful to italicize the terminal punctuation when styling internal dialogue this way.
Some authors will use quotation marks when writing thoughts, but the most important thing is to maintain consistency (which a copy editor or proofreader should help you with before publication).
Hopefully, these guidelines have clarified a few things about punctuating dialogue. If you want to see these rules in action, you can find some great dialogue examples here.
Signs in direct speech – “Gramota.ru” – reference and information Internet portal “Russian language”
Signs in direct speech
§ 195. To highlight direct speech, dashes or quotation marks are used, namely:
1. If direct speech begins with a paragraph, then a dash is placed before it, for example:
- A little girl ran and shouted:
– Have you seen your mother?
M. Gorky
- A little girl was running and screaming: “Did you see your mother?”
Quotations inserted in the middle of a sentence are also enclosed in quotation marks, but they are not preceded by a colon, for example:
- Gogol rightly said that “Pushkin, as if in a lexicon, contains all the richness, flexibility and strength of our language.
 ”
”
Belinsky
§ 196. A sentence in direct speech and indicating to whom it belongs (“author’s words”) can:
a) precede direct speech; in this case, a colon is placed after it, and after direct speech – a punctuation mark in accordance with the nature of direct speech, for example:
- He turned away and, moving away, muttered: “But still, this is completely against the rules.”
Lermontov
Finally I said to her: “Do you want to go for a walk on the rampart?”
Lermontov
She looked and screamed: “It’s Kazbich!”
Lermontov
b) follow direct speech; in this case, after direct speech, a question mark, or an exclamation point, or an ellipsis, or a comma (the last instead of a dot) is placed, and after this sign is a dash, for example:
- “What about Kazbich?” I asked the staff captain impatiently.
Lermontov
or:
– And what about Kazbich? I asked the staff captain impatiently.
“How boring!” I exclaimed involuntarily.
Lermontov
or:
– How boring! I exclaimed involuntarily.
“She’s dead…” Aksinya echoed back.
Sholokhov
or:
– Died… – Aksinya echoed back.
“There is the district ataman,” Pantelei Prokofievich whispered, pushing Grigory from behind.
Sholokhov
or:
- “There is the district ataman,” whispered Pantelei Prokofievich, pushing Grigory from behind.
c) break direct speech into two parts; in this case put:
before the words of the author, a question mark, or an exclamation mark, or an ellipsis in accordance with the nature of the first part of direct speech, or a comma (if none of the indicated characters is required), and after them – a dash;
after the words of the author – a dot, if the first part of direct speech is a complete sentence, and a comma – if unfinished, then put a dash; if at the same time direct speech is highlighted with quotation marks, then they are placed only before the beginning of direct speech and at the very end of it, for example:
- – Would you like some more rum? I said to my interlocutor.
 – I have a white man from Tiflis; it’s cold now.
Lermontov
– Well, full, full! said Pechorin, embracing him in a friendly way. Am I not the same?
Lermontov
“Listen to me…” said Nadia, “someday until the end.
Chekhov
– My name is Foma, – he answered, – and nicknamed Biryuk.
Turgenev
“It’s going to rain,” Kalinich objected, “the ducks are splashing over there, and the grass smells sickly.”
Turgenev
Note 1. If the words of the author contain two verbs with the meaning of the statement, of which one refers to the first part of direct speech, and the other to the second, then a colon and a dash are put after the words of the author, for example:
- “Let’s go, it’s cold,” Makarov said and asked sullenly: “Why are you silent?
M. Gorky
Note 2. The rules set out in this paragraph also apply to sentences containing quotations indicating to whom they belong.
Note 3. Internal monologue (“mental speech”), which has the form of direct speech, is also enclosed in quotation marks.
§ 197. If several replicas follow in a line without indicating to whom they belong, then each of them is quoted and, in addition, separated from the next one by means of a dash, for example:
- “Tell me, beauty,” I asked, “what were you doing on the roof today?” “I watched which way the wind was blowing.” – “Why do you?” “Where the wind comes from, happiness comes from there.” – “Well, did you call happiness with a song?” “Where one sings, one is happy there.”
Lermontov
Paragraph Formatting in Illustrator
User Guide
Cancel
Search
- Illustrator User Guide
- Illustrator basics
- Introduction to Illustrator
- What’s new in Illustrator
- Frequently Asked Questions
- Illustrator system requirements
- Illustrator for Apple Silicon
- Working environment
- Working environment basics
- Create documents
- Toolbox
- Default key combinations
- Setting shortcut keys
- Introduction to artboards
- Managing artboards
- Work environment setup
- Properties panel
- Parameter setting
- Working environment “Touch control”
- Microsoft Surface Dial support in Illustrator
- Recovery, cancellation, history and automation
- Rotate view
- Rulers, grids and guides
- Accessibility in Illustrator
- Safe Mode
- Viewing graphic objects
- Working in Illustrator using the Touch Bar
- Files and templates
- Illustrator tools
- Selection tools
- Selection tools
- Partial selection
- Bulk selection
- Magic Wand
- Lasso
- Artboard
- Navigation tools
- Hand
- Rotate view
- Scale
- Drawing tools
- Gradient
- Mesh
- Creating Shapes
- Text tools
- Text
- Text on a contour
- Vertical text
- Drawing tools
- Pen
- Add anchor point
- Delete anchor points
- Reference point
- Curvature
- Line segment
- Rectangle
- Rounded rectangle
- Ellipse
- Polygon
- Star
- Brush
- Blob brush
- Pencil
- Shaper
- Fragment
- Modification tools
- Rotation
- Reflection
- Scale
- Curvature
- Width
- Free Transform
- Pipette
- Mix
- Eraser
- Scissors
- Selection tools
- Introduction to Illustrator
- Illustrator on iPad
- Introducing Illustrator on iPad
- An overview of Illustrator on iPad.
- Illustrator on iPad FAQ
- System requirements | Illustrator on iPad
- Do’s and Don’ts in Illustrator on iPad
- An overview of Illustrator on iPad.
- Workspace
- Workspace Illustrator on iPad
- Touch shortcuts and gestures
- Keyboard Shortcuts for Illustrator on iPad
- Application settings management
- Documents
- Working with documents in Illustrator on iPad
- Import Photoshop and Fresco documents
- Selecting and arranging objects
- Creating repeating objects
- Objects with transitions
- Draw
- Create and modify paths
- Drawing and editing shapes
- Text
- Working with text and fonts
- Creating text labels along a path
- Adding custom fonts
- Working with images
- Vectorizing bitmaps
- Color
- Applying colors and gradients
- Introducing Illustrator on iPad
- Cloud Documents
- Fundamentals
- Working with Illustrator 9 Cloud Documents0172
- Sharing and collaborating on Illustrator cloud documents
- Cloud storage update for Adobe Illustrator
- Cloud documents in Illustrator | Frequently Asked Questions
- Troubleshooting
- Troubleshooting creating or saving cloud documents in Illustrator
- Troubleshooting cloud documents in Illustrator
- Fundamentals
- Adding and editing content
- Drawing
- Basic drawing
- Edit contours
- Drawing a graphic object with pixel-level precision
- Draw with the Pen, Curvature, and Pencil tools
- Drawing simple lines and shapes
- Image trace
- Contour simplification
- Definition of perspective grids
- Symbol tools and symbol sets
- Correction of contour segments
- Making a flower in five easy steps
- Drawing perspective
- Symbols
- Drawing pixel-aligned paths when creating designs for the web
- Adobe Substance 3D effects and materials
- Learn more about 3D effects in Illustrator
- Creation of 3D graphics
- Projecting a pattern onto 3D objects
- Creating 3D objects
- Creating 3D text
- Color
- About color
- Choice of colors
- Using and creating color swatches
- Color correction
- Adobe Color Themes panel
- Color groups (harmonies)
- Color Themes Panel
- Recoloring a graphic object
- Coloring
- About coloring
- Coloring with fills and strokes
- Live Paint Groups
- Gradients
- Brushes
- Transparency and Blending Modes
- Applying strokes to objects
- Creating and editing patterns
- Nets
- Patterns
- Selecting and organizing objects
- Selecting objects
- Layers
- Grouping and collating objects
- Move, align and distribute objects
- Placement of objects
- Locking, hiding and deleting objects
- Duplicate objects
- Rotate and flip objects
- Redrawing objects
- Cropping images
- Transform objects
- Combining objects
- Cutting, splitting and trimming objects
- Puppet deformation
- Scale, skew and distort objects
- Objects with transitions
- Redrawing with shells
- Redrawing objects with effects
- Creating shapes with the Shape Maker and Shape Builder tools
- Working with live corners
- Improved touch-enabled repaint processes
- Edit clipping masks
- Dynamic figures
- Creating shapes with the Shape Builder tool
- Global change
- Text
- Adding object types to text and work objects
- Create bulleted and numbered lists
- Text area control
- Fonts and decorations
- Text formatting
- Import and export of text
- Paragraph formatting
- Special characters
- Creating text along a path
- Character and paragraph styles
- Tab
- Text and fonts
- Search for missing fonts (Typekit workflow)
- Update text from Illustrator 10
- Font for Arabic and Hebrew
- Fonts | Frequently Asked Questions and Troubleshooting Tips
- Creating a 3D text effect
- Creative design
- Scaling and rotating text
- Leading and letter spacing
- Hyphenation and line breaks
- Text enhancements
- Spell checker and language dictionaries
- Formatting Asian characters
- Composers for Asian scripts
- Creation of text projects with transitions between objects
- Create a text poster using image tracing
- Creating special effects
- Working with effects
- Graphic styles
- Shading
- Appearance attributes
- Sketching and Mosaicing
- Shadows, glows and shading
- Overview of effects
- Web Graphics
- Best Practices for Creating Web Graphics
- Diagrams
- SVG
- Animation creation
- Fragments and image maps
- Drawing
- Import, export and save
- Import
- Import graphics files
- Import bitmaps
- Import artwork from Photoshop
- Putting multiple files in a document
- Image extraction
- Import Adobe PDF files
- Import EPS, DCS and AutoCAD files
- Link details
- Creative Cloud Libraries in Illustrator
- Creative Cloud Libraries in Illustrator
- Save dialog box
- Save illustrations
- Export
- Using an Illustrator graphic in Photoshop
- Export illustration
- Collection of resources and their bulk export
- Packing files
- Create Adobe PDF files
- CSS Extraction | Illustrator CC
- Adobe PDF Options
- File information and metadata
- Import
- Printing
- Preparing to print
- Setting up documents for printing
- Changing page size and orientation
- Setting crop marks for cropping and straightening
- Getting Started with Large Canvas
- Print
- Overlay
- Color managed printing
- PostScript printing
- Print styles
- Marks and bleed
- Printing and saving transparent graphics
- Trapping
- Printing of color plates
- Print gradients, meshes, and color overlays
- White overlay
- Preparing to print
- Automating tasks
- Combining data using the Variables panel
- Automation using scripts
- Automation using operations
- Troubleshooting
- Crash problems
- Restoring files after a crash
- Problems with files
- Supported file formats
- Problems with GPU driver
- Problems with Wacom
- Problems with DLL files
- Memory problems
- Issues with settings file
- Font problems
- Printer problems
- How to share a crash report with Adobe
devices
Use the Paragraph palette (Window > Text > Paragraph) to change column and paragraph formatting. When text is selected or the Type tool is active, you can also use the options in the Control panel to format paragraphs.
For a video on how to work with character and paragraph styles, see www.adobe.com/go/vid0047.
Paragraph panel (all options shown)
A. Justification and alignment B. Left indent C. First line left indent D. Lead before paragraph E. Hyphenation F. Right indent after lead G.
A. Font B. Font style C. Font size D. Left alignment E. Center alignment F. Right alignment
By default, only the most commonly used options are visible in the Paragraph panel. To display all options, choose Show Options from the panel menu. You can also click the double triangle on the palette tab to cycle from one display size to another.
Text in the area and text on the path can be aligned to one or both edges of the text outline.
-
Select a text object or position the cursor on the paragraph to be changed.
If no text object is selected or the cursor is not positioned on a paragraph, alignment will be applied to the new text.
-
In the Control panel or Paragraph panel, click the alignment button.
Justification is the alignment of text on both edges. Justification can be applied to all text in a paragraph, including or excluding the last line.
-
Select a text object or place the cursor on a paragraph to justify.
If no text object is selected or the cursor is not positioned on a paragraph, justification will be applied to the new text.
-
In the Paragraph panel, click the justify button.
Adobe applications let you fine-tune word and letter spacing and character scaling. Adjusting spacing is especially useful for justified text, although it can be adjusted for unaligned text as well.
-
Place the cursor on the paragraph you want to change, or select the text object or frame in which you want to change all the paragraphs.
-
Choose Justification from the Paragraph panel menu.
-
Set the values for Word Spacing, Letter Spacing, and Glyph Scale. The Minimum and Maximum values determine the allowable spacing range for justified paragraphs only. The Desired value is defined for both justified and unjustified paragraphs.
Word spacing
The spacing between words that appears when pressing the Space key. Word spacing values can range from 0% to 1000%. A value of 100% adds no extra spacing between words.
Letter spacing
Letter spacing including kerning and tracking values. Letter spacing values can range from -100% to 500%. A value of 0% adds no extra spacing between letters, while a value of 100% adds a spacing equal to a regular space.
Glyph Scale
Character width ( glyph is any font character). Glyph spacing values can vary from 50% to 200%.
Tip . Spacing options always apply to the entire paragraph. To adjust spacing for a few characters instead of the entire paragraph, use the Tracking option.
-
Select Single Word Justification (Illustrator) or Single Word Justification (InDesign) to specify how to align single-word paragraphs.
Narrow columns may contain a string containing only one word. If a paragraph is set to full justification, a single word per line may be too long. Instead of leaving these words completely off, you can align them to the center, right, or left.
The padding is the space between the text and the border of the text object. Indents only affect selected paragraphs, so you can easily set different indents for different paragraphs.
Indents can be set using the Tabs, Paragraph, and Control panels. When working with text, you can also indent using tab stops or change the indentation for a text object.
When working with Japanese text, you can use the mojikumi option instead of using the Paragraph panel to set the first line indent. If the first line indent is set in the Paragraph panel and the first line indent is set to mojikumi, the total indent is the sum of the two values.
Set indents in the Paragraph panel
-
Select the Type tool and click the paragraph you want to indent.
-
Set the indentation values in the Paragraph panel. For example, do one of the following:
-
To set the indent to 1 pix for the entire paragraph, type 1p in the Left Indent box.
-
To set a 1-pick indent for the first line of a paragraph, enter 1p in the First Line Left Indent field.
-
To create a 1-pick hanging indent, enter a positive value (for example, 1p ) in the Left Indent box and a negative value (for example, 1p ) in the First Line Left Indent box.
-
Set indent using the Tabs panel
-
Select the Type tool and click the paragraph you want to indent.
-
In the Tabs panel, do one of the following for indentation markers:
-
To indent the first line of text, drag the top handle. To indent all text except the first line, drag the bottom marker. To move both bullets and set the indent for the entire paragraph, Ctrl-drag (on Windows) or Command-drag (on Mac OS) the bottom bullet.
Text with an indent for the first line of a paragraph (left) and without it (right)
-
To indent the first line of text, select the top marker and enter an X indent value. To move the entire paragraph except for the first line, select the bottom marker and enter a value in the X field.
-
Creating a hanging indent
Creating a hanging indent indents all lines of a paragraph except the first.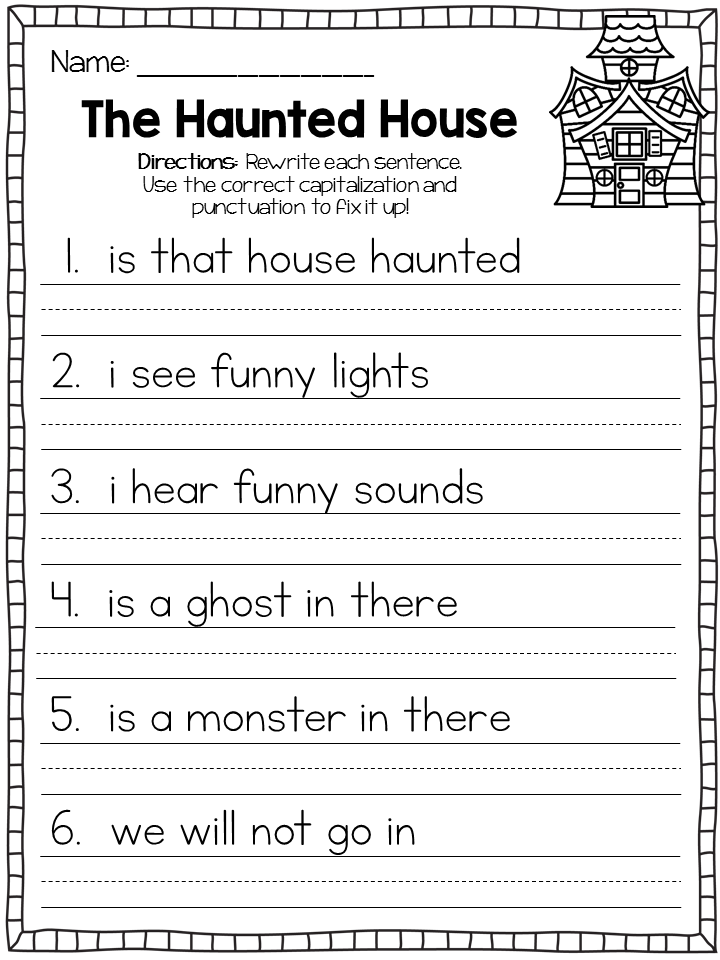 Hanging indents are especially useful when you want to add a graphic to the beginning of a paragraph or want to create a bulleted list.
Text without indent (left) and hanging indent (right)
-
Select the Type tool and click the paragraph you want to indent.
-
In the Control panel or Tabs panel, set the left indent to a positive value.
-
To set a negative indent value for the first line of a paragraph, do one of the following:
-
Position the cursor in the paragraph you want to change, or select a text object to change all of its paragraphs. If the cursor is not in a paragraph and no text object is selected, the setting will be applied to the new text.
-
In the Paragraph panel, set values in the Padding Before Paragraph ( or ) and Padding After Paragraph ( or ) boxes.
In the first paragraph of a column, an extra space before the paragraph is not added. In this case, you can increase the leading of the first line of the paragraph or change the indent for the text object.
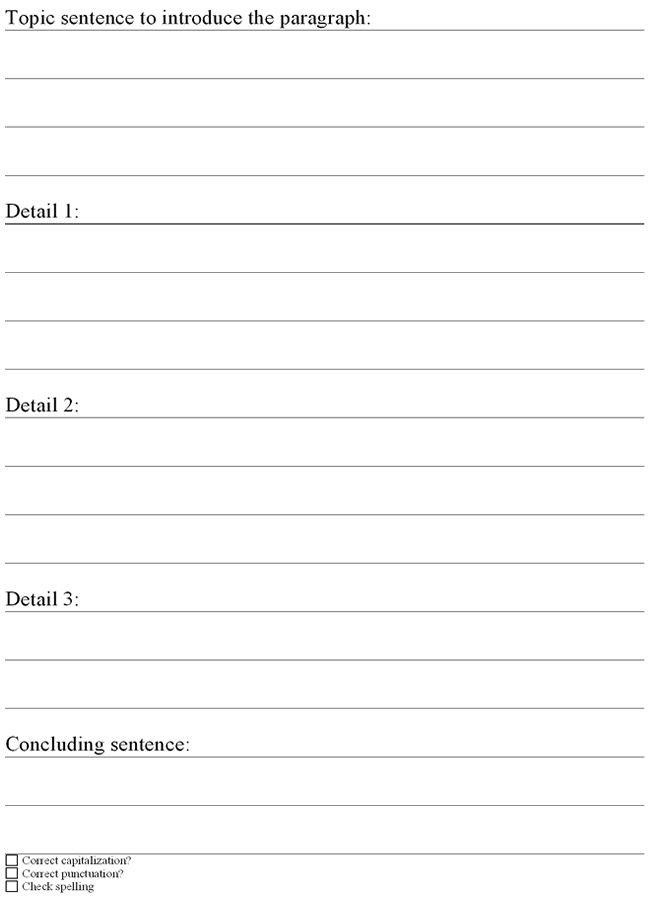
Hanging punctuation smooths the edges of text by wrapping punctuation characters outside paragraph margins.
A paragraph without hanging punctuation (left) and a paragraph with hanging punctuation (right)
Illustrator has the following options for hanging punctuation.
Hanging punctuation
Controls the alignment of punctuation characters for the selected paragraph. When Hanging Punctuation is enabled, the following characters are 100% outside the margins: single quotes, double quotes, hyphens, periods, and commas; the following characters are 50% outside the margins: asterisks, tildes, ellipsis, en dashes, em dashes, colons, semicolons. To apply this option, position the cursor in a paragraph and choose Hanging Punctuation from the Paragraph panel menu.
Visual alignment of margins
Controls the alignment of punctuation for all paragraphs in a text object. When “Visual Margin Alignment” is enabled, Latin punctuation characters, as well as the edges of letters (such as W and A), protrude beyond the text margins to make the text look even. To apply this option, select the text object and choose Type > Visual Margin Alignment.
Burasagari
Controls the alignment of double-byte punctuation characters (in Chinese, Japanese, and Korean fonts). These punctuation characters are not affected by the Hanging Punctuation and Visual Margin Alignment options.
Remember that the size of the margins that hanging punctuation extends is determined by the alignment of the paragraph. For left-aligned and right-aligned paragraphs, punctuation marks hang from the left and right, respectively. For top-aligned and bottom-aligned paragraphs, punctuation hangs at the top and bottom, respectively. For paragraphs that are centered and justified, punctuation marks hang on both sides.
Note . If a punctuation character is followed by quotation marks, both characters will be trailing.
To come in Account Management User Guide Search technology At the beginning of a set, each line is a separate paragraph. To set formatting options for one or more paragraphs (or for all paragraphs in a layer), you can select them and use the Paragraph panel.
Select the Horizontal Type Tool or the Vertical Type Tool .
The Paragraph panel is used to format paragraphs and columns. To display the panel, choose Window > Paragraph menu, or click the Paragraph panel shortcut if it is visible but not active. You can also select the Type tool and click the Panel button in the options bar. You can use the up and down arrows to set numeric values in the Paragraph panel, or you can enter a value directly in the text box. Paragraph panel
A. Leveling and alignment B. Left indent C. First line left indent D. Break before paragraph E. Hyphenation F. Right indent G. Break after paragraph
Additional commands and options can be accessed from the Paragraph panel menu. To access this menu, click the triangle in the upper right corner of the panel. Text alignment is made to one of the edges of the paragraph (for horizontal text – left, center or right, for vertical text – up, center or down). The alignment options are only available for the paragraph type. Do one of the following. In the Paragraph panel or Options Bar, click an alignment option. For horizontal text, these are the following options. Justify text to the left Aligns text to the left, leaving the right edge of the paragraph jagged. Justify text in the center Centers the text, leaving both paragraph edges jagged. Justify Text Right Justifies text to the right, leaving the left edge of the paragraph jagged. For vertical text, these are the following options. Justify Text Up Top-aligns text, leaving the bottom of the paragraph rough. Justify text in the center Centers the text, leaving the bottom and top of the paragraph jagged. Justify text at the bottom Bottom-aligns text, leaving the top of the paragraph rough. Text is considered off if it is aligned on both sides. You can justify all paragraph text, including the last line, or justify all paragraph text except the last line. The options you choose for paragraph justification determine the horizontal spacing within lines and the aesthetic appeal of text on the page. The justification options are only available for the paragraph type and determine spacing between words, letters, and glyphs. The line justification options apply only to Latin characters. They do not apply to double-byte characters in Chinese, Japanese, and Korean fonts. Do one of the following. In the Paragraph panel, click a justification option. For horizontal text, these are the following options. Justify the last line to the left Aligns all lines except the last one, which is left justified. Justify the last line in the center Aligns all lines except the last one, which is centered. Justify the last line to the right Aligns all lines except the last one, which is right-justified. Complete shutdown Justifies all lines, including the last one, which is also justified. For vertical text, these are the following options. Justify the last line at the top Aligns all lines except the last one, which is top justified. Justify the last line in the center Aligns all lines except the last one, which is centered. Justify the last line at the bottom Aligns all lines except the last one, which is bottom aligned. Complete shutdown Justifies all lines, including the last one, which is also justified. Text justification (right, left, center and full) along the path is performed from the insertion cursor to the end of the path. You can fine-tune the spacing between words and letters and change the size of characters. Adjusting spacing is especially useful for off-width text, although it is also possible for unjustified text. Select the paragraphs you want to change, or the entire text layer if you want to change all the paragraphs in that layer. Choose Justification from the Paragraph panel menu. Specify values for Word Spacing, Letter Spacing, and Glyph Scale. The Minimum and Maximum values determine the allowable spacing range for justified paragraphs only. The value of the Desired parameter is defined for both justified and unjustified paragraphs: Word spacing Word spacing resulting from space compression. Values of the “Word spacing” parameter can vary from 0% to 1000%. Letter spacing Letter spacing including kerning and tracking values. Letter spacing values can range from -100% to 500%. A value of 0% adds no extra spacing between letters, while a value of 100% adds a spacing as wide as a normal space. Glyph Scale Character width ( glyph is any character in the font). Values can vary from 50% to 200%. At a value of 100%, character height is not scaled. Spacing settings always apply to the entire paragraph. To adjust spacing for a few characters instead of the entire paragraph, use the Tracking option. Indent specifies the amount of space between the text and the bounding box or line on which the text is placed. Indents only affect selected paragraphs, so different paragraphs can have different indents. Do one of the following. In the Paragraph panel, enter indent options. Left margin The amount of indent from the left edge of the paragraph. For vertical text, this option controls the indentation from the top of the paragraph. Indent from the right edge The amount of indentation from the right edge of the paragraph. For vertical text, this option controls the indentation from the bottom of the paragraph. First line indent Indent value of the first line of the paragraph text. For horizontal text, the indent of the first line is determined relative to the indent from the left edge, for vertical text, it is relative to the indent from the top edge. To create a hanging indent (ledge), enter a negative value. Select the paragraphs you want to change, or the entire text layer if you want to change all the paragraphs in that layer. If there is no cursor in the paragraph and no text layer selected, the setting will be applied to the new text that is created.
In the Paragraph panel, adjust the values for Add Indent Before Paragraph and Add Indent After Paragraph.
Parameter Hanging punctuation controls the alignment of punctuation marks for a particular paragraph. If European Hanging Punctuation is enabled, the following characters can appear outside the margins: single and double quotes, apostrophes, commas, periods, hyphens, em and en dashes, colons, and semicolons. If a punctuation mark is followed by a closing quotation mark, both characters will be trailing characters. Remember that the size of the margins over which hanging punctuation can extend is determined by the alignment of the paragraph. Comparison between a paragraph without hanging punctuation (left) and a paragraph with hanging punctuation (right) Do one of the following. Choose European Hanging Punctuation from the Paragraph panel menu. The checkbox indicates that the option is selected. If you select European Hanging Punctuation, double-byte punctuation characters in Chinese, Japanese, and Korean fonts will not hang. Instead of this parameter, use either Standard Burasagari or Strict Burasagari. The options you choose to hyphenate a paragraph affect horizontal spacing within a line and the aesthetic appeal of text on a page. The hyphenation options determine whether and how words can be hyphenated. To apply automatic hyphenation, do one of the following: To set options, choose Hyphenation from the Paragraph panel menu and specify the following options. In words longer than _ letters Specifies the minimum number of characters in wrapping words. After the first _ letters and before the last _ letters Specifies the minimum number of characters at the beginning and end of a word that can be hyphenated. For example, if you specify a value of 3 for these parameters, then word aromatic will be carried as aromatic , but not aromatic or aromatic . In a row no more Specifies the maximum number of consecutive rows that can be wrapped. Hyphenation zone Specifies the distance from the right edge of the paragraph and limits the portion of the line in which hyphenation is not allowed. Setting the value to 0 allows hyphenation anywhere in the string. This setting only applies when using the Adobe inline linker. Arrangement of hyphenation in words typed in capital letters Clear this check box to prevent hyphenation of uppercase words. Wrap options apply only to Latin characters. Double-byte characters in Chinese, Japanese, and Korean fonts are not affected by these settings. You can prevent word breaks from appearing at the end of lines, such as in proper names or in words whose meaning changes when you add a hyphen. You can also ensure that multiple words or groups of words, such as initials and last names, are spelled inseparably. Select characters between which a break is not allowed. Choose No Break (Photoshop), No Hyphenation (Illustrator, InDesign) from the Character panel menu. If you apply the “No break/No hyphen” command to too many adjacent characters, the text may jump to another line without a hyphen in the middle of any word. However, if you apply the No Break/No Hyphenation command to multiple lines of text, the text will not be displayed. The appearance of text on a page is determined by the result of a complex interaction of processes collectively referred to as layout. You can choose from two linking methods: Adobe multi-line linker and Adobe line-by-line linker. Both methods determine all possible hyphenation options for a paragraph, and then choose the one that best matches the specified hyphenation and alignment options. The layout method only affects selected paragraphs, so you can use different layout methods for different paragraphs. Multiline Composer The Multiline Composer analyzes the number of breakpoints in a range of lines, and as a result can optimize previous lines in a paragraph to prevent future lines from breaking, which would particularly detract from the appearance of text. The multi-line linker relies on linking to identify possible breakpoints and assign “penalty points” to them according to the following principles. For text that is right-aligned, left-aligned, or centered, lines ending closer to the right edge of the page are preferred and have the least penalty points. For justified text, the most important thing is the uniformity of letter and word spacing. Transfer is avoided if possible. inline linker The inline linker offers the traditional approach to linking text line by line. This option is useful when you need to manually control how text breaks into lines. The inline linker is based on the following principles when analyzing breakpoints. Longer strings are preferred. In justified text, it is preferable to use decreasing or increasing word spacing instead of hyphenation. In unaligned text, it is preferable to use hyphens instead of increasing or decreasing letter spacing. If spacing adjustment is required, compression is preferred over expansion. You can select a layout method from the Paragraph panel menu. To apply a particular method to all paragraphs, first select the text object. To apply the method to the current paragraph only, place the cursor in the required paragraph. A paragraph style includes both character and paragraph formatting attributes and can be applied to one or more paragraphs. You can create paragraph styles and then apply them later. Select Window > Paragraph Styles to open the Paragraph Styles palette. By default, every newly created document contains the “Main Paragraph” style, which is automatically applied to the text you enter. This style can be changed, but not renamed or deleted. Styles created by the user can be renamed and deleted. You can also select a different style as the default text style. Font styles are hierarchical: Manual settings override any applied character styles, which in turn override applied paragraph styles. Watch video review by Julieanne Kost Paragraph and character styles in Photoshop CS6. (Creative Cloud only) You can specify character and paragraph styles as default type styles. For more information, see Defining Type Default Styles | Creative Cloud only. Paragraph Formatting in Photoshop
Cancel
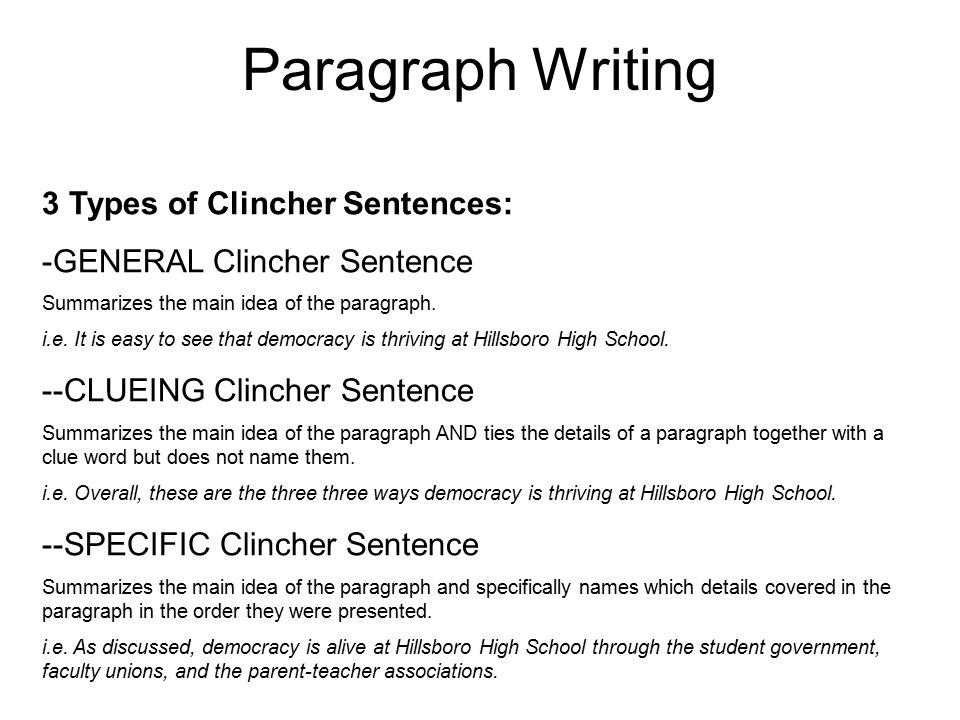 In the paragraph type, each paragraph can span multiple lines, depending on the size of the bounding box.
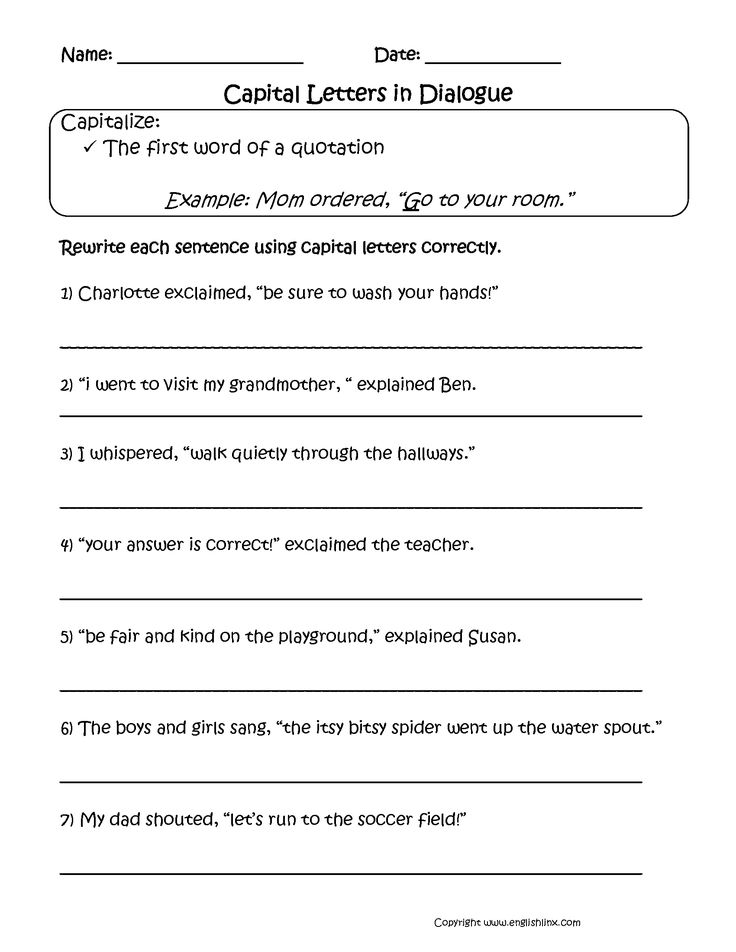 After changing the value directly, press the Enter key (Return) to save the value, Shift + Enter (Shift + Return) to save and select it, or Tab to save the value and move to the next panel field.

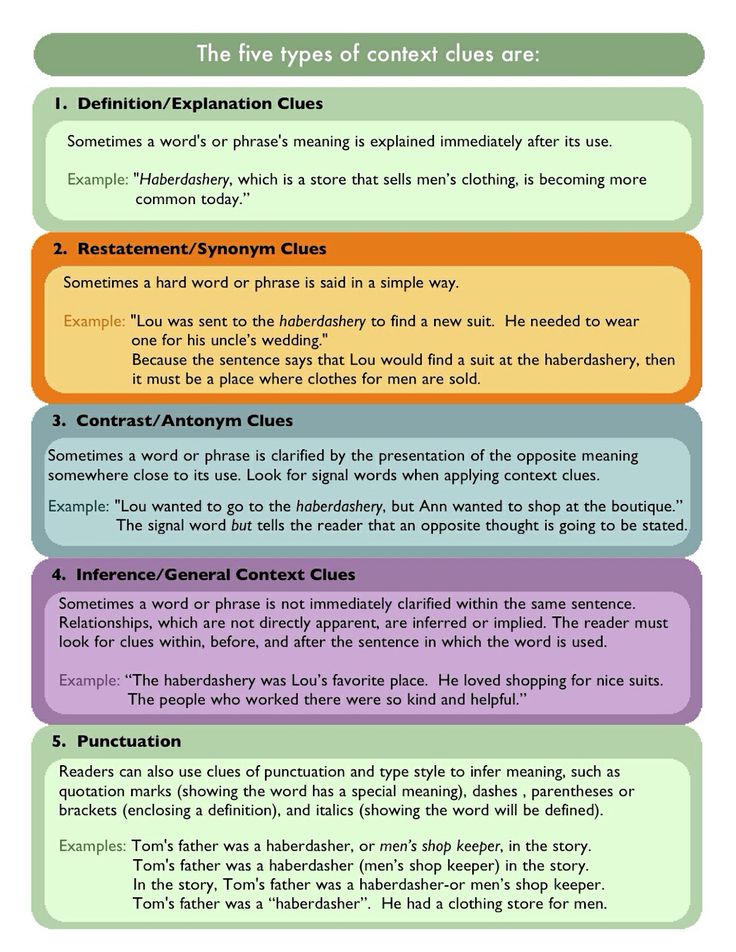
 A value of 100% adds no extra spacing between words.
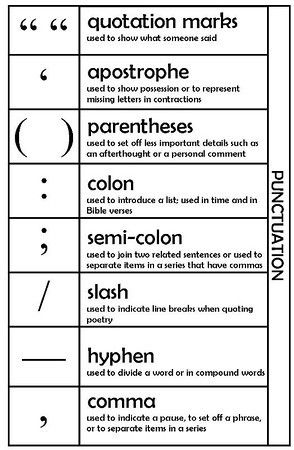
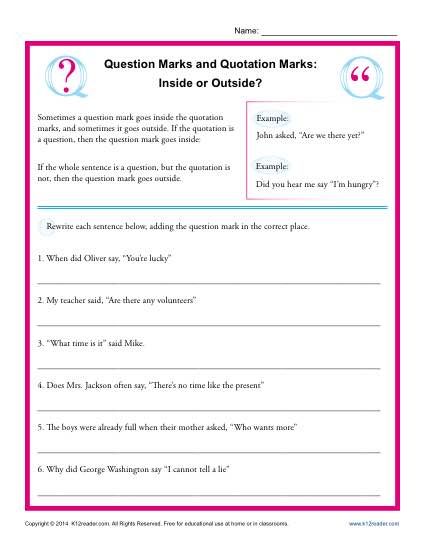
 For paragraphs turned off to the left, the punctuation symbols “hang” on the left, and for turned off to the right, they hang on the right. For paragraphs turned off at the top or bottom, punctuation marks hang at the top and bottom, respectively. For paragraphs that are centered or justified, punctuation marks hang on both sides.
 These options are only available if the Show Asian Text Options option is selected in the Font Options dialog box.
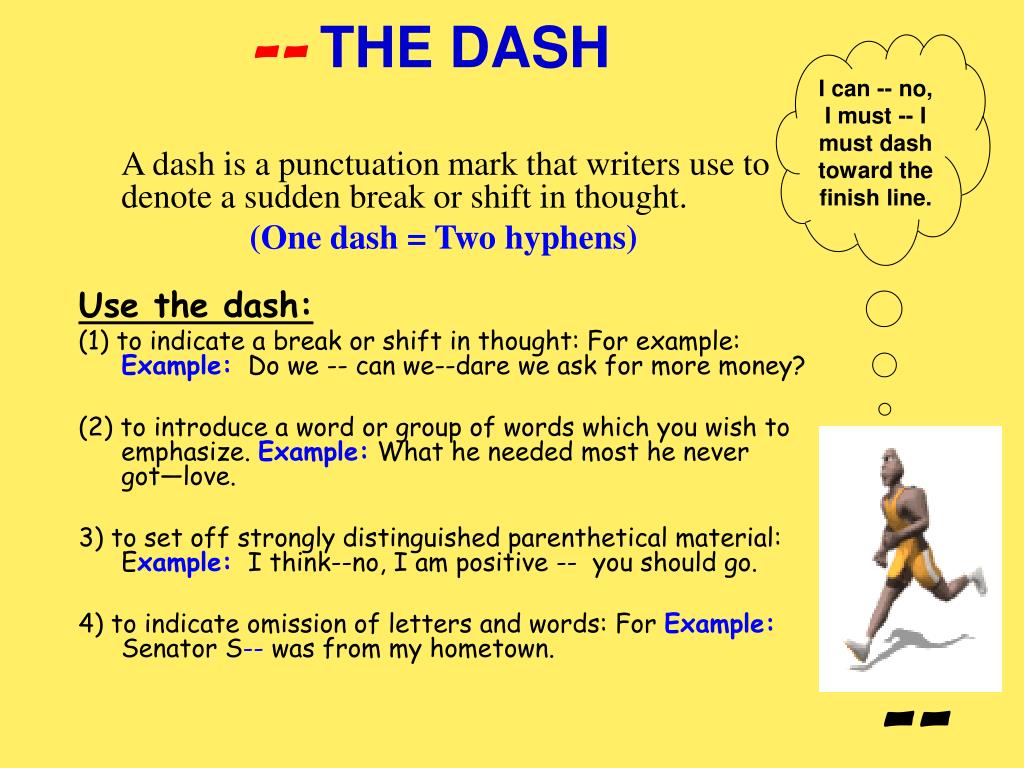
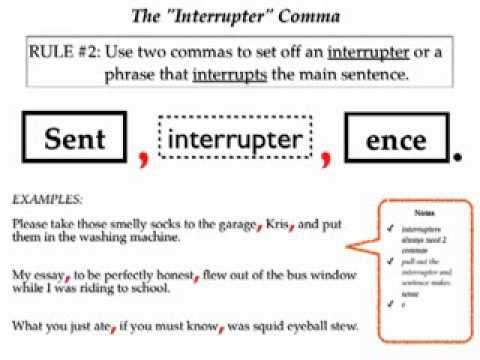 Using the specified word spacing, letter spacing, glyph spacing, and hyphenation options, Adobe applications evaluate how text can be broken into lines and select the best option based on the specified options.
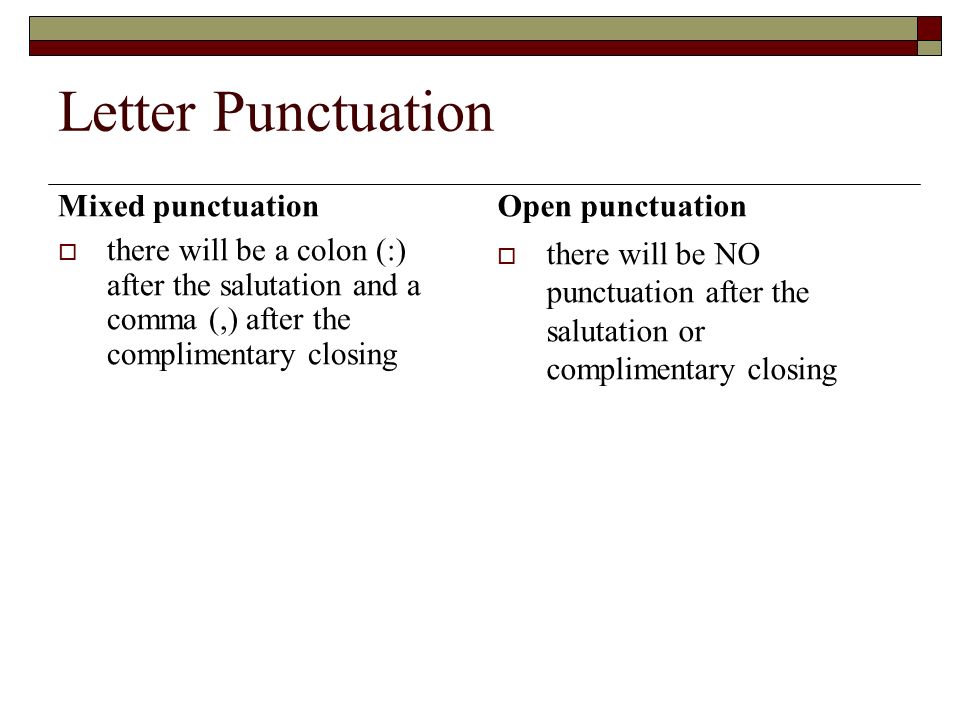
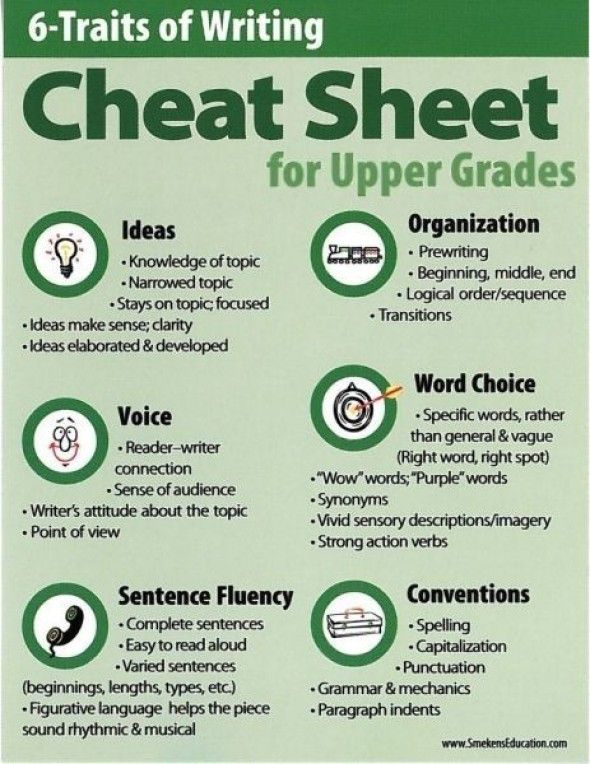
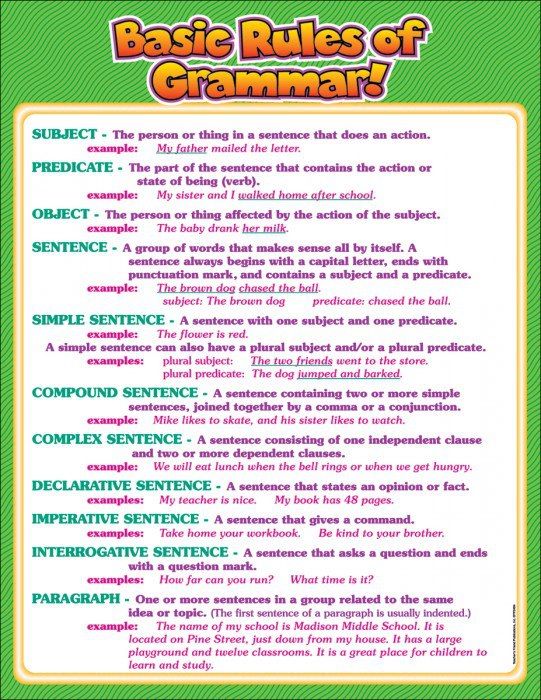 This hierarchical approach combines the efficiency of styling with the flexibility to customize projects.
 Create a paragraph style
- To create a new style based on the formatting of existing text, select the text or place an insertion point in it.
- Choose the New Paragraph Style command from the Paragraph Styles panel menu.
Note . To create a style without selecting text, click the Create New Style icon at the bottom of the Paragraph Styles panel. To change the style without applying it to text, select an image layer, such as Background.
Edit paragraph style
Double-click existing styles to edit them and update all related text in the active document.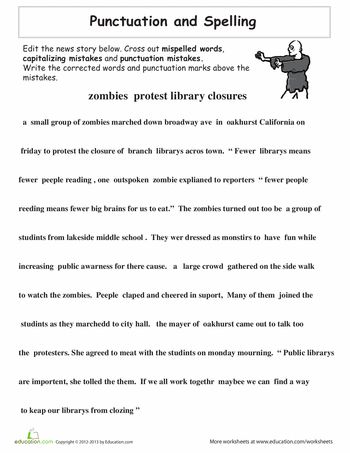 If you change the formatting of a style, the text to which it was applied will be updated to reflect the new format.
To change the style of a paragraph, do the following.
- Double-click a style in the Paragraph Style panel.
- To specify formatting attributes, select a category on the left (for example, Basic Character Formats) and specify the attributes you want to add to the style.
-
To create a new color when you set the Character Color option in the Character Style Options dialog box, double-click the fill or stroke box.
- Small font size
- Normal font size
- Large font size
-
Enable/disable image display
On
Off -
- Demographics
- Health
- Education
- Culture
- Society
- State
-
- Employment and labor
- Technological development
- Economics. Regulation
- Finance
- Social services
-
- Ecology
- Housing and cities
- Transport and communications
- Energy
- Industry
- Agriculture
-
- Regional development
- Far East
- Russia and the world
- Security
- Law and justice
- Selected documents with references to them
- Search across all documents
Account management
§ 52. Paragraphs in direct speech. Reference book on the Russian language. Punctuation
§ 52. Paragraphs in direct speech
1. If at first there is a text from the author (introductory part, description, etc.), and then a sentence introducing direct speech, then it usually begins with a paragraph:
He grabbed the pole, ordered Dina to hold and useful Twice it broke off – the block interfered. Kostylin supported him, – he somehow got upstairs. Dina pulls his shirt with her little hands, with all her might, laughs herself.
Zhilin took the pole and said:
– Take it to the place, Dina, otherwise they will miss you, – they will beat you (L.T.).
But if the sentence introducing direct speech begins with the joining union and, but , etc., then it is not allocated in a separate paragraph:
They talked some more and began to argue something. And asked Pahom what they were arguing about. And the translator said:
– Some say that you need to ask the foreman about the land, but without him it is impossible. And others say, and without it you can (L.T.).
2. “The text of the author, not related to the speaking person, coming after the author’s words following direct speech, is allocated in a new paragraph :
— Well, I’m very glad,” said the wife, “so now you, look, take your medicine carefully.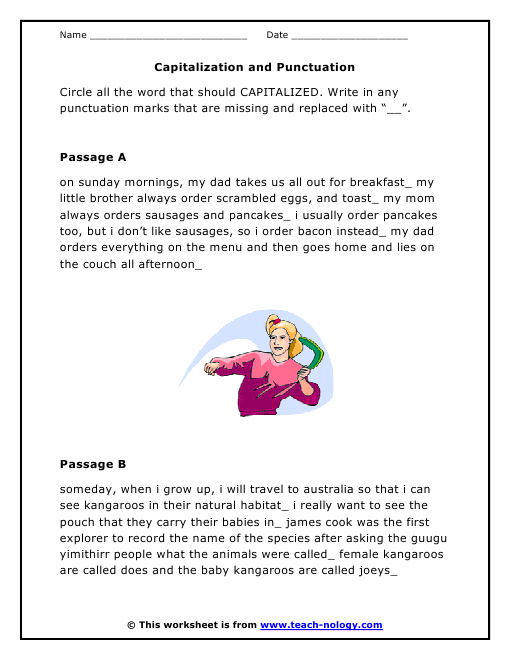 Give me the prescription, I’ll send Gerasim to the pharmacy. And she went to get dressed.
He didn’t take a breath while she was in the room and sighed heavily when she left (L.T.).
But if the text from the author is syntactically linked to a sentence that introduces direct speech (connective or joining union), then it is not highlighted in a new paragraph:
– When? many exclaimed. And meanwhile their eyes were fixed incredulously on the hunchback, who, after a moment’s silence, got up, saddled his horse, put on his horn, and rode out of the yard (L.).
3. The text of the author, not related to the speaker and immediately following direct speech, begins from paragraph :
– I am sure, – I continued, – that the princess is already in love with you. He blushed to the ears and pouted (L.).
4. If there is text from the author between two replicas of the same speaker, then neither this text nor the subsequent direct speech is usually separated into separate paragraphs:
– , replied the master.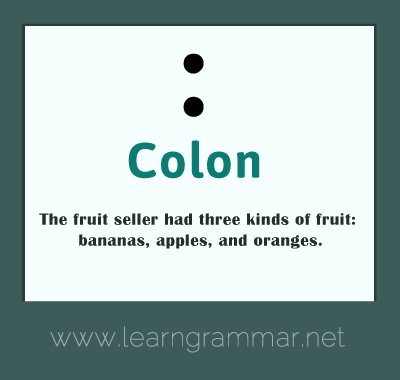 He thought for a while and added: — We’ll have to do everything again.
But if the text from the author describes the action of the speaker, then both the author’s text and the subsequent direct speech are separated into paragraphs:
— This formula can also have a different form,” the professor explained. He slowly walked up to the blackboard, took the chalk and wrote something new for us.
“This is the other option,” he said.
In poetic texts there are also cases when direct speech, interrupted by the author’s words (remark), is a continuation of the previous one or when his action is described between two replicas of the same person: in the first case dash is placed on the right, at the end of the line, in the second – on the left, at the beginning of the line (like a paragraph): You demand a lot, Emilia! — (Silence.) Who would have thought that such a fool, Such an insensitive. .. boring nature!
(Throws cards in his face. The prince is so amazed that he does not know what to do.) – Now we are even (L.).
In verses, after a direct speech ending before a space, a dash is not put.
5. If a dialogue that took place earlier is given in direct speech, it can be arranged either in the form of paragraphs or in selection, but the punctuation changes depending on whether the listener interrupts the narrator or not. If he interrupts, then the conversation that took place earlier is given with paragraphs and in quotation marks, so that the phrases of the narrator and the listener do not mix with the dialogue given by the narrator. For example:
… The traveler began his story:
– It was in the midst of our campaign. The conductor came up to me and said:
“We’ll have to stay for a while.” “Why? Something happened?”
— Did anything really happen? one of those who listened to the traveler could not stand it.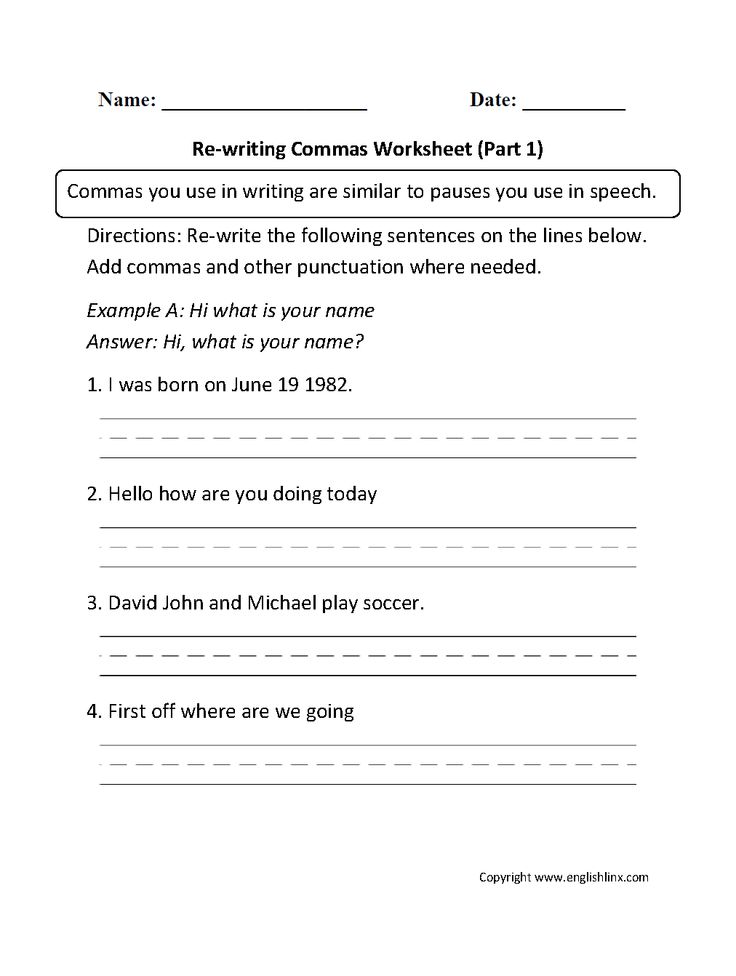
– I’ll tell you now.
Another option: the words of the earlier dialogue are given in the selection to the words and says, between the phrases enclosed in quotes, put dashes:
… The traveler began his story:
– It was in the midst of our campaign. The conductor came up to me and said: “We’ll have to linger for a while.” – “Why? Something happened?”
— Did anything really happen? one of those who listened to the traveler could not stand it.
– I’ll tell you now.
If the listener does not interrupt the narrator, then the dialogue given in the story can also be arranged in two ways: either through dash from paragraphs, or in the selection, and in this case the replicas are enclosed in quotation marks and separated by a dash . Compare:
a) .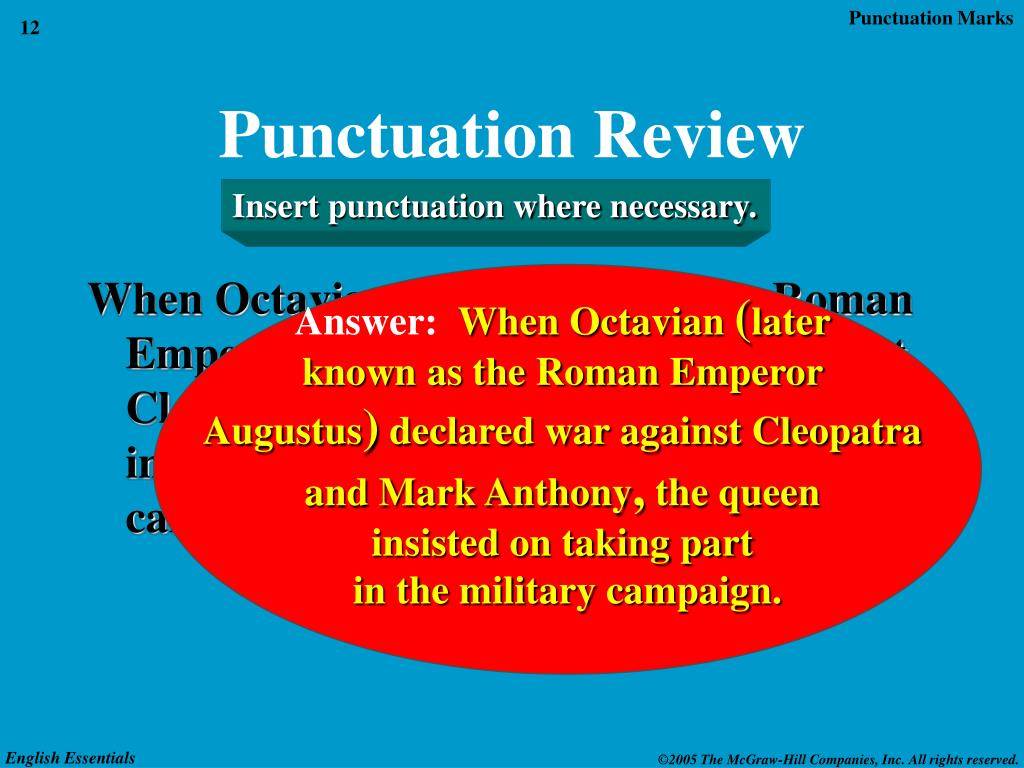 .. The traveler began his story:
– It was at the very height of our campaign. The guide came up to me and said:
– I’ll have to stay for a while.
– Why? Something happened?
— There was a collapse in the mountains.
– Any adverse effects?
– I’ll find out the details. But it is already known that there are victims. The audience listened attentively to the traveler’s story.
b) … The traveler began his story:
– This was in the midst of our trip. The conductor came up to me and said: “We’ll have to linger for a while.” – “Why? Something happened?” “There was a collapse in the mountains.” “Are there any unpleasant consequences?” “I’ll get the details. But it is already known that there are victims.”
The audience listened attentively to the traveler’s story.
If the dialogue given in the replica is accompanied by the author’s words, then it is given in selection and is marked with quotation marks:
Balzaminov.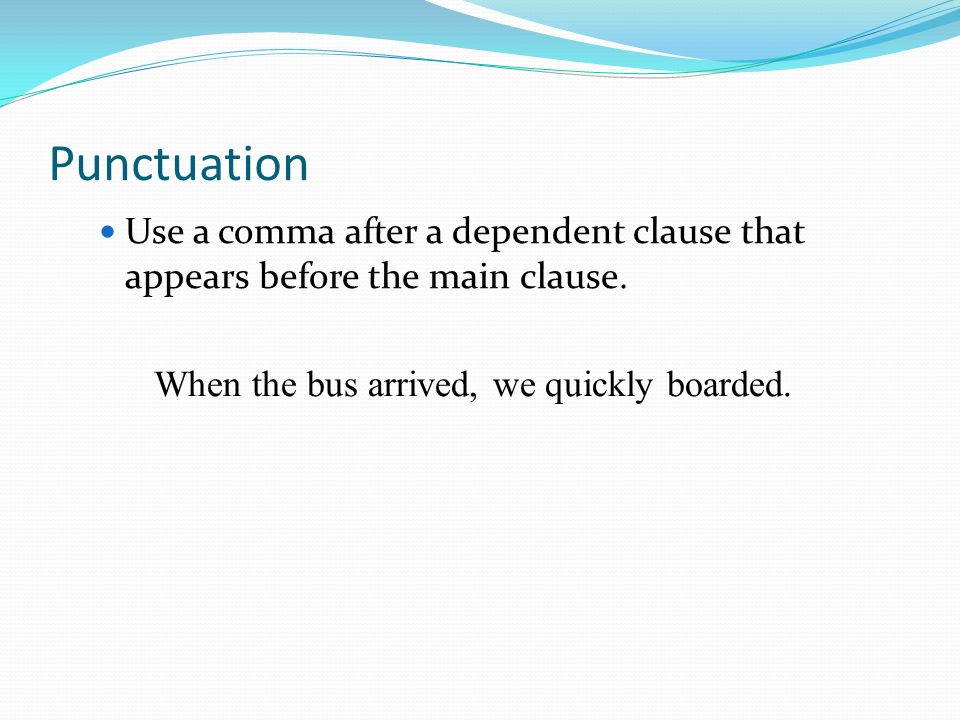 … They look and smile, and I imagine myself in love. Only once did we meet with Lukyan Lukyanych (I didn’t know him then), and he says: “Who are you following here?” I say “I’m with the older one.” And he said so at random… (Sharp)
6. If direct speech, conveying unspoken thoughts, is given after the author’s words, then it does not stand out from the paragraph:
Everything went smoothly. Suddenly, he caught himself and thought: “ Isn’t there some trick here? »
But if the author’s words are in the middle or at the end of such direct speech, then it is given from the paragraph; compare:
a) Everything went smoothly.
“Isn’t there,” he thought, “some trick?”
b) Everything went smoothly.
“Isn’t there some kind of trick here?” he thought.
7. If a long story with many paragraphs is transmitted, then a dash is placed only before the first paragraph (neither before the intermediate paragraphs, nor before the last dash is put):
– The work of our expedition went like this, – began his story geologist. – B a detailed plan was developed, routes were outlined. [Continues the story.]
These are the preliminary results of the expedition.
Straight grip
Direct grip
The straight grip is mainly intended for hard, penetrating punches. It is most preferred for serious work. The hand tightly wraps around the handle, while the blade points upwards, located between the thumb and forefinger. thumb is
No. 42: Paragraphs
No. 42: Paragraphs
Make paragraphs long or short depending on your goals.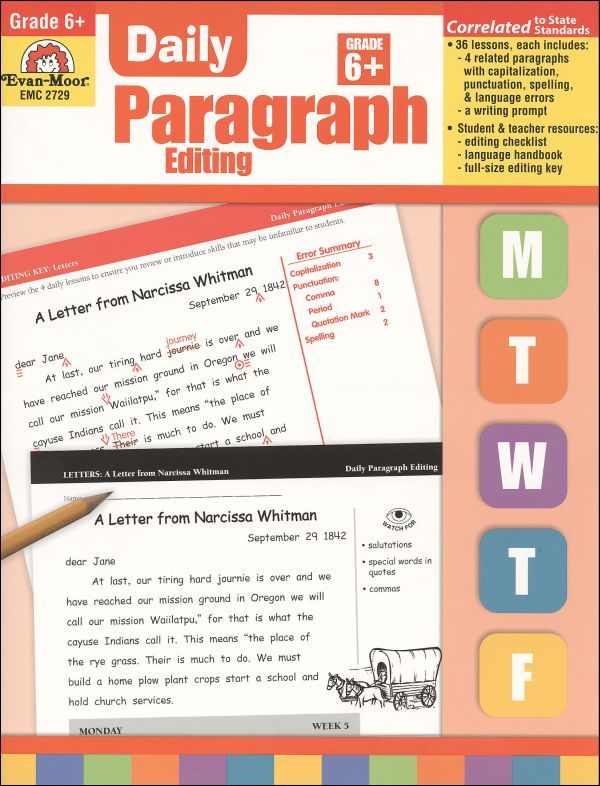 Vary the length. In one review, critic David Lipsky attacks the author for saying that in the 207-page book, “more than four hundred paragraphs in one sentence is a clear signal of the deplorable
STRAIGHT AVENUE
DIRECT AVENUE
The name of this avenue in the Nevsky district, running from Matyushenko Lane beyond Ivanovskaya Street to the continuation of Krasnye Zor Boulevard, has been known since 1896 years. Initially, it was longer and reached Chesnokov Lane (almost at
Punctuation marks for direct speech
Punctuation marks in direct speech
§ 133. Direct speech, that is, the speech of another person, included in the author’s text and reproduced verbatim, is drawn up in two ways.1. If direct speech is in a line (in selection), then it is enclosed in quotation marks: “I regret that I did not know your father, –
correlation of direct speech and author’s words
the ratio of direct speech and author’s words
direct speech before the words of the author § 134 direct speech after the words of the author § 134 the words of the author break direct speech § 135, paragraphs.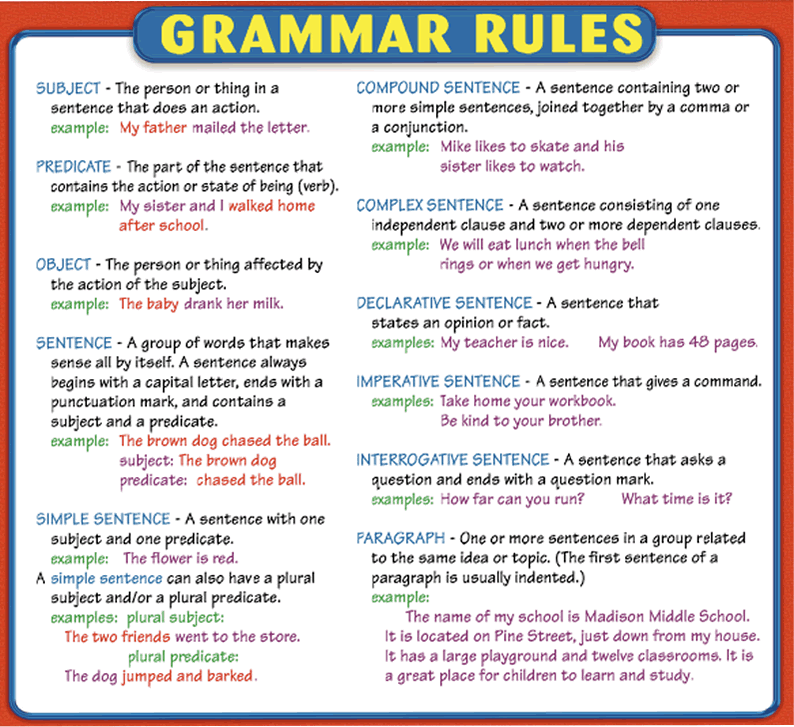 1, 2, 4, 5 the words of the author fall into two parts § 135, item 5 direct speech within the words of the author § 136 direct speech belonging to
XXXI. Punctuation marks in direct speech
XXXI. Punctuation marks in direct speech
§ 119. Direct speech after the author’s words
Direct speech is highlighted with quotation marks if it goes into a line (in a selection), for example: A stunning news burst into a small town like a whirlwind: “They threw off the Tsar!” (N. Ostrovsky). If direct speech begins with
§ 121. Author’s words inside direct speech
§ 121. Author’s words inside direct speech
If the author’s words are inside the direct speech, highlighted by quotation marks, then the latter are placed only at the beginning and at the end of the direct speech and are not placed between the direct speech and the author’s words.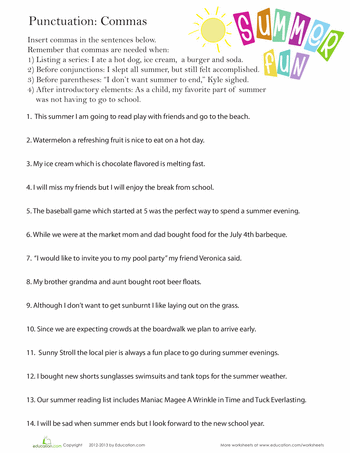 For example: “I came to command,” said
XXXI. DIRECT SPEECH PUNICATION
XXXI. PUNCTIVATION IN DIRECT SPEECH
§ 119. Direct speech after the author’s words1. Direct speech is highlighted in quotation marks if it goes into a line (in selection), for example: Remember the words of L. Tolstoy more often: “A person has only duties.” If direct speech begins with a paragraph, then
§ 121. Author’s words within direct speech
§ 121. Author’s words within direct speech
1. If the author’s words are inside direct speech, highlighted with quotation marks, then the latter are placed only at the beginning and at the end of direct speech and are not placed between direct speech and the author’s words, for example: “I can read,” the first again
SECTION 14 Direct Speech Punctuation
SECTION 14
Punctuation marks in direct speech
§ 47. Direct speech after the author’s words
1. Direct speech is highlighted in quotation marks if it goes in a line (in selection): Vladimir Sergeevich … looked at his man in bewilderment and said in a hasty whisper: “Go find out who it is”
§ 49. Author’s words within direct speech
§ 49. Author’s words inside direct speech
1. If the author’s words are inside direct speech (highlighted by quotation marks), then quotation marks are placed only at the beginning and at the end of direct speech and are not placed between direct speech and author’s words (such punctuation was found in works
11.5. Direct Marketing
11.5. Direct Marketing
The direct verbal appeal of the seller to the potential buyer preceded chronologically all other forms of commercial communication. In modern conditions, this type of formation of links with target audiences is defined as
7.
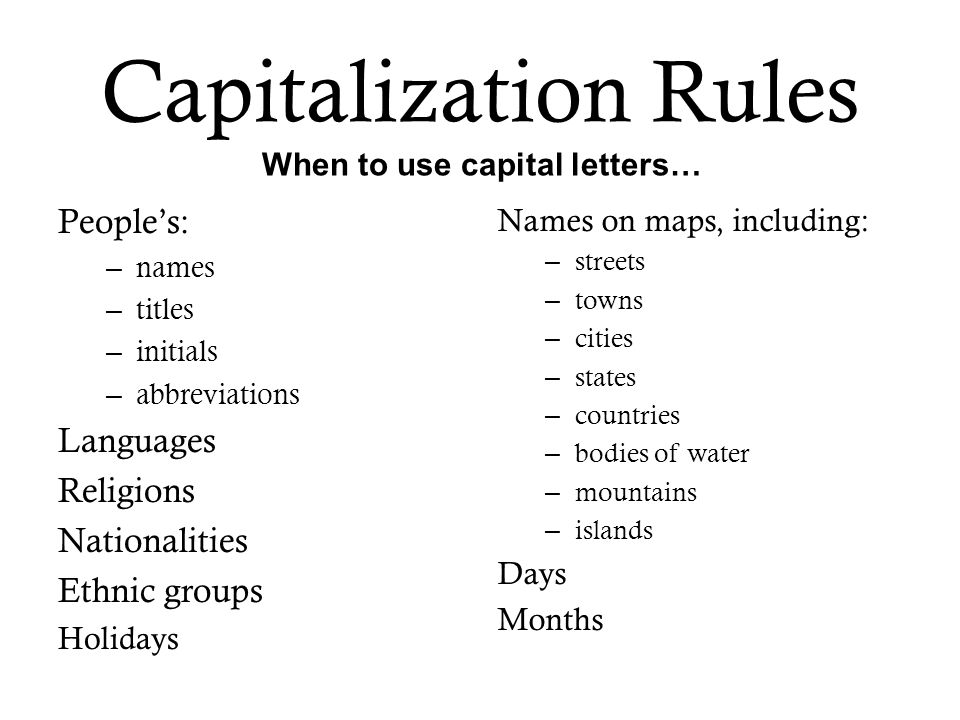 49. Punctuation marks for direct speech
7.49. Punctuation marks in direct speech
Direct speech can be framed in two ways – with the help of paragraph selection of each new replica and in selection, in a line. When paragraph selection of dialogue replicas, a dash is placed before the replica; after the words of the author preceding the dialogue
How direct speech is formed, punctuation marks in direct speech
We tell you how to correctly place punctuation marks in sentences with direct speech, and give examples for each case.
Any artistic text is inconceivable without direct speech. The characters communicate, ask rhetorical questions, exclaim something and strive to share their thoughts with the world. Even in a non-fiction work, we may need to correctly convey direct speech, for example, by retelling a conversation with speakers important for understanding the topic or by quoting an expert.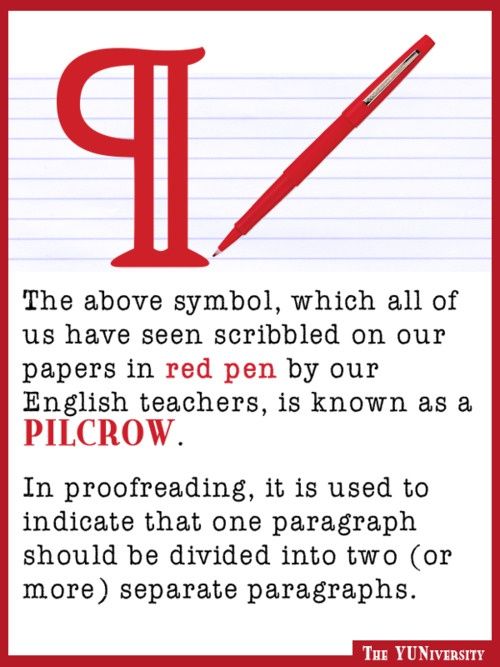 We have already described how to write dialogues, and in this article we will look at how to correctly arrange punctuation marks in sentences with direct speech .
Direct speech after the words of the author
The author’s text is separated by a colon. The period is always placed after the quotation marks, all other punctuation marks are before. Design schemes for are as follows:
A: “P”.
A: “P?”
A: “P!”
Consider some examples.
The doctor turned to me anxiously : “Jim, my boy, what happened ? »
I showed the honorable gentlemen the map and explained : “Doctor, squire, the Admiral Benbow was attacked by pirates, they were looking for this map.” .
Trelawney jumped up, nearly knocking over his chair, and exclaimed : “The scoundrels will still pay for their atrocities ! »
Direct speech before the words of the author
If direct speech begins a sentence, then it is separated from the author’s text by a dash.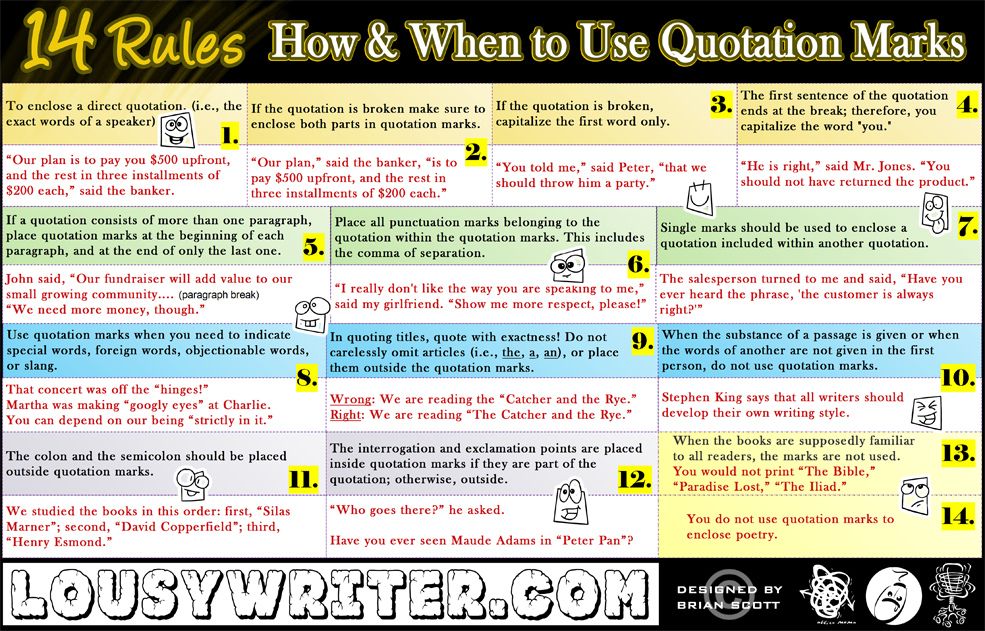 The words of the author are written with a lowercase letter. Direct speech is distinguished by quotation marks and provides for three punctuation marks at the end of the replica: a question mark, an exclamation point and a comma. The comma is placed after the closing quotes, all others are before.
Let’s consider the schemes for the design of direct speech:
“P” – a.
“P?” – a.
“P!” – a.
Consider variants of direct speech in the text .
“Jim, my boy, pass me the rifle” , – n interviewed by Dr. Livesey.
“Where is Jim ? » – with Trelawney grabbed.
Pirates, sir ! ” – at Joyce called out.
Direct speech inside the words of the author
After the first passage of the author’s text, a colon is placed, the second is separated by a comma or a dash.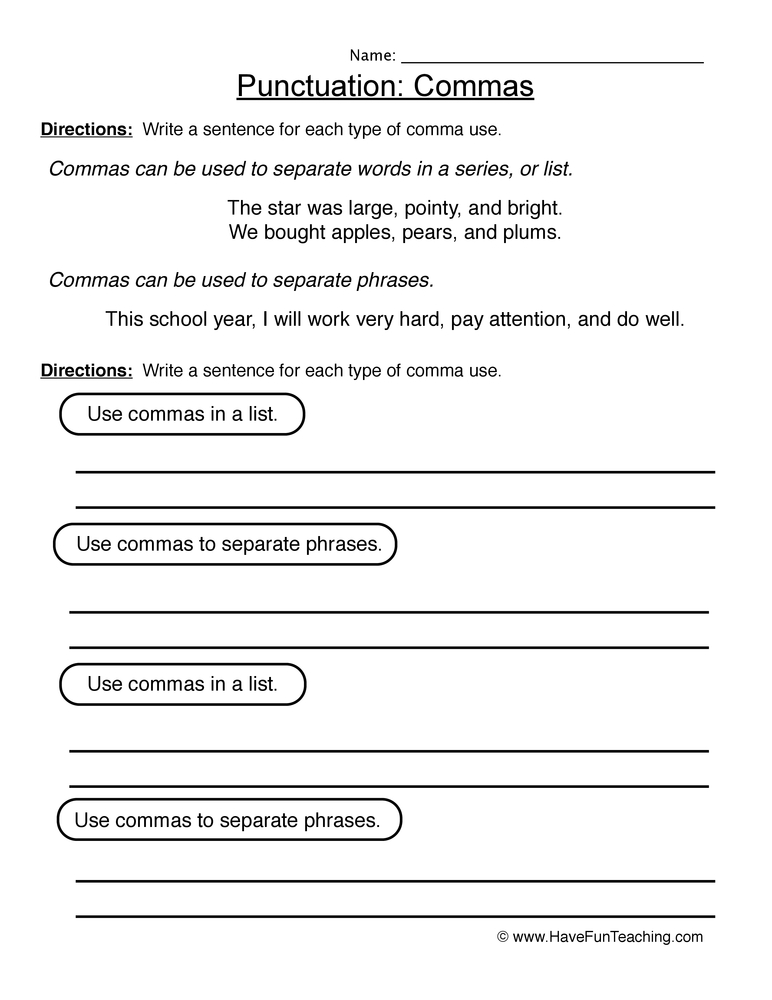 A dash is placed if the replica that has fallen into direct speech ends with an exclamation or a question.
A: “P”, a.
A: “P!” – a.
A: “P?” – a.
Let’s look at options for the design of direct speech in the text .
The doctor shrugged, said : “ O X Already this squire” , and 9231 hid in the doors.
Billy Bones looked thoughtfully after the blind man, then turned to me, shouted rudely : “Boy, bring me some rum ! “- and resolutely jumped out of the room.
The words of the author inside the direct speech
If the entire direct speech is one sentence, then a comma is placed at the end of the first part of the replica, and the second begins with a lowercase letter.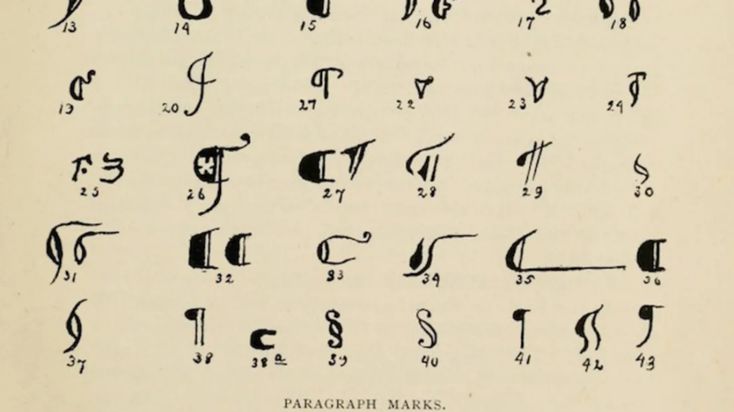
“You know, Jim,” Livesey said thoughtfully, “there’s a thought that’s bothering me.”
The author’s text may be inside the replica, in which case the author’s words are separated from direct speech by a dash. A replica can consist of either one sentence or several. In the first case, a comma is placed at the break point, and the second passage begins with a lowercase letter. In the second, a comma is still kept at the break point, but after the author’s text, a period should already be put, and the second passage starts with a capital.
“Gentlemen, great news,” said Dr. Livesey with a 32-tooth smile. “Pirates are heading here!”
“Wake up everyone! Trelawney shouted in a heart-rending voice. “Pirates are coming!”
“Where is Jim? Livesey asked in a sleepy voice. “He will miss all the fun like that.”
The second part may also consist of several sentences. Closing quotes must be at the end of the last one.
“I rented a schooner, found us a great cook and hired the rest of the crew,” Trelawny said with a pleased air. “Gentlemen, you just have no idea!” Everyone, literally everyone, having learned that we are going for treasures, tries to help us!”
Direct speech , separated by the words of the author, uses the following design schemes .
“P, – a, – p”.
“P! – a. – P”.
“P? – a. – P”.
Dialogue punctuation
The previous examples are needed when you need to convey a single statement from the characters. If you need to describe a conversation between two or more people, you should use dialogue.
In a dialogue, all replicas start with a new line, are preceded by a dash and do not require quotation marks.
“So, Jim,” said Dr. Livesey, leaning back in his chair, “to what do we owe such an unexpected visit?
– Gentlemen, – I said, gathering my strength, – I want to turn to you for help. The Admiral Benbow was attacked by pirates.
— Pirates! cried Trelawney, jumping up from his chair. – Here? In England?
“Yes,” I confirmed. “I guess they are interested in that. — I put on the table a card borrowed from Billy Bones’s chest. “I believe this map will show the way to the treasure hidden by Captain Flint himself.
If the replica is preceded by the author’s speech, it is separated by a colon, and the phrase itself is written on a new line.
Dr. Livesey leaned his fists on the table, looked around us intently, and said:
“Gentlemen, I think our course of action is obvious. We must get to the island ourselves and find these treasures so that they do not fall into the hands of pirates!
If the replica precedes the author’s speech, then it is separated by a dash and one of the three punctuation marks.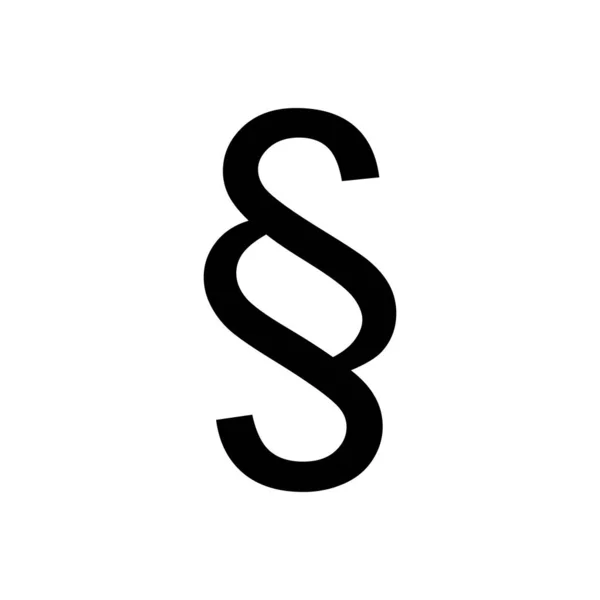
“I need to warn my mother,” I said uncertainly.
“I guess there won’t be any problems with that, I take you under my responsibility,” the doctor assured me and turned to Trelawney. “And what say you, squire?” he asked.
– To Bristol, friends! Trelawney exclaimed.
If the author’s speech breaks the replica, then it is separated by a comma and a dash.
– Some were afraid of Pugh, others of Billy Bones, and me, – Silver looked around with a ferocious look of those present, – Flint himself was afraid of me.
If the remark separates the words of the author, then it should start on a new line. The first passage of the author closes the colon, and the second remark is separated by a comma or two other punctuation marks.
The door opened and a tall, stately gentleman entered.
The man put the bag on the table and looked friendly at the pirate lying in bed.
– Hello, hello, I’m Dr. Livesey. The doctor looked Bones carefully and wrinkled his nose.
The author’s text is not required for dialogue.
– Athos!
– Porthos!
– And Aramis!
— Where is the Gascon?
– Here I am!
A paragraph at a direct speech
The new paragraph should begin:
Introduction to the text of the line that begin with the unions and or.
The author’s text not related to direct speech in meaning immediately after it, with the exception of sentences beginning with the conjunctions AND or BUT.
Authorial text denoting an action, caught between two replicas of the same speaker.
Direct speech expressing the author’s unexpressed thoughts, if the author’s words fall at the end or middle of the thought.
Direct speech and quotations
Depending on the volume of the fragment used, quotations are made according to the rules of direct or indirect speech. The first applies to complete independent sentences, in the second case, you should follow the rules of indirect speech and enclose the quoted text with quotation marks. The capital letter in the first word of the fragment is not needed, as well as the colon after the author’s text.
If you decide to omit part of the quote, then you need to put an ellipsis in place of the missing piece. If a gap falls at the beginning of a quotation, and the quoted fragment itself, in turn, begins a sentence, the first word is capitalized. Otherwise, it starts with a lowercase.
Verses and epigraphs do not need to be quoted.
Other rules for using direct speech
Direct speech is not quoted if:
It is not clear who pronounces it.
It was said about John Silver that Flint himself is afraid of him.
It cannot be distinguished from indirect.
And then Jim thought: why did he get into this barrel at all?
In the middle of direct speech, the word “says” is found, clarifying the identity of the speaker.
I will go out, says, and I will lay down all the pirates with one left.
We are writing a news item and inserting a link to its authorship in the middle of direct speech.
On Skull Island, our special correspondent reports from the schooner Hispaniola, skirmishes took place between representatives of the crown and malicious pirates.
The author does not quote the quoted fragment verbatim.
The dimensions of Flint’s treasures, Trelawney noted, are not known to anyone in particular.
Was this article helpful to you?
Documents –
Government of Russia
Site search options
Close
Next news
Previous news
Government of Russia
 Regulation
 Type of document
Decree of the Government of the Russian FederationOrder of the Government of the Russian FederationOrder of the President of the Russian FederationDecree of the President of the Russian FederationFederal LawFederal Constitutional LawCode
Number
Title or body of the document
Signing date
September 7, Wednesday
Decree of the Government of the Russian Federation of 07.
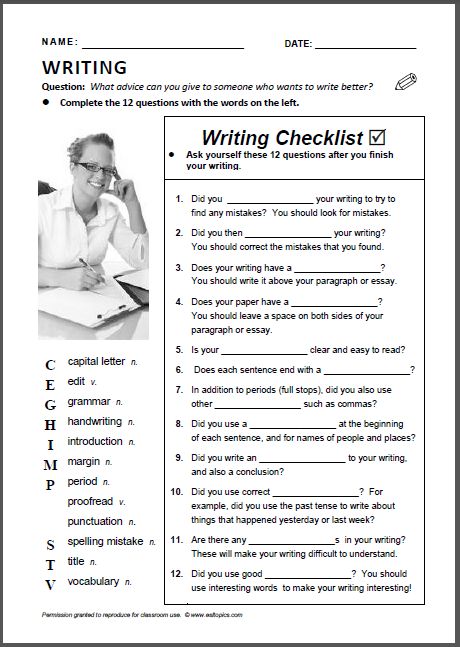 09.2022 No. 1571
On measures to implement the decision of the Commission of the Customs Union of November 27, 2009No. 130 “On the unified customs and tariff regulation of the Eurasian Economic Union” in relation to goods used for the development of digital technologies
September 6, Tuesday
Decree of the Government of the Russian Federation of 09/06/2022 No. 1566
On approval of the criteria to be met by a Russian legal entity that is a participant in the selection process for the sale of a share in the authorized capital of Sakhalin Energy Limited Liability Company
Decree of the Government of the Russian Federation No.
 1568 dated September 6, 2022
On Amendments to the Regulations on Licensing Activities for the Conduct of Industrial Safety Expertise
Decree of the Government of the Russian Federation of 06.09.2022 No. 1567
On amendments to the Regulations on conducting from June 1, 2021 to May 31, 2024 an experiment on labeling with federal special stamps of alcoholic products imported into the Russian Federation, placed under the customs procedure of a customs warehouse
September 5, Monday
Decree of the Government of the Russian Federation of 05.
 09.2022 No. 1558
On amendments to the Decree of the Government of the Russian Federation of April 7, 2022 No. 612
Decree of the Government of the Russian Federation of 05.09.2022 No. 1559
On amendments to the Rules for granting subsidies from the federal budget in the form of a property contribution of the Russian Federation to the State Development Corporation “VEB.RF” for the implementation of development projects for single-industry municipalities
Decree of the Government of the Russian Federation of 05.
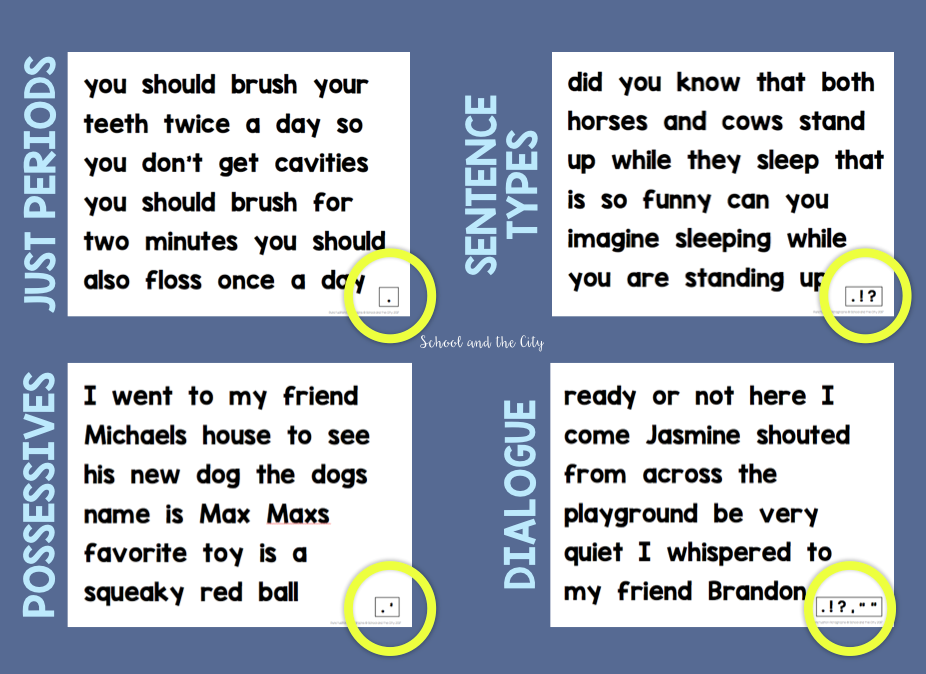 09.2022 No. 1564
On approval of the Rules for the provision in 2022 of another inter-budgetary transfer from the federal budget to the budget of St. Petersburg in order to reimburse the expenses of the budget of St. Petersburg incurred to organize events for holding additional matches of the UEFA European Football Championship 2020
Decree of the Government of the Russian Federation of 05.09.2022 No. 1562
On Amendments to the Regulations on Conducting State Ecological Expertise
Decree of the Government of the Russian Federation dated 05.
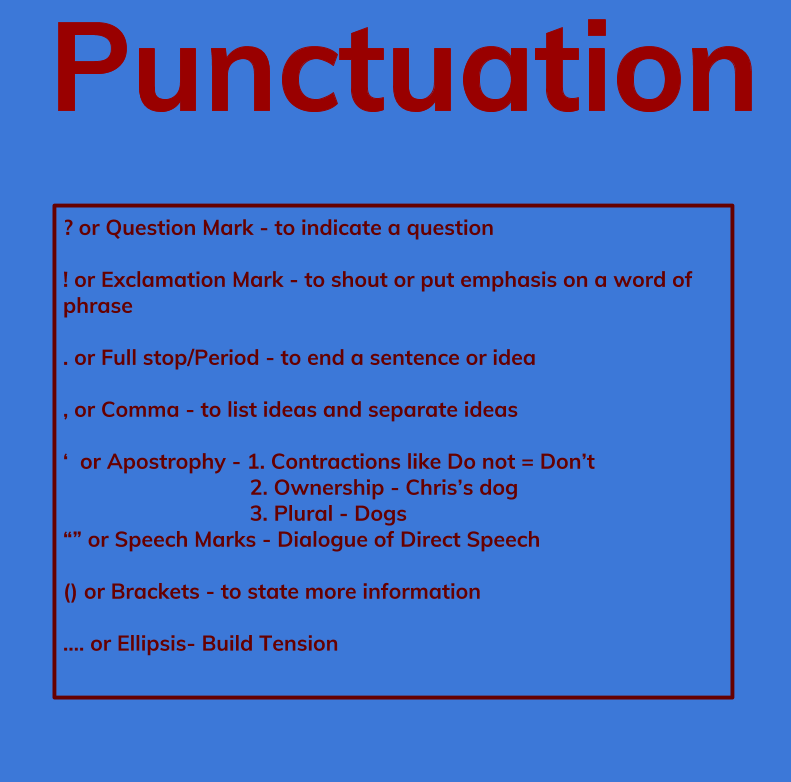 09.2022 No. 1563
On Amendments to Certain Acts of the Government of the Russian Federation
Decree of the Government of the Russian Federation of 05.09.2022 No. 1560
On the implementation of cash payments to students of educational institutions with the special name “cadet corps”, which are under the jurisdiction of the Investigative Committee of the Russian Federation
Saturday September 3
Decree of the Government of the Russian Federation of 03.
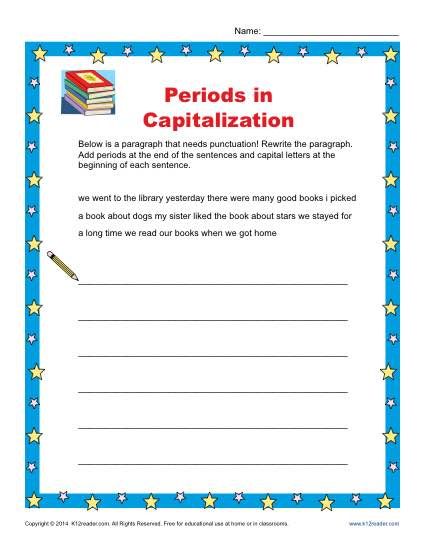 09.2022 No. 1556
On amendments to clause 6 of Decree of the Government of the Russian Federation of December 26, 2005 No. 812
Decree of the Government of the Russian Federation of 03.09.2022 No. 1557
On approval of the Rules for granting subsidies from the federal budget to the autonomous non-profit organization “Information and Analytical Center for Foreign Trade Activities”, Moscow, in order to financially support activities for information and consulting support for the implementation of uninterrupted foreign trade operations
Decree of the Government of the Russian Federation of 03.
 09.2022 No. 1555
On approval of the Rules for the development and placement in the federal state information system “Unified portal of state and municipal services (functions)” of interactive forms of messages, appeals, applications and documents, as well as applications for electronic appointments
September 2, Friday
Decree of the Government of the Russian Federation of 02.09.2022 No. 1554
On amendments to the Basic Provisions for the Formation and State Regulation of Gas Prices, Tariffs for Gas Transportation Services, Payments for Technological Connection of Gas-Using Equipment to Gas Distribution Networks in the Russian Federation and Payments for Technological Connection to Main Gas Pipelines of Gas Pipelines Under Construction and Reconstruction Designed for Transportation gas from main gas pipelines to capital construction facilities, and gas pipelines designed to transport gas from natural gas fields to the main gas pipeline
Decree of the Government of the Russian Federation of 02.
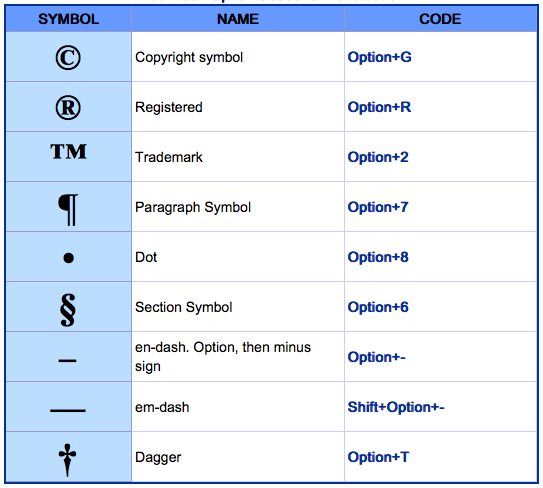 09.2022 No. 1551
On amendments to the Decree of the Government of the Russian Federation of March 10, 2022 No. 336
Decree of the Government of the Russian Federation of 02.09.2022 No. 1552
On establishing the case in which goods may arrive in the Russian Federation and depart from the Russian Federation in places that are not places of movement of goods in accordance with the Customs Code of the Eurasian Economic Union
Decree of the Government of the Russian Federation of 02.
 09.2022 No. 1545
On Amendments to Certain Acts of the Government of the Russian Federation
Decree of the Government of the Russian Federation of 02.09.2022 No. 1543
On Amendments to the Regulations on the Ministry of Construction and Housing and Communal Services of the Russian Federation
Decree of the Government of the Russian Federation of 02.09.2022 No. 1548
On approval of the Rules for the provision of other interbudgetary transfers from the federal budget, the source of financial support for which is the budgetary allocations of the reserve fund of the Government of the Russian Federation, to the budgets of the constituent entities of the Russian Federation in order to provide social benefits established by paragraph 1 of the Decree of the President of the Russian Federation dated August 27, 2022 No.