


Draw on wall paint: 6 Ways to Paint Designs on Walls
PAINTING A WALL MURAL – The Ink Bucket
It’s been almost a year since my first wall mural at Fabcafe but my fascination with hand-painted walls dates back to the summer of 2014 when a senior from work and a very good friend took me to a beautifully painted cafe in Delhi for lunch. I was amazed at the walls and even more amazed when I found out that the walls were hand-painted.
I could instantly relate to the illustrations and knew this is what I would love to do someday.
Over the years, I have realized that when it comes to a wall mural, there are so many possibilities, permutations, and combinations, that you don’t have to be a skilled artist to create a beautiful wall. I am no expert either and what I am about to share with you is merely out of my own personal experience and some practice. I still remember how intimidated I got looking at a big wall before I started painting my first mural ever but that ended the moment my brush touched the wall. It’s been an incredible journey since then and one of my favourite things to do now 😀
WHAT PAINTS AND BRUSHES TO USE AND WHERE TO FIND THEM :
Acrylic paints work great on almost all surfaces. They are bright, opaque and the good quality ones are even water and light resistant. Even if you are a beginner, choose your brands and colors wisely because that does make a lot of difference. You could start with Pebeo studio acrylics or Camel artists acrylics ( easily available ) they are quite pocket-friendly and have a nice smooth texture. Some other brands that I use and really like are Daler-Rowney, Winsor and Newton and Golden. These are available on Amazon and certain other offline stores that stock professional art supplies.
I started painting with my regular Faber Castell brushes and often now add different shapes and sizes as and when needed. For larger areas and base coats, use flat hard bristle brushes or thick round brushes and finer ones for top layers and details.
HERE ARE SOME BASICS TO REMEMBER WHILE PAINTING A WALL :
- Prepare the wall that you will be painting on – Before you begin transferring your paint to the wall, make sure the wall is clean of any impurities, dirt or dust.
 For instance, unwanted grains, oil or grease might hamper your artwork once you start painting, so get rid of those before you begin.
 - Create a theme for your artwork and indulge in a little space design – Look around and see what theme you’d want that space and your mural to reflect, bright, bold, minimal etc. This is also a good stage to come up with a color palette and how much of the wall would you want the mural to cover and the approximate proportion of the artwork you’ll have to work on, for e.g, square, 4:3, 6:9, landscaper, portrait etc.
- Start designing the artwork – One of the best ways is to keep a proportion in mind and start designing accordingly. For eg. if you wall is 10×10 feet, work on a 1ftx1ft area so that you know how much to blow it up while transferring it on the wall.
- Transfer the artwork on the wall using on of the following ways –
- Grid method – Create a grid using horizontal and vertical lines on your artwork and the same on the wall and transfer each box onto the respective box on the wall. For e.g. – Divide the 1ftx1ft artwork into 10 columns and 10 rows which gives you 100 unique boxes. Divide the 10ftx10ft wall also into 10 columns and 10 rows. copy the artwork on each box on the paper to the corresponding box on the wall. Once all the boxes are done, you’ll have the blown up version of your paper artwork on the wall. You can use as many rows, columns and boxes as you need. Sometimes, 4 is enough and sometimes, more than 10 might be needed for really big murals.
- Free hand drawing – This is my favourite way. You don’t need to be too precise sometimes especially with botanicals. Go ahead, and draw free hand the way you feel like, no one’s going to know.
- Projector transfer – Sometimes you need very precise artworks, e.g.. certain logos etc. In those cases, create or use a digital file and project it on the wall using any projector. This makes it super easy to trace the lines and shapes and once you have done that, color it in.
- Grid method – Create a grid using horizontal and vertical lines on your artwork and the same on the wall and transfer each box onto the respective box on the wall.
- Start painting using multiple techniques to make it simple for you and to add depth and interest to your artwork. You could even go crazy with the supplies you use. Try experimenting with different kinds of brushes, sponges etc to create textures and interesting strokes on the wall.
- Start with the lightest color to create a base coat and move on to darker colors. Acrylic colors are opaque and once a layer dries, you can easily coat it with another without disrupting the base layer. You can add as many layers, shades as you want.
 For instance, unwanted grains, oil or grease might hamper your artwork once you start painting, so get rid of those before you begin.
  For e.g. – Divide the 1ftx1ft artwork into 10 columns and 10 rows which gives you 100 unique boxes. Divide the 10ftx10ft wall also into 10 columns and 10 rows. copy the artwork on each box on the paper to the corresponding box on the wall. Once all the boxes are done, you’ll have the blown up version of your paper artwork on the wall. You can use as many rows, columns and boxes as you need. Sometimes, 4 is enough and sometimes, more than 10 might be needed for really big murals.
  You could even go crazy with the supplies you use. Try experimenting with different kinds of brushes, sponges etc to create textures and interesting strokes on the wall.
 These are just some guidelines and basics that I wanted to share with you all. However pls don’t feel the pressure to follow any of them if you don’t feel like. The first time I started painted a wall, it was a small wall in my room and I started without anyone teaching me how to paint on a wall. I treated it like another paper and started painting the way I would usually do. Slowly, I got a hang of what colors go together well and what tools work for me the most. The reason I am telling you this is that the above-mentioned points might give you a starting point or a direction but you are going to have most fun and create the best that you can if you forget the existing rules for a while and create your own new rules or mix it up with what I have shared with you.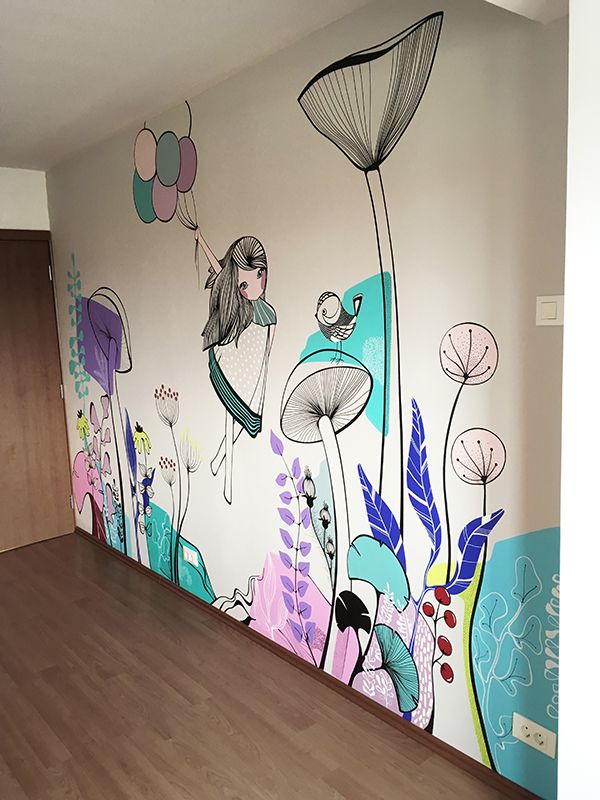
Most importantly, Don’t be scared of ruining a wall or two because there is nothing that can’t be fixed and because it’s so very important to make horrible mistakes before you create that one thing that you can be proud of.
Hope you create beautiful walls around you and I can’t wait to see. Don’t forget to take pictures and tag me on instagram if you share them, I would love to see what you come up with 🙂
Feel free to ask anything else that I might have missed out on in the comments below!
April 26, 2019
—
Vidhi Khandelwal
Comments
DIY Paint Pen Accent Wall (Cheapest Faux Wallpaper Ever)
By: Author Erin
Posted on – Last updated:
45
shares
-
Share
-
Tweet
To Tutorial
Are you looking for a very unique way to dress up a room? We searched high and low for the right modern wallpaper but found a much better solution. Save time and the hassle of hanging wallpaper by creating a hand-drawn black-and-white accent wall for under $10!
*Disclosure: I only recommend products I would use myself and all opinions expressed here are our own. This post may contain affiliate links that at no additional cost to you, I may earn a small commission. Read our full privacy policy.
Table of Contents
Choosing A Design
First, you have to decide if black and white is the style you are going for. If you want more color, then you can consider designing with painter’s tape or geometric shapes first and then adding hand-drawn elements to your painted wall patterns.
Modern Style
Before we decide to just draw on the wall, we were looking at different black and white hand-drawn wallpapers at places like Etsy and Pottery Barn.
Things To Consider When Planning Your Wall
- Do you want an abstract design, nature-inspired or a combination for your DIY accent wall design?
- Do you want a variety of lines where some are thicker and some are thinner?
- What else will go on the wall? Will the space be broken up with things hanging on the wall like a shelf or mirror?
- If designing a more traditional faux wallpaper, are you going to repeat the same pattern over and over? If do this you will probably want to consider making a template like we did when making this painted geometric wall idea.

Our Plan
We knew that we wanted a natural look to the lines and even a sketchy quality. This faux wallpaper would be more random instead of completely repeated.
By not worrying too much about the repetition you are able to just have fun drawing a bathroom wall mural.
Best Markers For Drawing On Walls
This is one of the most important parts of creating a hand-drawn wall. You can use a variety of different types of permanent markers, however, we recommend using these water-based paint markers.
Be careful, because these markers can also come in oil-based. If you ever want to change the room decor, it will be easier for you to paint over your wall mural if you draw with water-based markers instead of oil-based ones.
How To Use Paint Markers
Paint markers take a little bit of getting used to. We recommend practicing your drawing on paper before just jumping right into the white wall. This will help you get the feel and how much pressure to apply.
Get Your Marker Started
First, you have to follow the instructions to get your paint marker started.
- Open the package.
- Keep the paint pen upright and press the tip down into the canister.
- Recap and shake the marker.
- Press the tip of the paper to fully saturate the tip.
Recommended Supplies
- Water-based Paint Markers With Medium Tip: Buy at least the 3-pack so you can change out markers when the lines are not as bold as you would like.
- Pencil with a great eraser: As crazy as it sounds, we love Ticonderoga pencils, and having a box around is always a great idea.
- New Wall Paint Color: We used Samplize peel-and-stick paint samples to help us decide on which white paint was best for our small space.
Want Bolder Lines? This broader tip paint marker is also a great option and comes in a variety of colors.
No matter what design you choose, you can follow our basic steps. If free-hand drawing a mural isn’t really your thing, consider making a stencil out of cardboard that you could easily repeat.
Before You Begin
- You should have practiced drawing with paint pens and markers.
- You also need to start with a clean and dry painted surface. We painted our walls with SW Pure White before beginning this drawing process.
- Tape any areas where your lines may hit the other walls and counters. Small pieces of tape will work just fine.
You can see what this half-bathroom looked like before.
Do you need help deciding what color of paint to use?
We recently just tried Samplize and it totally beats having to buy individual paint samples. These 9″ x 14.75″ samples will get shipped directly to you and save the hassle of clean-up (we loved that).
Promos: Use code “FIRSTFIVE” to get $5 off your first purchase.
See our review to also get answers to frequently asked Samplize questions.
How To Draw With Markers On Your Wall
Step 1: Create A Sketch Of Your Design On Paper
Sketching your design on paper is very important. Your design will naturally change once you start, but it is good to help get your ideas on paper first.
Step 2: Sketch Very Lightly With Pencil On The Wall
As lightly as you can, draw on the wall. If you think you can just go for it with the marker, it will save some eraser time in the end.
Since we were free-hand drawing this mural, we found pencil sketching was the best way to go for our design.
Pro Tip: Step away from the wall periodically and look at the sketch from a distance. When looking up close for a while it is hard to see what it really will feel like in the space.
Step 3: Begin Tracing With Paint Pen
Use the paint marker to go over your designs. It is easiest to do the thin lines first and then go back to thicken the lines that did not turn out as well.
Pro Tip: When drawing on the wall, hold the paint marker at as much of a 90-degree angle as possible. This will help the paint flow out of the tip and give you the smoothest and bold line.
Step 4: Continue To Look At Your Mural From A Distance
Step back and look for areas that could use more details, thicker lines, or ones that should be left alone. Like most artmaking, it can be hard to decide when to stop. Just remember, sometimes less is more.
Here is the start of the lines that were continually made thicker.
Step 5: Let The Paint Marker Fully Dry
These markers dry surprisingly fast on drywall. Just give extra time before erasing as you do not want to smudge all your hard work.
Lines still have a sketchy quality but have been made bolder.
Step 6: Erase Visible Pencil Lines
On our Pure White wall, we were nervous about eraser marks and smudges. The pink eraser on a good-quality pencil worked the best for us with the texture of our wall. You can experiment with other erasers, but some seemed to smudge more than others.
Take your time when erasing on your paint pen wall.
Optional: Use A Foam Brush For Touch-Ups
If have any areas that you don’t like or that smudge, you can use a small foam brush with your wall color to try to clean those areas up. Just be careful you don’t overdo it and make an area worse.
Tips For Success
- Before beginning, test that you are able to erase pencil lines on your wall without smudging or looking horrible. You need to be to lightly draw and find the right eraser for your space.
- Paint markers or pens will give you a smoother and bolder line than regular permanent markers.
- Plan your faux wallpaper ahead of time. If repeating a pattern, make a stencil or tape out guidelines.
- You can use an overhead projector to project design on the wall. We were unable to do this due to this half bath being such a small space.

Before and After Small Bathroom Makeover
This “before and after” half-bathroom makeover was done with very limited demo.
We love this budget-friendly gold mirror we added to the accent wall.
Tutorial FAQs
Do the water-based paint markers smear?
When using the marker, you need to be careful not to rub your hand against the wet paint. Once the paint marker dries, it appears to be very permanent. The lines did not smudge when erasing the pencil and also when water was rubbed a little on the wall.
Can you use paint pens on walls?
Paint pens or markers are the perfect way to draw a fun mural or create faux wallpaper easily.
What is the difference between paint pens and paint markers?
Paint pens usually refer to a smaller tip on the end such as ultra-fine or fine and paint markers generally have a broader or chisel tip. You can use any-sized paint pen or marker for your mural. It just depends on what you are comfortable with and the details you are drawing.
Can you only use black markers for walls?
No, you are able to find water-based paint pens and markers in a variety of colors. If you don’t want white walls with black then you could always try to black or gray walls with white paint pens. for a fun and modern mural in your home.
How many markers did we use for our paint pen wall?
This accent wall has a lot of drawings and bold lines and we did not use 3 full markers. To keep the lines fresh and bold we switched between a 3-pack of water-based medium-tipped paint markers. We still have some paint left in all 3 markers.
Follow us on Pinterest, Youtube or Facebook for more DIY inspiration!
More Budget Bathroom DIY Projects
These cheap bathroom remodel projects helped us cheaply makeover this space. Seriously we could not believe that we were able to get this done for under $150!
Get These Tutorials!
- How To Repaint A Bathroom Cabinet: Get our tried and true method for repainting painted cabinets. We just love the modern feel of adding classic black to the vanity.
- How to Paint Laminate Countertops: This step-by-step tutorial will show you exactly how to paint your countertops without using an expensive kit.
- How To Spray Paint Bathroom Fixtures: No need to always replace your fixtures when a little spray paint can make them match your current decor. See what primer is the most important part of this DIY project.
- How To Remove Old Carpet & Glue: This is not the most glamorous DIY but is a necessity if you plan on removing carpet from concrete to add new budget-friendly flooring.
- Easy Peel and Stick Flooring Installation: Get all our tips for installing new flooring for under $40!
If you like this tutorial, make sure to give it 5-stars below 🤩🤩🤩🤩🤩. It truly helps us to continue to bring your more free, budget-friendly DIYs.
- ▢
1 Small Foam Brush optional
- ▢
Painter’s Tape only a few small pieces
- ▢ Water-based Paint Markers With Medium Tip this 3-pack comes in handy to switch out markers while working
- ▢ Pencil With A Good Eraser
Optional
- ▢ New Wall Paint Color sample of SW Pure White that we used to repaint our bathroom
Before You Begin
-
Plan out your wall mural design on paper.
-
If needed, paint your walls a new base color of your choosing.
Making Your Wall Design
-
Follow directions on paint pen to get paint flowing.
-
Tape any areas where your lines may hit the other walls and counters. Small pieces of tape will work just fine.
-
As lightly as you can, draw on the wall with a pencil.
-
Step away from the wall periodically and look at the sketch from a distance.
When looking up close for a while it is hard to see what it really will feel like in the space. -
Use the paint marker to go over your designs with thin lines to start.
-
Continue to work on your lines by making some thicker than others. Make sure to hold the marker as close to 90° for the smoothest application.
-
Let the paint pen fully dry.
-
Use a good eraser to get rid of extra pencil lines.
-
If needed, add a little wall color to a foam brush to clean any smudges or imperfections.
 When looking up close for a while it is hard to see what it really will feel like in the space.
- Test that you are able to erase pencil lines on your wall without smudging or looking horrible. You need to be to lightly draw and find the right eraser for your space.
- Paint markers or pens will give you a smoother and bolder line than regular permanent markers.
- Plan your faux wallpaper ahead of time. If repeating a pattern, make a stencil or tape out guidelines.
- You can use an overhead projector to project design on the wall. We were unable to do this due to this half bath being such a small space.

Don’t Forget this Tutorial? Pin This Today!Visit @thediynuts for more great DIYs!
Posted on – Last updated:
What paints can be painted on the wall. Wall paint options
Contents
- What paints can be used to paint on the wall. Wall paint options
- Acrylic compositions
- Fluorescent paints
- Oil and screen paints
- Wall painting with water-based paint. Wall decor paint options
- Acrylic
- Fluorescent
- Oil and screen
- How to draw on a whitewashed wall. What paints to paint on the walls
- Acrylic paints for painting on the wall. Features and characteristics of acrylic paint for painting on walls
- What paints to paint on the wall on the street. Types of suitable paints
- What kind of paint is used to paint graffiti. How to draw graffiti on the wall
- Video What paints are best for painting on the wall? Oil, acrylic or enamel.
 Types of suitable paints
 What paints can be used to paint on the wall. Wall paint options
In order to figure out what paints are painted on the walls, you need to know what composition the base is coated with. So, walls covered with acrylic paint can only be painted with a similar composition. If the surface of the wall is covered with an emulsion, then oil-based paints are suitable for painting. The design of the wall with water-based paint makes it necessary to carry out painting work also with an analogue of the original composition. For a detailed description, you need to learn about the features of all types of paint that are designed for painting on walls.
Acrylic compounds
Acrylic based paints are the leading paints for wall painting. Such popularity is due to the ease of application and quick drying, a high degree of adhesion with various kinds of materials, the absence of a pungent odor during operation and resistance to high temperatures on the finished drawing.
After the acrylic paint dries, a film is formed on the surface of the wall, which is resistant to mechanical stress. The environmental safety of the paintwork material becomes especially relevant if the drawing is done on the wall in the children’s room.
There are currently 2 types of acrylic paints available. These are synthetic and organic dyes. The basis of any of these types of material is artificial resin. The only difference is the pigments used. For synthetic paints, pigments obtained from salts of various metals are used. Wall painting with acrylic paints of this type is brighter and more lively.
If the idea of the drawing is not an abundance of colors, but a pastel image of something, then it is better to use organic-based paints.
The wall application tool is selected according to the area to be painted. It can be a brush, roller or spray gun. The use of acrylic paints for wall painting is not limited only to rooms, now there is a noticeable trend in such design of building facades.
As a rule, acrylic paints are available only in white. To obtain a particular shade, tinting is performed. For painting surfaces with your own hands, this is very convenient, since on the spot you can choose the color that will be relevant for a particular image.
Fluorescent paints
These paints are designed to create original paintings that can decorate any interior. The image applied with this type of paint appears at night when ultraviolet radiation is directed at it. Complex images are almost never created in this way, focusing on simple forms, for example, butterflies, star placers or images of space are especially popular.
The easiest way to make a drawing is to use special stencils, according to which the image is as clear as possible. Professional designers often combine these paints with other materials to add glow to the main design.
Oil and screen paints
More rarely, but still, oil paints are used for painting on walls. Usually, only professional designers or artists undertake drawing with such material. The result is paintings that can be called highly artistic. They are able to cause genuine delight of the guests of the house, where there is such a design.
But the use of this type of coloring agents is limited by some factors:
- The complexity of the application, which is carried out only by qualified craftsmen with relevant experience.
- Sufficiently high cost of starting material.
- Long process of drying the finished image.
- The presence of an unpleasant odor that accompanies the entire process of application and drying.
Another kind of interesting interior design is the use of screen paints. Even with a small amount of substance, you can create an original picture.
Wall painting with water-based paint. Options for choosing paints for wall decoration
The answer to the question of what paints are used to paint on walls directly depends on the quality of the surface coating. Preliminary design with an acrylic base involves choosing a similar material for applying a decorative image. If the wall is covered with a conventional emulsion, the picture should also be painted with oil-based paint. The use of water-based paint in the initial interior design obliges to stop at a similar material for the final decor. Consider the characteristic features of each type of paint for painting on the walls.
Acrylic
The leader among paints and varnishes intended for wall painting are acrylic paints. The popularity of products is due to multiple advantages:
- ease of application;
- fast drying;
- no offensive odour;
- high adhesion to any surface;
- resistance to high temperatures.
After drying, a film is formed on the surface of the wall, resistant to mechanical stress, which does not change color under the influence of the sun’s rays. The environmental safety of the product is especially relevant if you plan to draw in the children’s room. In some situations, acrylic paints are used to create a relief surface. Knowledge of the special application technique with a palette knife knife allows you to create an interesting texture of the walls.
There are two types of acrylic paints – synthetic and organic. Artificial resin is the basis of the paintwork material, the difference lies in the origin of the coloring pigment, they are artificial and natural. If you paint on the walls with synthetic products, where salts of various metals are used as dyes, the picture is bright and juicy, as in the following photo:
If you want to get an image of soft pastel shades in the process of painting, it is better to turn to products on an organic basis. The result of such art is shown in the photo below:
Depending on the area to be treated, paint on the walls with acrylic paints using a brush, roller or spray gun. The range of its use is very wide. Due to the water resistance of the paintwork, in addition to finishing interior surfaces, it has recently become fashionable to paint on the facades of houses.
In most cases, acrylic paint is presented exclusively in white. To paint on the walls, they turn to tinting, which results in the desired shade. For painting surfaces, this is a very convenient option.
Fluorescent
A very original interior can be obtained by painting with fluorescent paints. Such an image appears at night when ultraviolet light is directed at it. Complex pictures are not created by this method, usually they stop at simple shapes. Butterflies and scatterings of flowers are especially popular, often they draw original patterns.
Stencils purchased or made by yourself will help speed up the process of interior design. Professional designers use the option of combined painting, when the main pattern is complemented by fluorescent paints. It looks very attractive.
Oils and screens
Oil paints are sometimes used as wall paints. Usually professionals in their field undertake to paint with oil products. The result is images that, without exaggeration, are highly artistic works of art and arouse the admiration of those present.
The limited use is due to the following factors:
- the complexity of application, requiring professional skills;
- high cost of material;
- long drying process;
- Due to the presence of a solvent in the composition, the entire drying period is accompanied by an unpleasant odor.
Notice! Oil paints allow you to get a lively and detailed image on the walls, which cannot be achieved using acrylic paint products.
Another option to decorate an interesting interior is to paint the walls with screen paints. Economic consumption allows you to create a pattern even with a small volume of product packaging.
How to draw on a whitewashed wall. What paints to paint on the walls
In one of our articles, we told you what beautiful drawings in the porches draw craftsmen from different cities and countries. Bright juicy pictures adorn the walls of entrances and front doors, and delight the eyes of residents, bringing comfort and neatness to the house. But we did not delve into what paints to paint on the walls better. Because our task was to arouse readers’ interest and desire to take up this interesting and beautiful activity themselves. And today we want to help you figure it out and suggest what paints it will be more convenient to paint on the walls and the drawings will retain their color and durability.
Let’s take this as an example of an entrance. For example, our walls are whitewashed with whitewash and washing it off is troublesome and not always desirable. When preparing a wall for a drawing, we must ensure that it is comfortable to draw, and the paint does not crumble or rub off later. After all, this is an entrance, and someone will still rub his hand or smear the wall with wheels from a baby stroller that is brought into the house. In order to achieve the desired effect, we use a white or transparent acrylic primer. We will not specify the brand of primer, because different brands are sold in different regions. The main thing is that it should not be yellow, otherwise yellow emerging spots will ruin all your work. You can buy such a primer at any building material store. Its consumption usually ranges from 8 to 10 square meters per liter. We apply it not with a roller, because the whitewash will begin to curl under it, but rather with a construction brush. This is a convenient wide brush that allows you to cover a large part of the area at a time.
After the primer dries, it usually takes 1-2 hours, we begin to draw the drawing itself with a simple pencil, wiping the bad places with an eraser. When the sketch is ready and you like everything drawn, we start coloring.
We need acrylic water-based pigments, white water-based paint (preferably washable) and a liter of clear water-based paint. Usually it is designated “Base D” and from it in hardware stores, at tinting studios on special tinting machines, dark, bright or saturated colors are made. It is difficult to find it on the shelves of the store, but you will have to ask to sell it. Because we will also make bright colors from it, which we will never achieve from a white emulsion.
If the sketch of the drawing is outlined with a black outline, then we take a jar (not large), pour 50-100 grams of a colorless water-based emulsion into it and add a black colorant. If it is concentrated, then you will need a couple of drops. That’s it, we have a bright black color ready. Outline the contours of our sketch. This paint dries very quickly, and after 1 hour you can touch it with your hands. Sometimes even earlier.
For coloring in other colors, we again use colorants and a water-based emulsion. For saturated colors we tint a slightly colorless paint base, and for desaturated colors we use white. Similarly, pouring a little white paint into a jar, add a colorant of the desired color and dilute the desired shade.
After the paints have dried, it takes 2 hours according to the technology, you can touch the drawing with your hands. After 21 days, the walls can be washed with a soft washcloth using non-abrasive liquid detergents.
You can use both exterior and interior paint, as long as it is resistant to washing and wet abrasion.
Using our wall paint tips will save you money on paint and your drawings won’t fade as if you were painting with watercolors. And it comes out much cheaper than gouache. They will not peel off like enamel paints, they are odorless and your liver will be healthy and unharmed when working with them. No toxicity. Everything is ecological and clean. And if you get dirty, then you wash it off with plain water and that’s it. Clothes can be washed in the machine if they do not lie for a long time. Brushes should also be washed with plain water.
Let our advice come in handy and you can be happy to paint your walls in the entrance, in the front door or in your apartment, in beautiful juicy bright drawings.
Acrylic paints for wall painting. Features and characteristics of acrylic wall paint
Acrylic mixtures used for art painting are an aqueous dispersion of acrylic resins. A number of functional components provide additional paint properties – stability, resistance to low temperatures, aesthetics and strength after drying.
Water-based formulations have become very popular due to their low toxicity, resistance to moisture and mechanical stress. Unlike many painted coatings, acrylic paints do not bleed when wet cleaning, allowing you to maintain cleanliness throughout the room.
The drying time of the acrylate composition is from one to several hours, thus significantly speeding up the finishing work. Painting steps include:
- surface preparation – includes complete cleaning of the previous layer of paint or wallpaper,
- grouting irregularities and wall defects with putty, brought to the required smoothness with sandpaper,
- applying an acrylic primer, which is the basis for the future coating. Considering that the painting rarely completely covers the walls, the primer should visually correspond to the interior of the room and the theme of the drawing,
- surface painting, carried out with brushes or other improvised means – fabric, polyethylene, fingers, etc. There are separate thematic areas devoted to painting without using a brush or spray gun,
- painting on top with clear acrylic lacquer for extra protection.
 There are separate thematic areas devoted to painting without using a brush or spray gun,
 What colors to paint on the wall outside. Types of suitable paints
What paints are used to paint on the walls? Most often they do wall painting with acrylic. The composition of most mixtures includes components:
- coloring pigments;
- water;
- acrylic resin binds components;
- modifying modifiers and stabilizers.
It is always possible to select a paint with the required properties. Today’s range includes the following mixtures:
- Acrylic based plain paints.
- Fluorescent mixtures glow under directed ultraviolet light. Paint and varnish material does not create a masterpiece, often the contours are simple, the figures are not ornate. A popular ornament is butterflies, flower bouquets, peculiar patterns.
- Invisible solutions are not visible during the day, they become visible only under ultraviolet light. The application of such a coating is intended to create an effect of surprise.
- Pearlescent paints are distinguished by their brilliance and tints.
- Brilliant paints and their prototype – metallic mixtures.
- Luminescent drawings emit light at night, due to the energy accumulated during the day.
- For rooms with high humidity (eg swimming pools), paints with water-repellent properties are suitable.
 The application of such a coating is intended to create an effect of surprise.
 Oil paints are also used for wall painting, which can be purchased at specialized stores like “everything for artists”. Such a product is often used only by a professional, it will be extremely difficult for novice artists to draw with such paints. The result is picturesque landscapes and unusually finely drawn images of life, everyday life, and nature. The material is rarely used due to the following reasons:
- Increased difficulty of application, the technique requires professional skills.
- Expensive component cost.
- Long drying time.
- The solvent in the formulation produces a repulsive odor during drying.

Oil paints give you a level of detail that can never be achieved with other paint products.
What paint is used to paint graffiti. How to draw graffiti on the wall
Everyone can draw graffiti. You don’t have to be a professional artist to do this. A beginner rider needs to practice sketching on paper first. Then they need to equip themselves, choose paint and start looking for a suitable wall for your graffiti. You will learn a more detailed description of the rules and techniques for creating graffiti below.
You will need
- Spray cans, pencils, markers, respirator, gloves
Manual
1
You are about to draw graffiti. First you need to make a sketch, which is called a sketch. Drawing a beautiful and neat sketch is not an easy task. Although at first glance it may seem that this is not the case. If you are just getting started with graffiti, you need to practice sketching. Take a piece of paper, pencils, helium pens, felt-tip pens are also suitable and exercise, fill your hand.
Preference should be given to thick paper. Whatman is quite suitable for these purposes. Take your time. Take a pencil and start applying light strokes. Then you can correct the shortcomings. Then circle everything you drew with a felt-tip pen. Erase unnecessary pencil strokes with an eraser. Paint over the background and fill everything with color.
If you like your result and you are sure that you do not want to change anything else in it, then you can transfer the sketch to the wall.
Now prepare your equipment. You need to decide on the choice of paint. You should also wear gloves and a respirator. Vapors of paint are poisonous, they can be poisoned. Your clothes should also be able to be stained with paint.
2
Now you need to choose a suitable wall. The most suitable option for you would be porous concrete or any primed surface. You can also draw on a metal surface, but it will first have to be degreased.
Try to draw in areas designated for graffiti. Don’t paint on top of other people’s work. Or choose an inconspicuous wall.
If you have a wall in front of you, fully painted, but it seems quite suitable for your first creation. Try to see if your balloon covers the painting, and if it is clearly visible. Not all colors, especially light ones, can overlap other inscriptions the first time. It is extremely difficult to overlap black paints.
When you’re at the wall, try sketching with a balloon in the air. When drawing graffiti, first of all, you need to take care of the background. The sketch is displayed first. This is done with the main background color. Even if you make a mistake, you can fix it. Do not stop the drips with a rag, otherwise you will get stains. Better wait until the paint dries. Color them in with the background color later.
Do not rush to aim the jet at a specific area of graffiti. First, check if the cap is installed correctly. Test it by splashing it on the ground.
In rain and cold weather, the paint may not adhere well and take a long time to dry. It is best to choose warm weather. Wind can also be a hindrance to drawing.
Useful advice
Stock up on caps, even professional riders fill them up quickly, take spare ones with you.
Before changing the cap, turn the can upside down and press. Let the paint come out.
Video What paints are best for painting on the wall? Oil, acrylic or enamel.
Which paints are better to use for wall painting
I am often asked various questions about wall painting. There are a lot of questions and they are often repeated, so I decided to answer everyone at once, writing in my blog about each aspect of the painting separately. Today I’ll answer about paints 🙂
So, let’s start with the most common question: “Aaron, what paints should be used to paint the walls so that they stick and don’t wash off?”
I will try to answer as much as possible capturing all the nuances..jpg) To begin with, it is worth figuring out what characteristics the paint for painting walls should have, and these are:
To begin with, it is worth figuring out what characteristics the paint for painting walls should have, and these are:
- GRIP WITH THE SURFACE (wall), so that when it dries, it does not fall off and is not smeared, not remaining on the fingers. It also depends on the preparation of the wall, but I will talk about this later.
- SHIPPING – how many layers of paint will cover the area without gaps.
- COLOR SATURATION – the paint must provide the ability to mix colors, both muted and bright and saturated.
- DISPERSION – this is how coarse or fine the paint is to pass through the airbrush nozzle, but this is only relevant for airbrushing, for a brush this factor is practically not important.
These are perhaps the most important characteristics in choosing paint for painting. Depending on the specifics of the room or the facade of the building, there may still be different requirements for paint, but let’s not go too deep!
Acrylic paint meets these four characteristics!
Personally, I use high-quality building acrylic (water-based paint) from Dulux or Tikkurila for wall painting, in combination with Exmix art paints for airbrushing.
Now I’ll tell you about each separately.
And so, construction acrylic! Why not artistic, you ask?
The answer is: construction acrylic of a good company is much cheaper than art acrylic. It’s one thing if you are given the task of painting 2 square meters. meters of the wall, no question, thin. Acrylic might work. But when it comes to 10 sq. meters or more, and most often they order large volumes, then artistic acrylic will hit your pocket great! Then, building acrylic is much easier to buy, construction supermarkets and shops, you see, more than art shops. Even in such a large and developed city as Moscow, you can often spend a whole day getting to only one place 😉 One day I still tried thin. acrylic firm POLYCOLOR “Maimeri”. They have a large color palette, but the paint is weakly opaque, I spent a lot of time overlapping one area, it was great “pissing me off” 🙂
Another BIG PLUS of building paint is its durability! And if it is covered with a protective varnish, then the painting can even be washed! Paints from Dulux or Tikkurila provide excellent white bases to which you add “to taste” colors that you also buy in hardware stores.
Speaking of colors, most of them are bad, and they won’t make bright saturated colors, but of all that I personally used, TEX colors “Koler Pasta” and “Unicoler” do a good job. I don’t cooperate with the above companies in any way, I don’t advertise them, I just give good advice, because I tried a lot of colors and settled on these 🙂
The main thing in choosing building paint is not to buy latex by chance, it DOES NOT SUIT for us for painting! I also strongly recommend not to paint walls painted with latex paint!
Now about the SECOND component – Exmix airbrush paint. This paint is already from the category of professional paints for airbrushing. It is suitable for painting various surfaces, including walls, plastic and even metal. The latter require their own technology for preparing for painting and fixing.
But we’ll focus on the walls 🙂
The paint has a palette of stunningly vibrant colors! It’s great for small nozzle airbrushes, it’s WATER based and mixes great with builder’s acrylic!
It has a rather biting price tag, but it is very economical and its performance is simply impressive! So I highly recommend!
It is also possible to use enamel paint from cylinders (for example, for graffiti).