5Th grade graph worksheets: Grade 5 Data and Graphing Worksheets
Coordinate Graphing Worksheets for Grade 5
Interpreting graphs worksheets for grade 5
5th grade data analysis activities – coordinating graphing worksheets for grade 5 are given to train kids on how to better organise and analyse data in line graphs, bar graphs, pictographs, histograms, line plots, frequency charts, stem-and-leaf plots and circle graphs. Given that titles of graphs instantly tell what information is being displayed, our interpreting graphs worksheets for grade 5 have been clearly labelled, with titles and key words for easy interpretation.
5
th GRADE MATH PRINTABLES
-
Best of FREE 5
th Grade Math Worksheets Categories
-
- Number sense
- Addition and subtraction
- Multiplication
- Division
- Exponents
- Number theory
- Decimals
- Add & subtract decimals
- Multiply decimals
- Divide decimals
- Fractions & mixed numbers
-
- Add & subtract fractions
- Multiply fractions
- Divide fractions
- Mixed operations
- Problems solving
- Ratios and rates
- Percentages
- Money Math
- Number sequences
- Coordinate graph
-
- Variable expressions
- Data and Graphs
- Probability and statistics
- Telling time
- Unit of measurements
- 2D figures
- Triangles & quadrilaterals
- Symmetry & transformations
- 3D figures
- Geometric measurements
-
-
5
th Grade Integral Math Workbook
Important facts about coordinate graphing and data analysis for grade 5
As we can recall, graphs are a common method to visually illustrate relationships in data that is too complicated to be adequately described in a text.
Given its great importance, our visual, clear, colourful and readable graphs designs will enable young math learners to enjoy creating and interpreting different types of graphs. Also, they’ll feel excited to interpret data and as well draw conclusions about mathematical relationships, such as equality, inequality, more than, less than and grouping.
How can 5th grade data analysis activities help your kids acquire basic graphing skills?
Gladly access our 5th grade data analysis to help your kids acquire basic graphing skills. Activities here are have been chronologically designed, moving from fun ways to create and interpret each and every type of graph.
Moreover, our activities are full of authentic real life stories created to entice kid’s interest and the need to eagerly interpret and draw conclusions from data.
Furthermore, it is important for kids to know the best type of graph to use given a particular situation. To this effect, our exercise: choose the best type of graph is aimed at offering kids effective skills needed to master each graph’s functions, or what each graph represents.
Graph Worksheets – Free Graphing Worksheets – JumpStart
Help your kids master their graph lessons with Math Blaster’s free and printable graph worksheets for kids of all ages!
Weekly Weather Track
Here’s a fun hands-on activity cum worksheet that introduces kids to the concept of graphing. See more
My Favorite Candy
Here’s a fun worksheet that uses candy to teach math-phobic youngsters about graphing. See more
Groundhog Day Graph
Here’s a simple but fun worksheet to help young children grasp the concept of graphing. See more
Color Graph
It is important to use different kinds of graphs to add variety to your lesson. Use this free graph worksheet to help your child learn better. See more
Add up the Hearts
Graphing is a great tool to teach kids basic math concepts and vocabulary. Use this printable graphing worksheet by MathBlaster. See more
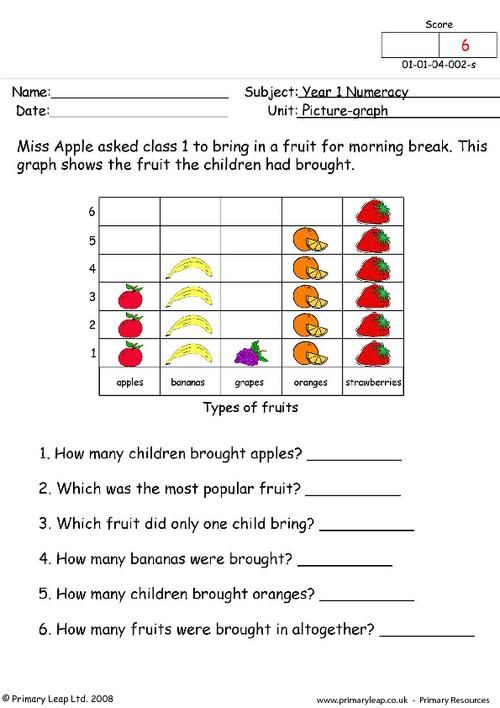
Fruit Count
In ‘Fruit Count’, kindergarteners fill in the graph by coloring one box for each fruit. This simple and fun graph worksheet is a great way for introducing graphs to kindergarteners. See more
Oh Brother!
‘Oh Brother!’ is a free graph worksheet for first graders, great for practicing how to interpret graphs. Use the graph to find out how many siblings the first graders of Oakwood Elementary have. See more
Master Blaster
Use the graph provided to see who earned the title of ‘Master Blaster’ in the fun math game ‘B-Force Blaster’. Then answer the questions that follow. This printable graph worksheet is great for third graders. See more
Mark’s Exercise
Get your fourth graders to find out how many rounds Mark walked on each day of the week, and to fill in the graph provided. ‘Mark’s Exercise’ is perfect for practicing graphs and mental math with kids.See more
Ice Cream, You Scream
A pie graph is a graph that uses “pie slices” or sectors to show relative sizes of data. ‘Ice Cream, You Scream’ is a great worksheet for introducing this type of graphs to students.See more
Graph worksheets are available in plenty online for parents and teachers who are trying to help their kids master this very important skill.
Help your kids master their graph lessons with Math Blaster’s free and printable graph worksheets for kids of all ages!
Why Graph Worksheets are Important for Kids
Graphing worksheets help students master the very important skill of interpreting and charting different kinds of graphs. Graphs are a simple and universally accepted medium for representing data of all kinds. Irrespective of a person’s particular area of interest, at some point during his/her life, the ability to interpret or chart a graph will become important.
In spite of the simplicity of graphs, young learners may take a little while to understand what to look for in graphs and how to make sense of the drawings. The more dimensions there are to the data being represented, the more complex the graphs become. Learning how to read graphs gets easier with practice. Interpreting graphs worksheets are a great way to give kids extra practice reading graphs and help them make sense of the process. You can find line graph worksheets, bar graph worksheets, pie graph worksheets, circle graph worksheets and double bar graph worksheets online, so you can help kids get better at reading any type of graph.
Coordinate Graphing Worksheets
Coordinate graphing worksheets help students practice drawing graphs on coordinate grids. Through coordinate graphing worksheets, kids can familiarize themselves with coordinate grids and practice naming and plotting points on coordinate grids. Being adept at this will prove useful when dealing with coordinate grids in geometry and algebra in higher classes.
Lesson “Computer graphics. The simplest graphics editor. Graphic editor tools, Grade 5
Subject: Computer graphics. The simplest graphics editor. Graphic editor tools.
Class: Grade 5
The purpose of the lesson: to form an idea about computer graphics and the graphic editor Paint, about its capabilities; to familiarize students with the tools of the graphic editor.
Lesson type: lesson in mastering and applying new knowledge.
Planned results
Subject: formation of the ability to choose a graphic editor tool in accordance with the task. Work out the skills of resizing, copying a fragment, filling with color.
Meta-subject : the ability to build logical reasoning, inferences.
Personal: formation of communicative competence in communication and cooperation
Used technologies (methods, techniques): verbal (conversation, story), visual (presentation), practical work
LESSON PROGRESS
Organizational moment
Hello guys! Let’s start the lesson. Please check if everything is ready for the lesson (pencil case, diary, workbook).
2. Motivational beginning of the lesson.
Guys, today we will learn how to draw on a computer, learn how to choose tools depending on the goal of creating a drawing. (Who?) Dunno (the picture is attached on the board) came to our lesson to learn to draw.
3. Updating knowledge APPENDIX A
4. Learning new material
Today we will learn what computer graphics is, what types of computer graphics are. We will also learn what a graphics editor is and consider its tools.
You can draw with paints or pencils, or you can depict something with felt-tip pens. You can draw on canvas, paper, fabric. Or on a computer screen. An image created with a computer is called Computer Graphics.
Drawings can be created not only on paper, but also in computer programs. The most popular are: Paint, Adobe Photoshop, Adobe Illustrator etc.
-
Graphic editor is a program designed to draw pictures, greeting cards, invitations and other images (to create and modify images).
We will work with you in the raster graphics editor Paint. To download the program , go to the Start menu, select All Programs→Accessories→Paint. Create drawing: File→New. To finish working with Paint: File→Exit.
Consider the Paint editor window.
The Toolbar contains the tool buttons. If you hover your mouse over each button, you can read a tooltip with the name of the tool.
Now we will watch the video lesson “GR Tools”; listen carefully and write down in the notebook Instruments GR. (Watch video tutorial) .
5. Physical education
6. Computer workshop
, 1-2, 1-3, 1-4)
Tasks 2: Open the “Collect the picture” file in the GR (select the “selection” tool and collect one picture from the fragments), (see Appendix 2-1, 2- 2, 2-3)
7. Homework: §11 – learn, p. 82
APPENDIX A
Complete the table “My library” with at least 5 books
Make sentences on the diagrams on the topic “Our school affairs”
Build a bar chart using the following data.
250 people study at school No. 1, 300 people study at school No. 2, 450 people study at school No. 3, 400 people study at school No. 4.
|
Activities of the teacher |
Expected activities of students |
||
|
1. Organization (2 min) Purpose: to ensure a normal external environment for work in the lesson and psychologically prepare students for communication and upcoming lesson |
Long -forth DISCIPLE DIRECTLY DIREED DIRECTION DISCULATION DISCOUNTION. I wish you all May success await you ahead. Your bright mind and kind heart We will take with us on the road Well, friends, good luck to you Let’s start the lesson! Today we have an unusual lesson, we will turn into artists! But a real artist should have a palette and paints!? The more the artist uses colors in his work, the better his paintings! There is a palette of colors on the tables, but the colors have not yet been used, you will open them during the lesson, otherwise how many colors you can use in the lesson will depend only on your attention and knowledge. Sign your palettes on the back. |
Get up. Welcome teachers. Conveniently located. Palettes are signed. |
|
|
2.Updating knowledge (7 min) Purpose: to summarize the students’ ideas about the stages of creating text documents; and check the correctness, completeness and awareness of previously acquired knowledge, motivate and mobilize the strength of students. |
To open the first colors on the palette, we need to return to the topic of the previous lessons – “Text Information Processing”. Each of you has a crossword puzzle on the table, take it and, first of all, sign it. Solve the word processing crossword puzzle. 5 minutes to solve the crossword puzzle. Swap crosswords and let’s check what you got. One of you will write your answers on the board. Who has not made a single mistake can open 3 colors in his palette. Who made 1-2 mistakes – 2 colors. Who 3-4 mistakes – 1 color. |
Take crossword puzzles. Solving a crossword puzzle. Cross checking. Open the colors on the palette. |
|
|
3. Goal-setting and motivation (3 min) Purpose: to increase the motivation of students to participate in the process of cognitive activity, the organization of active, independent and effective work of each student in solving educational and cognitive tasks. |
The first colors are already open, you can start painting. Guys, open your sketchbooks. I think you didn’t forget to take them to class? Pupils: why do we need albums, we are in the informatics class? Teacher: why why? Where are we going to paint today? Pupils: We don’t think we need albums for this. The computer has special programs for drawing. Teacher: Well, I wanted to confuse you, but nothing happened. Let’s start studying the “Artist” program. We will always help each other, To study better and learn more. Teacher: Guys, did you pay attention to the fact that when solving a crossword puzzle, not all the words related to the topic? Students: Yes. Teacher: What is the word? Pupils: Graphics. Teacher: Do you think it was here by chance? Pupils: we think not. Teacher: What is graphics? Students: Teacher: So what are we going to talk about today? Students: About the schedule. And since we are in a computer science lesson, it is probably about computer graphics and programs with which we can draw. Teacher: Right. Today you will learn:
And also learn how to create simple drawings. At the end, you will evaluate your work. The topic of today’s lesson is “Computer graphics. Graphic editor Paint» Let’s write down the number and topic of the lesson in a notebook. |
Student answers Write down the topic of the lesson. |
|
|
4 . Assimilation of new knowledge (10 min) Purpose: to give students concrete ideas about computer graphics, graphic information, about the program that processes graphic information, consider the program interface, introduce the tools of a graphic editor. |
Relevance of the topic What do you understand by computer graphics? Representatives of various professions use computer graphics: architects in the design of buildings; design engineers when creating new types of equipment; astronomers when drawing new objects on a map of the starry sky; fashion designers when designing new models of clothing; multipliers when creating new cartoons; advertising specialists. It is important that when using computer graphics programs, as well as word processing programs, there is no need to take a new sheet of paper in order to start all over again due to a mistake. The wrong fragment (element) is simply removed from the computer’s memory, and work continues on. Computer graphics tools allow you to get rid of the tedious and painstaking work performed when building images manually. Teacher: Who can define what computer graphics is? Pupils: Computer graphics are images created using a computer. Teacher: Right. Let’s write in a notebook: Computer graphics are images created using a computer. New material explanation We will get acquainted with the simplest program that allows you to process graphic information – this is the Paint graphic editor. What do you think can be done with the graphics editor? Graphic editor is a program for creating and editing pictures, greeting cards, advertisements, invitations and various illustrations. Teacher: Write in a notebook: Graphic editor – a program for creating and editing drawings. To find this program, No need to travel around the world; For you to find her, Look at the DESK! I press START at the bottom of the screen – The MENU opens; It is necessary to select PROGRAMS there I will use the mouse again. Although there are a lot of programs here, We are going our own way: We will enter this list, There STANDARD will find. Here is another MENU opened; The mouse moved here. We will choose the line The one where the jar of brushes, PAINT is written on it; Here – Artist for children. And so, let’s write down in notebooks, the algorithm for launching the Paint program. Program start: Start→Programs→Accessories→Paint. A window opens. How much is given here! There are a lot of colors on the PALETTE The Artist has one; So many different tools Hanging on the side of the window; There are inscriptions on top – You will need to read them. To the right, near the corner, Three familiar icons: Minus, cross and square, Are you glad to meet them? Do you know how important they are ■ And everyone needs programs. Teacher: After starting the Paint program, its window opens on the computer screen, the main elements of which are shown on the slide (the elements of the window are studied). And now let’s check how you remember the elements of the window? Opening the workbooks on page 84 task №52. Connect the inscriptions with the corresponding elements of the picture with arrows. Let’s check the correctness of the work. We take our palette again: if you have not made a single mistake, then open 2 more colors; if 1-2 mistakes were made – 1 color; if 3-4 – then you cannot open a new color. |
Student answers. Write the definition in a notebook. Students’ assumptions. Write the definition in a notebook. Show presentation slides. Pronounce and write down the algorithm in a notebook Slide Slide Work in a notebook. One student works at the blackboard. |
|
|
5. Physical education minute (1 min) |
We’ll have a little rest, Get up, take a deep breath. Hands to the sides, forward, A hare is waiting at the edge of the forest. Bunny jumped under a bush, Inviting you to his house. Hands down, on the belt, up, We are running away from everyone. |
The student is exercising. |
|
|
Continuation of the study of the new topic. |
Guys, we will continue to study the topic at computers. Before we sit down at computers, let’s remember TB while working at a computer. And now you sit comfortably at your computers. Sit correctly: back straightened, legs placed at an angle of 90º. The distance from the eyes to the monitor screen is not less than 50-60 cm.
Working area – the place where you will draw. Your drawing may be small and occupy a small part of the workspace, or it may be such that you have to use the scrollbars to access its individual parts. Find in the menu Picture and select Attributes and use it to set the white canvas to 20 cm wide and 15 cm high. Color selection. Look at the palette. On the right is a set of different colors. On the left there are two squares. The top main one is the one with which you will draw on the canvas – it is set by clicking the left mouse button on the palette. Try setting a different color, like red. Background color – this color seems to be placed under a white canvas and appears when using the tool Eraser , as well as in some other situations – it is set by right-clicking on the palette. Try to choose green. Take the eraser, activate it and work with it. What did you get. The default is black foreground and white background color. Toolbox. Look closely at the toolbar. In drawing lessons, you most likely used pencils, brushes. Similar tools are available in the graphics editor. Pencil (its color is chosen on the palette). Brush (one of the twelve brush options is selected in the additional settings menu). Atomizer (you can choose one of three options). If you press the left mouse button while working with the Pencil, Brush, Sprayer and Paint Bucket tools, the image is filled with the foreground color. If you press the right – background. Today we will also get acquainted with the tools Line and Ellipse. These are draftsman’s tools. It is convenient to draw straight lines (segments) using the Line tool. To do this, first select the line width (one of the five options in the setup menu), click the button at the starting point and drag the mouse pointer in the desired direction. For drawing a vertical line, a horizontal line and a line with a slope of 45 0 while creating them, hold down the key Shift . Activate tool Ellipse. The outline width can be changed. To do this, activate the line tool and select the required width in its settings menu. We practiced a bit on drawing the main elements. Clear the entire screen. Drawing/Clear. |
Slide The student removes unnecessary pictures They take their jobs at the computer. I start the program Follow according to the teacher |
|
|
6. Consolidation of knowledge (16 min) Purpose: to consolidate in the memory of students the knowledge that they acquired during the theoretical study of the material, to promote the formation of students’ skills and abilities when working with the tools of a graphic editor |
Guys ! What time of the year do you like the most? And I’m summer. But before we get started, let’s dream a little. Close your eyes and count to three. (Summer music sounds). How did you imagine summer? Let’s get to work. (Soothing music plays while students work). Well done! We can remember the drawing in FILE, The name of which we wrote down; When we read this file later We will immediately recognize our picture! You will find the word FILE at the top, Deftly move the mouse, Press the left button And you will get into the tablet. SAVE AS you choose, Confirm with the left button, Find your folder. Here is the order. |
Draw a caterpillar. Save drawing Slide |
One student works at the blackboard Self-examination. |
|
7. Summing up the lesson. Reflection. (3 min) Purpose: to sum up the lesson, evaluate the work of students, create conditions for self-assessment of learning activities, consolidate positive emotions from learning new things. |
And now let’s count who used paints the most at the lesson today, which means they showed excellent knowledge of the material and became a real artist. If you have opened 7-6 flowers, you get a score of “5”. If 5-4 colors – “4”. If less than 4 colors – “3”. Raise your hands, who earned the mark “5”; “four”; “3”. You will put these grades in your diaries when you write down your homework. Guys, on the palette you have an unfinished face of a little man. For example, it was very interesting for me to work with you. |
Raise hands Show mood |
|
|
We opened our diaries and wrote down our homework. Homework: draw a picture with For those who have computers, draw a picture on any topic and print it out or bring it on electronic media. If there are no computers at home, then complete the task as usual in the computer class. Here’s what I got. (at this time the teacher signs the diary for the grade). Good luck in learning computer science! |
Write down homework Slide |
 Graphic editor Paint.


 Well done!


 Note that there are no scrollbars. Now resize the canvas to 30 cm wide and 20 cm high. Scrollbars are present.
 Three possible ways of filling appear on the toolbar: 1. Without filling, the contour is made with the main color; 2.filling with a background color, the contour is performed as the main one; 3.and the outline and filling is done with the main color. If you want to draw a Circle, then you need to press the Shift key and hold it to draw a circle.
  Therefore, I suggest you use an oval and a brush to draw a Caterpillar, which consists only of ovals and lines.
 What is missing? Let’s fantasize and draw a mouth for him and a little man will reflect your mood and show whether you were interested in the lesson.