Games light: Gaming Lights – Govee
Gaming Lights
– Govee
Sort
SortFeaturedBest sellingAlphabetically, A-ZAlphabetically, Z-APrice, low to highPrice, high to lowDate, old to newDate, new to old
Upgrade your gaming peripherals and venture into different virtual worlds with our innovative gaming lights. Score big with our specialized effects and colors that give you the best open-world experience for your favorite titles. These lights will react to all of the sights and sounds of your games for a visual spectacle you must see to believe.
Quick view
Govee AI Gaming Sync Box & Strip Light Kit
$167.99
Regular price
$239.99
Sale price
Quick view
Govee Gaming Light Strip G1
$43.99
Regular price
from
$69.99
Sale price
Quick view
Govee RGBIC LED Neon Rope Lights for Desks
$59. 99
Regular price
from
$89.99
Sale price
Quick view
Govee Neon LED Strip Light
$71.99
Regular price
from
$119.99
Sale price
Quick view
Govee Glide Wall Light
$66.99
Regular price
from
$99.99
Sale price
Quick view
Govee Glide Hexa Pro LED Light Panels
$149.99
Regular price
from
$199.99
Sale price
Quick view
Govee Glide RGBIC 3D Wall Light
$109.99
Regular price
$179.99
Sale price
Quick view
Govee RGBIC Wi-Fi Gaming Light Bars with Smart Controller
$59. 99
99
Regular price
from
$89.99
Sale price
Quick view
Govee AI Gaming Sync Box Kit
$149.99
Regular price
from
$219.99
Sale price
Quick view
Govee Glide Hexa Light Panels
$119.99
Regular price
from
$179.99
Sale price
Quick view
Govee Glide Music LED Wall Lights
$109.99
Regular price
$179.99
Sale price
Quick view
Govee Glide Triangle Light Panels
$119.99
Regular price
$199.99
Sale price
Quick view
Govee Glide Lively RGBIC Wall Lights
$47. 99
99
Regular price
$69.99
Sale price
Quick view
Govee Glide RGBIC Y Lights
$137.99
Regular price
$229.99
Sale price
Quick view
Govee DreamView G1 Pro Gaming Light
$69.99
Regular price
$169.99
Sale price
Quick view
Govee DreamView G1 Gaming Light For 24′-32′ PCs
$45.99
Regular price
from
$99.99
Sale price
Lights that Match Your Playstyle
Take your gaming to the next level with our innovative gaming lights. Sync the lights with the sights, sounds, and scenery of your favorite titles.
`
$(‘#CartDrawerForm .drawer__inner .drawer__scrollable’).after(el)
}
}
// 打开购物车
document. addEventListener(‘drawerOpen’, function () {
// 打开购物车时添加折扣提示
jQuery.ajax({
cache: false,
contentType: ‘application/json; charset=utf-8’,
dataType: ‘json’,
type: ‘GET’,
url: ‘/cart.js’,
success: function (res) {
addCartTips(res) // 满减折扣 1/2
},
})
})
// 监听购物车数量变化
document.addEventListener(‘cart:updated’, function (data) {
addCartTips(data.detail.cart) // 满减折扣 2/2
})
}
})
Govee DreamView G1 Gaming Light For 24′-32′ PCs
Product Guides and User Manual (PDF)
Great lights!
So I plug them in expectantly with a white screen the lights show yellow! Me: 😳 So I calibrated it-and they work amazingly now!
So my monitor does have a large hump on the back-and Govee says that that is not good-but it doesn’t seem to matter. My desk has a hutch on it, and I was afraid that it would hinder the camera, but I did some fiddling and got it working! See my picture below 👇. After about 10 min of calibration and recalibration, it was up and running. The little button on top doesn’t actually click, it’s kind of like a touch screen. The DIYs pop and are super smooth, as the rope has 3 lights per IC.
Govee DreamView G1 Gaming Light For 24′-32′ PCs
It’s a gift for someone..
Holy FREEKIN AMAZING!
First off I love my govee lights.Besides my bathrooms they are in every room of the house, including outside.I get super jealous because my husband and myself game.He uses the livingroom(75″ 8k samsung tv) with the backlight camera setup and its nothing short of STUNNING.ESP watching movies and playing anything on the XBOX.I have a samsung monitor setup that I use to work and game and recently I treated myself to neon strip lights for behind my computer (from govee) that are in the shape of a heart.I hate using the overhead lights in my work area because they are hard on the eyes.The heart gives me just the right amount of light on darker days that its raining or something and I need to work. After hooking up these back lights I seen that they can link together!now both my monitor lights and heart change based on what is seen by the little camera on top.I would buy these 5 more times if I had to, and along with the warranty, and customer service help from the people over at govee no wonder the company has grown so much over the years.GOOD FOR THEM!Believe it or not, but I do think that having the back lights on the monitor helps relieve some eye stress from staring at electronics all day too.I have noticed I have a lot less head aches after setting these up.(between working from home and gaming after work I easily sit at the desk up to 12 hrs a day).I tend to get migraines, so this may be worth trying…I posted a reel on my instagram with the lights working and linked together.. thequeenbacon
123
`
$(‘#CartDrawerForm .drawer__inner .drawer__scrollable’).after(el)
}
}
// 打开购物车
document.addEventListener(‘drawerOpen’, function () {
// 打开购物车时添加折扣提示
jQuery. ajax({
cache: false,
contentType: ‘application/json; charset=utf-8’,
dataType: ‘json’,
type: ‘GET’,
url: ‘/cart.js’,
success: function (res) {
addCartTips(res) // 满减折扣 1/2
},
})
})
// 监听购物车数量变化
document.addEventListener(‘cart:updated’, function (data) {
addCartTips(data.detail.cart) // 满减折扣 2/2
})
}
})
Card file of games with light and shadows | Card file (younger group):
in the second younger group
Educator: Skopintseva A.M.
Kindergarten No. 36
Yaroslavl, 2021
“Something in a box”
Purpose: to introduce the meaning of light and its sources (sun, flashlight, candle), to show that light does not pass through transparent objects.
Material: Box with slotted lid; flashlight, lamp.
The course of the game – experiment
Artistic word
Dad gave the bunny a small flashlight, the bunny liked to play with the flashlight. He turned on the flashlight and looked under the sofa, shone inside the closet and in all corners.
– Bunny, where is your ball? Mom asked.
– I’ll go look! – said Bunny and went into a dark room.
– I’m not afraid! – Bunny said cheerfully and lit a flashlight.
Bunny shined a flashlight and found a ball.
An adult invites children to find out what is in the box (unknown) and how to find out what is in it (look into the slot). Children look through the slot and note that the box is darker than the room. The adult asks what needs to be done to make the box lighter (fully open the slot or remove the lid so that light enters the box and illuminates the objects inside it). An adult opens the slot, and after the children are convinced that it has become light in the box, he talks about other light sources – a flashlight and a lamp, which he lights in turn and puts inside the box so that the children see the light through the slot. Together with the children, he compares in which case it is better to see, and draws a conclusion about the meaning of light.
“Sunny Bunny”
Purpose: to introduce the natural source of light – the sun.
Material: small mirrors, sunlight
The course of the game – experiment
Having chosen the moment when the sun looks through the window, catch a ray with the help of a mirror and try to draw the child’s attention to how the sunny “bunny” jumps on the wall, on the ceiling , from the wall to the sofa, etc. offer to catch the fleeing “bunny”. If the child liked the game, switch roles: give him a mirror, show him how to catch the beam, and then stand against the wall. Try to “catch” the speck of light as emotionally as possible, while not forgetting to comment on your actions: “I’ll catch it! What a smart bunny – runs fast! Oh, and now it’s on the ceiling, you can’t get it … Come on, hare, come down to us! etc. The laughter of a child will be your best reward.
Shadows on the Wall
In the evening, when it gets dark, turn on the table lamp and point it at the wall. With the help of the hands, you will get the shadow of a barking dog, a flying bird, etc. on the wall. You can use various objects and toys.
“Who heated the objects?”
On a walk, the teacher shows the children a bunny and says: “The bunny jumped onto the bench. Ah, how warm! Touch the bench, what is it like: warm or not? Who warmed it up? Yes sun! Spring came. The sun is very hot – the bench has also warmed up. Now the bunny has jumped on the swing.” The children, together with the teacher, go around the site and find out that the table, the wall of the building, etc. have become warm. “Who heated all this?” – asks the teacher.
You can put the bunny on a bench and after a while make sure that the bunny has become warm. “Who warmed him up?”
“Dancing shadows”
Purpose: to develop visual sensation, to form ideas about light and darkness.
Game progress: This game is played on a walk. In sunny weather, point out to the children that their bodies cast shadows on the ground. Invite the children to move around (preferably standing on a flat surface) and watch how the shadow on the pavement follows their movements.
You can draw children’s attention to the fact that shadows are different at different times of the day: short or long.
“Walking in the dark”
Purpose: to develop visual sensations, to form an idea of darkness.
Game progress: This activity is best done in the winter, when the day is short.
When it gets dark, invite the children to take a walk (around the room, on the playground): “Let’s take a walk in the dark! It’s not scary.” Let the little ones join hands and begin their journey. Once the children’s eyes have adjusted to the dark, ask them to tell you what they see
At the end of the game, invite the little ones to talk about when and where it is dark (light) .
“Day and Night”
Purpose: to develop visual sensations, to form ideas about light and darkness.
Game progress: This activity is best done in the winter, when the day is short.
When it gets dark, invite the children to play: “Let’s play the game Day and Night. When I turn on the light and it becomes light in the room, the day will come. During this time you will walk, play, dance. And when I turn off the light and it gets dark, night will come. Then you lie down on the carpet and sleep.”
This game can be played several times until the children lose interest in it.
“Flashlight”
Purpose: to develop visual sensations, to form ideas about light and darkness.
Materials: electric flashlight.
Game progress: when it gets dark, walk with the children around the dark room, lighting it with a beam of a flashlight. When traveling around a dark room, look into dark corners, examine the surrounding objects. Then pass the flashlight to the child, let him now lead the rest of the children.
“Candle”
Purpose: to develop visual sensations, to form ideas about light and darkness, twilight.
Materials: candle.
How to play: When it gets dark, place a long candle on the table and light it. Have the children watch it burn. You can walk with a lit candle through the group, illuminating the path. Draw the attention of the children to the fact that the candle has become lighter. Then invite everyone together or in turn to blow out the candle. Turn on the electric lights and point out to the children that the light bulb is brighter than the light from the candle. (Be sure to remind about safety rules.)
The game can be repeated several times.
Unusual Shadows
Explore which objects cast amazing shadows. Try shining a light on a colander, colorful plastic, balloons, a lace doily, flowers, palms, a basket. Study: an illuminated cone gives a triangular shadow, and by changing the angle of the light beam, we can change the length of the shadow.
Flashlight Hunt
Hide pictures of your child’s favorite characters, toys, building blocks or anything else in the room ahead of time. Turn off the lights and ask your child to look for them with a flashlight.
“Shadow theater”
You can make a theater of cardboard silhouettes: to do this, you need to draw them on cardboard, cut them out and stick them on bamboo sticks using adhesive tape. And then play on any wall illuminated by a directional light source.
Development history of The Light Remake. Part 1 / Habr
Greetings, reader! My name is Sergey, I am an indie game developer. I already have several indie projects in my portfolio, some of which were self-released on Steam. The game “The Light” or “The Light”, released in 2012, was my first attempt at writing, opening the way to the world of game development. The project was distributed for free, but the reaction of the public and feedback from the players gave me a serious motivation for further work. “The Light” became for me something like a philosophical parable about humanity and its destiny. The plot is abstract and does not pursue any specific goals, it is only an opportunity to reflect on a broad topic.
Since the original game never made it to release on Steam, I decided to correct this omission and in June 2019 engaged in a large-scale redesign of the project so that it could be gameplay and visually consistent with its time and be considered a full-fledged game.
What is it about?
In this article, we will focus on the Light project and the work done related to porting the game to a newer version of the Unity engine. This implies a large number of technical nuances. The article will be presented in two parts.
Part 1
The original version of the game back in 2012 was built on Unity 4.2. Then in my information field there was no talk about PBR materials, reflection tests and other methods that are relevant now. The basic shaders in Unity were very simple and did not shine with much realism. Of course, it was possible to add a lot of additional elements, such as reflections in fresnel, but then shader programming for me was a secret with seven seals. The main shader used was Normal Bumped Specular and AlphaTest diffuse for objects with transparency (leaves of trees, figured metal lattices).
Realtime shadows were missing, almost all lighting was baked into texture and the resolution of these shadows was very low in places. Baking the light on top of everything else almost eliminated the bumped specular shader’s bump effect, making the objects look more like flat cardboard on closer inspection.
The image was largely transformed by post-effects on the camera, in particular Bloom and Color Correction. They added color and variety, although they were too intrusive in places.
At the time of the creation of this project, I still had a vague idea about optimization, batching (combining into one mesh), occlusion – culling (cutting off invisible objects), etc. But due to the fact that technically the scene was not loaded with something complicated, did not have real-time lighting, grass with an alpha channel, etc. – the game came out quite optimized and worked well on weak hardware, giving a picture that was pleasant for 2012.
After 7 years, you look at any of your creations with different eyes. Technologies have advanced a lot, the toolkit has changed, the latest versions of the Unity engine are significantly different from their predecessors. In connection with all of the above, transferring the project from version 4 to version 2017 (I decided to stop at it for a number of reasons) is a rather long and painstaking work. In addition, given the fact that the original project could not be called a full-fledged game (most of the actions in the game were carried out using a single script with a trigger function), it was necessary to write from scratch all the logic, interaction with objects, inventory, menu system, system saves, achievements, settings, etc. In general, a very large-scale amount of work awaited me!
Beginning. Shaders and light
The first thing that demoralizes when opening a project in a new engine is that the whole visual breaks down. Many shaders and post-effects that were imported from third-party sources stop working. Those shaders that continue to work look a little different. Lighting in the scene changes, lightmaps fly off, everything needs to be recalculated.
New Standard
It was decided to start by replacing the old shaders with the new PBR Standard. In a previous article on the development of 35MM, I already mentioned a new type of PBR shaders (Physically Based Rendering), which implies physical correct rendering. The new Standard material no longer has the usual o.Gloss and o.Specular from previous versions, here we have a map of metallicity (o.Metallic) and Smoothness. Also, there are more slots for textures of various categories. For example, we have the opportunity to add an Occlusion map for soft shading. The effect is very useful, because it allows you to emphasize the volume and shading in those parts of the model where there is less light. Without this map and lightmap texture, objects look flat and unrealistic.
There is the same Detail Albedo and Detail Normal – these maps add detail to our existing textures, for example, you can place an additional normal map with small cracks and tile it by adjusting the degree of influence. As a result, the original low-resolution terrain texture will appear more detailed. For some materials I used this technique, for others I left it unchanged.
Vegetation
After changing the basic materials, I moved on to vegetation. The original build of the game used the standard Alpha Test shader without specular and Normal Map. Of course, this state of affairs in 2019I was not happy with the year. It was possible to buy or find a ready-made solution on the Internet, there are whole packs with shaders and ready-made models with many features, imitation of swaying in the wind, etc. But already traditionally I try to understand such issues myself and experiment. It’s kind of like a sport. My new Vegetable shader is based on the Toon Ramp reference from the Unity Tutorial.
The presented lighting model LightingRamp made it possible to draw the silhouette of shadows both on the illuminated side of the polygon and on the opposite side. This imitated the ability of foliage to transmit light – translucency.
A similar shader can also be used to render translucent fabrics such as curtains.
Unfortunately, in this mode, the automatic rendering of the back side of the polygon using the Cull Off method did not give a very correct result, so the Backface had to be added manually in the editor. Next, a Normal and Specular map was added to the shader. I didn’t manage to use the PBR shader lighting model and connect Reflection Probes (reflection probes), but with the help of masks and the Emission map, an imitation of Ambient Occlusion was added. And finally, it was extremely necessary to revive this whole thing and give movement to the vegetation. With the help of the Vertex function and the same mask, the desired areas of the plates with foliage begin to come to life. Vertex displacement is based on the Normal Extrusion with Vertex Modifier example from the Unity manual.
Speed and amplitude can be set. By the way, in these experiments, the new for me function of managing global shader variables was very useful … You can easily assign any variable or texture to all the necessary shaders from the script.
Light
The approach to the lighting device in the scene has been significantly changed. In the original, all the light was baked into lightmaps, and the rendering worked in Forward mode. In the remake, an important aspect was the use of real-time light to be able to change the time of day. The render mode has been changed to Deferred. The main light source (the sun) was used in Mixed mode, directional lighting and shadows were drawn in real time, and global illumination was baked into textures. This allowed changing the light level and direction, but at the same time retained the effect of soft global illumination and reflections, which always give the picture extra realism. Lightmap textures were not baked for all objects, mainly for large and more or less simple ones. Small and difficult to create sweeps remained dynamic and were highlighted with either light samples, reflection samples, or just a basic ambient light (which is specified in the main lighting settings). Baking was done with a Progressive lightmapper.
Day and night
To change the time of day, a shader for the skybox was created with two texture options: day and night. Both options were supplemented with an offset function to simulate the movement of clouds. The textures of the starry sky and an anomalous glow for the scene of the flight of combat missiles were also added to the night one. All this disgrace was controlled by a special script that rotated the skybox and the sun, at certain positions of the sun the color of the skybox changed, the textures were mixed using the Lerp method and the night sky and stars smoothly appeared. Also, a sky glow effect was added as a separate layer after rocket launch.
To optimize, at the minimum light level (approximately at 0.1-0.2), the shadows were smoothly turned off. To change the time, it was necessary to take into account a couple of important points. There were particles on the stage – poplar fluff. Their material did not react to light (at that time I had not yet found a suitable shader), so the color of the fluff material had to be changed by a script depending on the time of day.
Also, when changing the time, the script adjusted the desired color for the Global Fog post-effect, because in the daytime the fog should look like a light gray-blue haze, and at night it should have a darker, almost black tone.
Models and new content
The main part of the location and basic models: the model of the main building, trees, benches, lampposts remained original. Many other props have been completely or partially redone. The model of a kerosene lamp was redesigned, a new diesel generator with separate animated elements was created, a new model of a movie projector, etc. was created.
Nearby structures that were previously inaccessible have been reworked and made available to the player. The interior layout of the main building was also changed. In addition to reworking old content, new content was also added, for example, a PAZ bus model, a slot machine, a soda vending machine, a puzzle – an electrical panel, a pressure gate in the basement, inventory items, etc. Some of the content was created independently, while some models were outsourced.
For almost all objects for which lightmaps were baked, a UV2 scan was created manually, with the most optimal arrangement of fragments for economy. For example, for buildings, all hard-to-reach areas (for example, ceilings and walls of upper floors), which the player will practically not see, occupied minimal space on the scan.
Effects and custom shaders.
Water
With each new project, I want to take into account the nuances that were previously overlooked. The overall picture is created from individual details, and even not very important elements can affect perception. Plus, it’s kind of a challenge – every time to improve something that I’ve already worked with. Particularly satisfying is the independent search for solutions, and not the use of ready-made assets. In all previous projects I had to work with water. As a rule, it was a fairly simple vertex shader that did not react to the player and lighting in the scene. It was based on Mirror Reflection from the Unity Wiki, which was an example of a mirror implementation.
The surface was dynamic due to the displacement of vertices (imitation of waves), but always too monotonous and somewhat boring. Through trial and error for the Light project, I managed to create a Surface variant of a similar shader, which, like the sample, can: accept a specular texture from the Mirror script, deform vertices to simulate waves, record the screen in a Grabpass texture to create refractions under water, have soft Alpha edges when intersecting with the geometry ( depth fade). Also, for the effect of reaction to the player, information about the coordinates of the player’s position is passed to the shader. A dynamic spot is drawn at the coordinate point, which simulates splashes when the character is directly in the water column. The most important thing that allowed the Surface shader is to accept lighting from any light source. This makes the water seem more tangible, voluminous and allows you to play with it with the help of lighting effects.
Caustics
Another important detail was the creation of the caustics effect – light reflections falling on surfaces. In the darkness of the basement tunnels flooded with water, this technique was simply necessary. The effect was created using a Projector object and a glowing material with an animated texture. The shader mixes 2 caustic textures that move in different directions, resulting in a dynamic effect. In most of my shaders, to save money, I usually use mask textures containing 4 channels (RGBA) – each for a specific purpose. The R channel can have the main texture, the G channel can have softer highlights, and the B channel can have a noise texture to distort the caustics pattern.
The water surface has a collider with a special tag. As soon as the character enters the water, the script detects this using the raycast method, and smoothly turns on the caustics. In this case, several conditions are also prescribed, such as the presence of a lighter in the hands, a flashlight or a kerosene lamp nearby.
Particles
An interesting effect was realized for small particles in the air that are visible in the light. The idea itself was inspired by the Homesick project, in which I once saw something similar. At a certain distance, the particles have the usual texture, something like the texture of poplar fluff. But as the camera approaches, the texture in the shader smoothly changes to the second option, reminiscent of the defocus effect. In dynamics, it looks quite nice and the particles seem more tangible.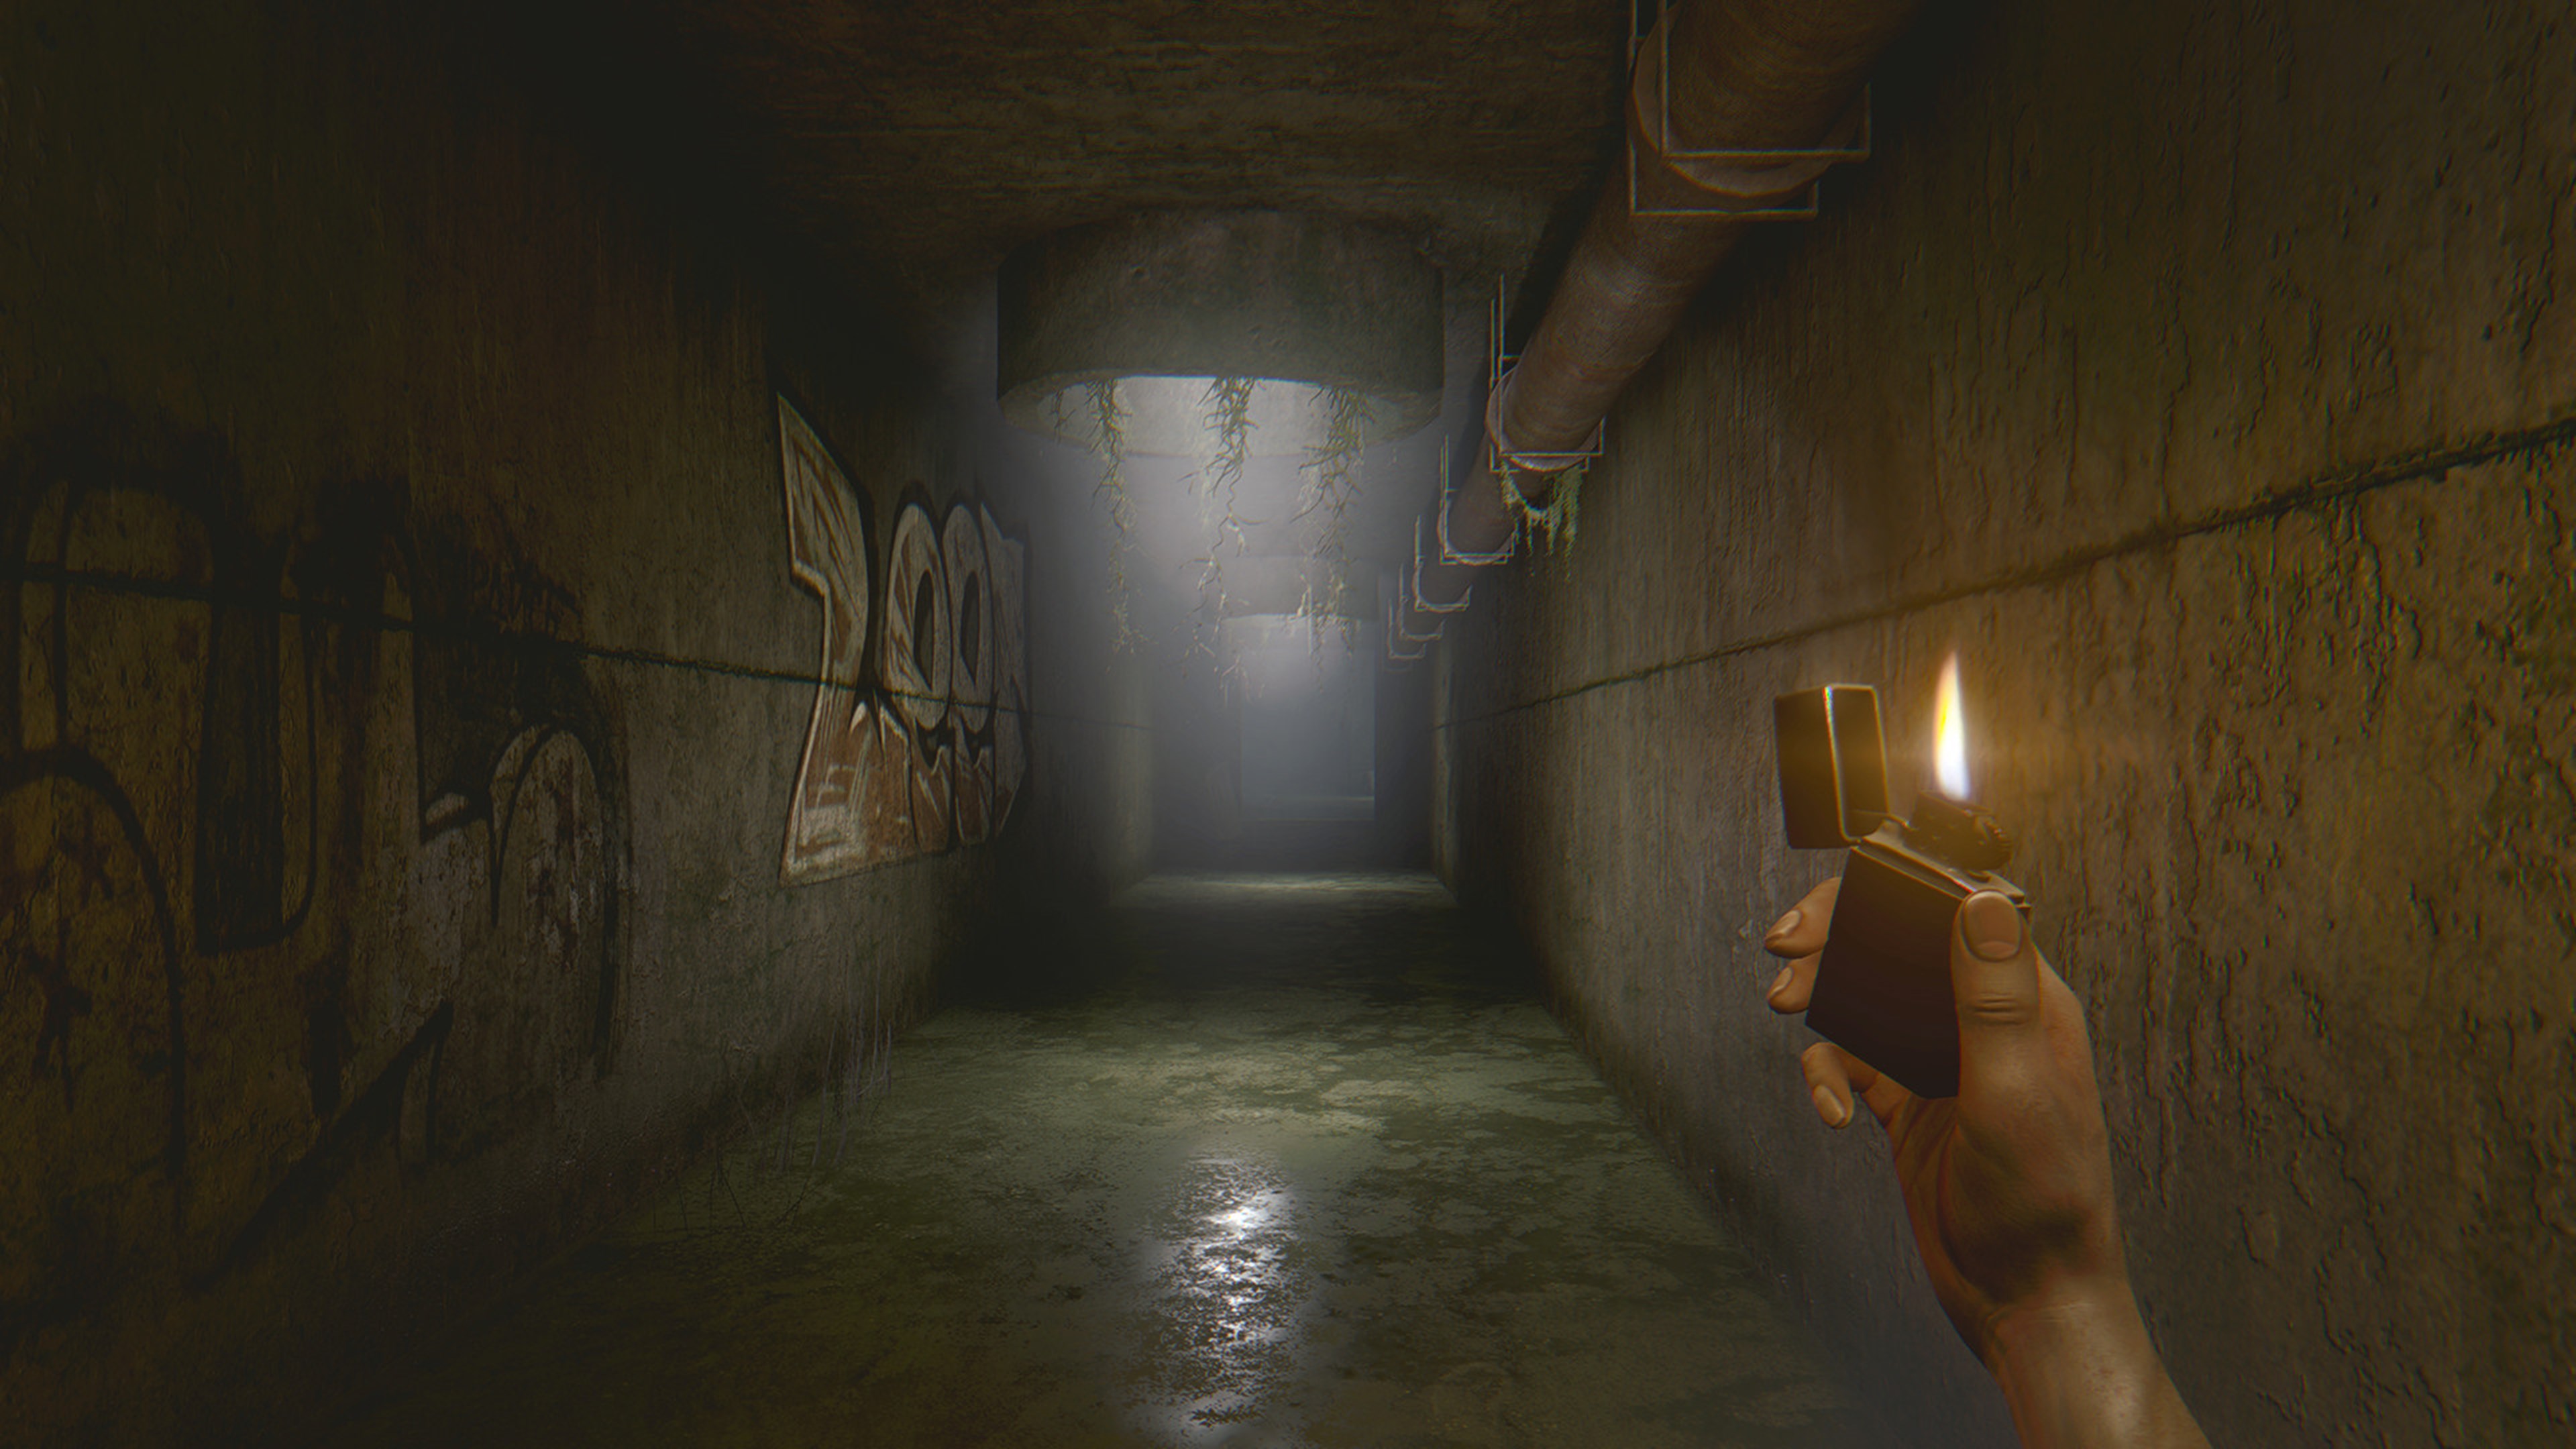
As noted above, almost all base surfaces in the scene use a modified version of the Standard PBR shader. Some have added masks with different stain options to further detail the Albedo textures. Surfaces like asphalt or paving stones now have a speck mask to simulate rain puddles. The floor tile shader in the main building has an additional map for reflections, which are drawn by the Mirror script in a similar way to a water surface. For optimization, only basic and large objects are included in the rendering of reflections, and reflection rendering is turned off at a certain distance.
Fog/smoke
An important detail that I wanted to take into account when creating a remake is the dynamic fog and the effect of lighting on it, in particular the light of a lantern. In earlier works, the main shader for smoke and fog was the standard Particle blend and its modifications. This is a vertex shader that is good in terms of performance, but does not react to light at all. The display of fog with such a material will always be the same in the shade and in the light, it cannot be illuminated with a flashlight and it does not always look attractive and natural. In the underground catacombs I conceived, the haze had to be illuminated by a lantern from the darkness, emphasized by dynamic lighting. To solve this problem, a shader from the free Asset was used. The shader cannot boast of high performance, but visually it did an excellent job with its task.
Decals
Finding the right shader for the decals was another important step. A lot of all kinds of graffiti were planned in the game, which were most often installed using the old decal system plugin (from the old version of Unity 4.6). For graffiti, inscriptions and signs, a large atlas of 4096 by 4096 was created. The images on the decals are semi-transparent and are drawn in the Transparent alpha mode, so in the case of dynamic lighting they do not always look adequate, since the standard alpha shader is not capable of accepting shadows.
A special two-pass shader was created to solve the problem. In the first pass, the dark parts of the image are drawn, in the second, the light parts are drawn using the Blend DstColor One blending method. I may not understand the drawing method quite correctly, so I will refrain from detailed explanations, but the desired result was achieved: in the shadows, the image is buried in darkness, and in the light it appears and even plays with colors. The shader’s two-pass performance had no effect, since the Decal system initially combines all decals into one large mesh. There are probably better ways, but this option suited me just fine.
Ground/Grass
Another two-pass shader was created for the ground surface. The territory itself at the location is made by geometry in 3d max. But for rendering the grass, an additional terrain was created. I had to manually adjust the terrain heights in the right places to match the terrain. Then the rendering of the terrane itself was turned off, and several options for the prepared grass meshes were applied to the surface with a brush. Native grass on the terrain is terribly load on the scene in terms of performance, because it is not batched and each element creates an additional draw call (maybe someone will correct me if I’m wrong), but this method is extremely convenient in terms of work. The density of the grass is not high, and in those places where it is absent, the simplicity of the surface is very striking. Just in connection with this, as an experiment, I used the two-pass shader, which was mentioned above. The first pass is the usual opaque geometry, the second is a slightly raised duplicate of the surface in Alpha test mode. Roughly speaking, a copy of the ground/grass surface is additionally drawn with hard transparency and vertices shifted upwards. This method somewhat complements the flat grass and creates the illusion of additional detail and volume.
Light outside the window
Outside the windows of the main building, one-sided translucent sprites were placed in some places to simulate highlights.